How to Develop AI Projects inside a Docker Container
Develop inside a Docker container / Server, without worrying about dependencies.
First, you need to do the following:
Install VSCode
Install the Remote Development Extension
Follow the instructions to connect
.vsix pkg. Go to VS Code extensions -> 3 dots -> Install from vsixVSCode Dev via SSH
For SSH connection, you can do:
CTRL+SHIFT+P-»Remote SSH (Connect to Host)- Add the user name amd the IP/Domain:
youruser@192.168.1.117 - Authenticate and Select the Platform (Linux?)
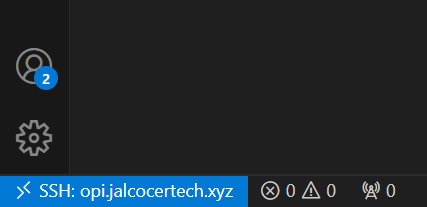
You will see that you are connected to the server in VSCode via SSH.
Pay attention to the bottom left side:

VSCode Dev via Containers
Tested at - https://github.com/JAlcocerT/Py_Trip_Planner/tree/main/Development
For container, do this instead.
- Install the Dev Containers extension
ext install ms-vscode-remote.remote-containers- Clone your repository:
For Docker Desktop: Start VS Code and clone your repo in a container volume.
For Docker Engine: Clone your repo locally, then open it in a container via VS Code.
- Wait for the Dev Containers setup to complete.
Option 1
- Get your Dockerfile Ready
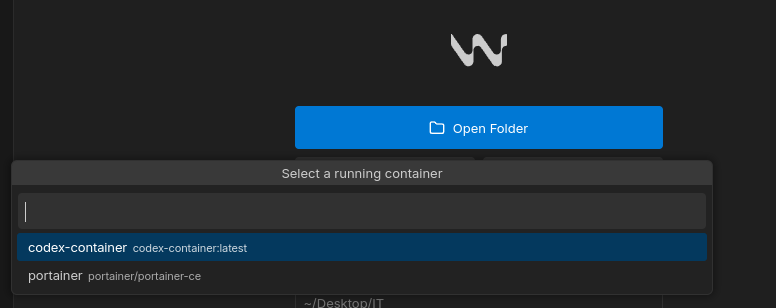
CTRL+SHIFT+P-> Attach to running container. Accept to run docker in wsl- Steting up Dev Containers….


Option 2
- Get your Dockerfile Ready
CTRL+SHIFT+P-> Add development container configuration files. -»From Dockerfile- a
devcontainer.jsonwill be created - Update the forwardPorts field of the json, for example with
"forwardPorts": [4321,4321], - Re-open command palette
CTRL+SHIFT+P, select DevContainer: reopen in container
docker exec -it webcyclingthere /bin/bash #see what happens inside the containerThanks to this Maksim Ivanov YT Video
Remember, Never install locally
Setup Containers for Development
Dont forget about: .gitignore, .dockerignore
Containers for Python
I enjoy creating Data Driven apps within python.
And I like to do them so that they work reliably and sistematically.
Docker combined with Python helps me with it.
Python Docker Compose 📌
version: '3.8'

services:
  my_python_dev_container:
    image: python:3.8
    container_name: python_dev
    ports:
      - "8501:8501"
    working_dir: /app
    #command: python3 app.py
    command: tail -f /dev/null #keep it running
You will also need a Dockerfile and most likely a requirements.txt
Containers for WEBS
Node is a very popular one.
But you may also need GO, or Ruby…
The idea is the same: bundle all the files and dependencies and ship your website.
Node
It will work for Astro sites, NextJS,…
Node Dockercompose 📌
docker exec -it webcyclingthere /bin/bash
#git --version
#npm -v
#node -v #you will see the specified version in the image
npm run dev

#npm uninstall react-slick slick-carousel #to fix sthversion: '3'
services:
app:
image: mynode_webapp:cyclingthere #node:20.12.2
container_name: webcyclingthere
volumes:
- /home/reisipi/dirty_repositories/cyclingthere:/app
- .:/app
working_dir: /app
command: tail -f /dev/null
#command: bash -c "npm install && npm run dev"
ports:
- 4321:4321
- 3000:3000Other raw docker-compose:
version: '3'
services:
  app:
    image: node:20.12.2
    volumes:
      - .:/app
    working_dir: /app
    command: bash -c "npm install && npm run dev"
    ports:
- 5000:5000version: '3.8'
services:
gatsby-dev:
image: gatsby-dev:latest
ports:
- "8001:8000"
volumes:
- app_data:/usr/src/app
- node_modules:/usr/src/app/node_modules
# environment:
# - NODE_ENV=development
command: tail -f /dev/null #keep it running
volumes:
node_modules:
app_data:Node Dockerfile 📌
sudo docker pull node:20.12.2
#docker build -t mynode_webapp:cyclingthere .
docker build -t mynode_web:web3 .
Depending where you run this, it will take more or less time:
- With a Opi5 I had ~2min33s
- With a Pi4 4GB ~2min18s
Once built, just run the container:
sudo docker run -d -p 4321:4321 --name astro-web3 mynode_web:web3 tail -f /dev/null
#docker run -d -p 3000:3000 --name astro-web3 mynode_web:web3
docker exec -it astro-web3 bash
npm run dev --host

#docker run -d -p 3001:3000 --name astro-web33 mynode_web:web3 npm run dev
# Use the official Node.js image.
# https://hub.docker.com/_/node
FROM node:20.12.2
#https://hub.docker.com/layers/library/node/20.12.2/images/sha256-740804d1d9a2a05282a7a359446398ec5f233eea431824dd42f7ba452fa5ab98?context=explore
# Create and change to the app directory.
WORKDIR /usr/src/app
# Install Astro globally
#RUN npm install -g astro
# Copy application dependency manifests to the container image.
# A wildcard is used to ensure both package.json AND package-lock.json are copied.
# Copying this separately prevents re-running npm install on every code change.
COPY package*.json ./
# Install production dependencies.
RUN npm install
# Copy local code to the container image.
COPY . .
#If you'd like to set npm run dev as the default command for the container
# Add this line at the end of your Dockerfile
#CMD ["npm", "run", "dev"]HUGO
version: "3.9"

services:
  hugo:
    image: 0.107.0-ext-ubuntu-onbuild #klakegg/hugo:ext-alpine
    volumes:
      - ./mysite:/src
    ports:
      - "1313:1313"
Jekyll
version: '3'
services:
  jekyll:
    image: my-jekyll-site
    ports:
      - "4000:4000"  # Map the container's port to the host
    volumes:
      - jekyll-site:/app  # Mount the named volume into the container
      #- .:/app  # Mount your Jekyll site files into the container
    command: tail -f /dev/null #keep it running
volumes:
  jekyll-site:  # Define the named volume her
Gatsby
Thanks to Gatsby, I heard for the first time about headless CMS
There is a way to integrate Ghost as CMS and use Gatsby as SSG. Having the bost of both worlds.
Ghost and Gatsby Together - headless CMS sample 📌
A starter template to build lightning fast websites with Ghost & Gatsby
Demo: https://gatsby.ghost.org/

Installing
# With Gatsby CLI
gatsby new gatsby-starter-ghost https://github.com/TryGhost/gatsby-starter-ghost.git
# From Source
git clone https://github.com/TryGhost/gatsby-starter-ghost.git
cd gatsby-starter-ghostThen install dependencies
yarn
Running
Start the development server. You now have a Gatsby site pulling content from headless Ghost.
gatsby developReleted Concepts I discovered
Testing Astro with Ghost as HeadlessCMS
And with some interesting Themes supported!
Thanks to matthiesenxyz!