Racing and Data Overlay
Tl;DR
People are doing cool videos with racechrono paid software, Garmin Virb or other paid software for video edition.
Could not avoid thinking on the GoPro GPS Telemetry again for those Racing addicts around!
Fake it tinker til you make it.
Intro
Karting racing is expensive.
If you want to make the most of it, tracking every lap gives you the possibility to know where to improve.
I got to know about Race Chrono Pro that allows to do:
This can potentially guide you on the optimum gears to be and potentially, on the optimum path.
Last year, I tinkered with random APIs: among which there was telemetry for F1
If you are into f1 / cars / trackdays or simply enjoy tinkering with IoT Data…

https://a1karting.pl/cennik/https://sklep.drive-position.pl/kategoria-produktu/quady-i-adv/
Lets get started!
OnBoard Telemetry
Getting the GPS position in real time would be great.
But there is latency and battery drain.
Also the frequency of updates is not high enough.
But anyways, can we represent data into a dashboard with Open Street Maps?
Basically, to represent into every data point of OSM what was the temperature, speed, acceleration…
- Data Collection first!
- Offline data visualization
- On board life telemetry - Im aware that people with bmw have made this possible!
GoPros Telemetry Data
Not the first time Im tinkering with geospatial data nor with GoPro built in GPS
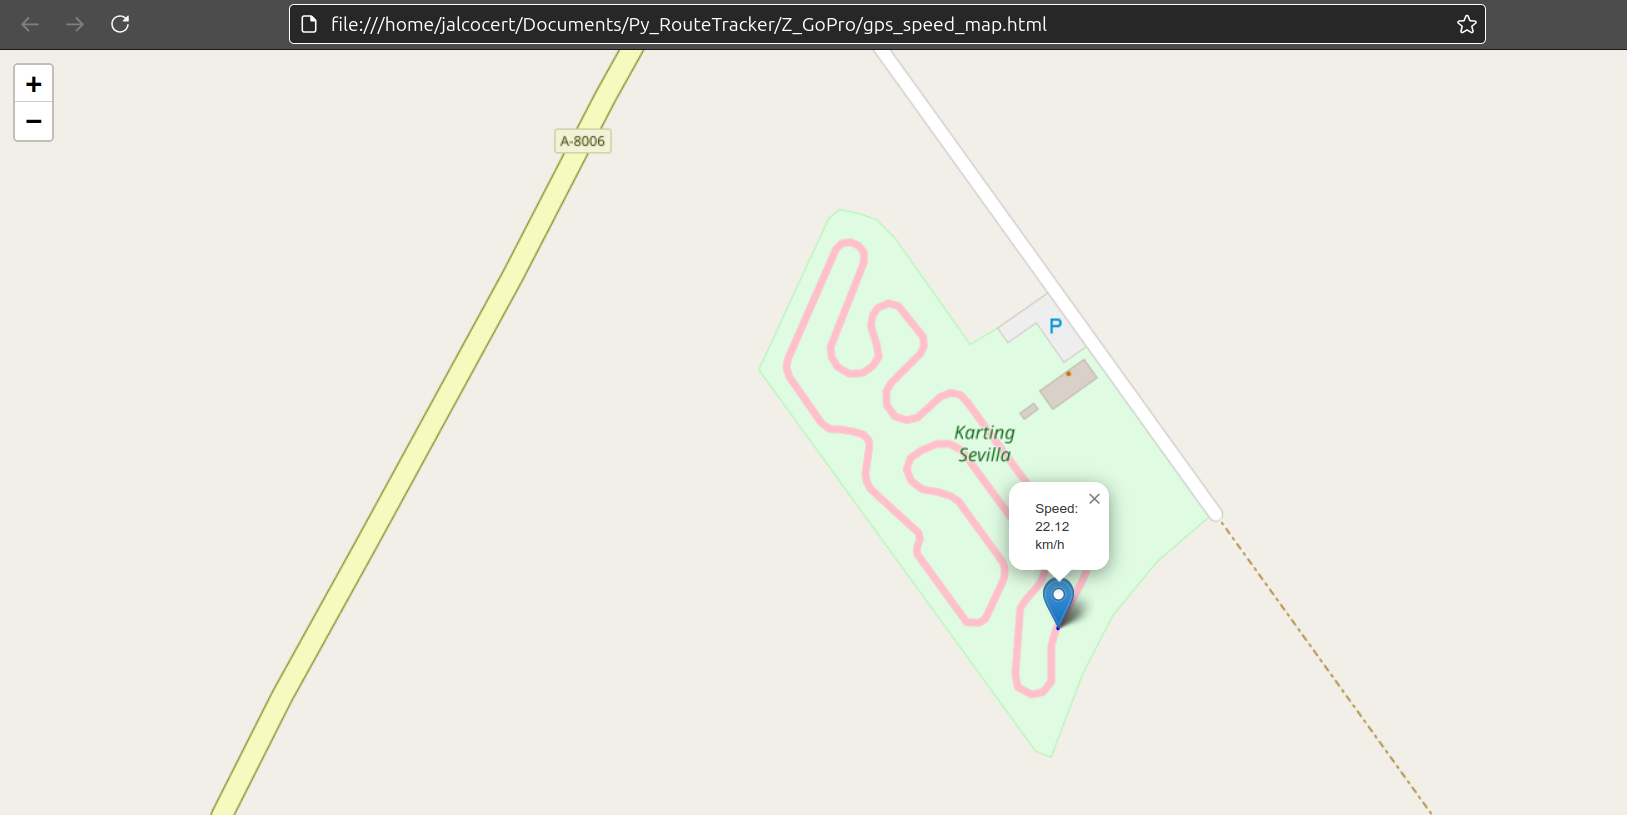 GoPro GPS Telemetry Magic
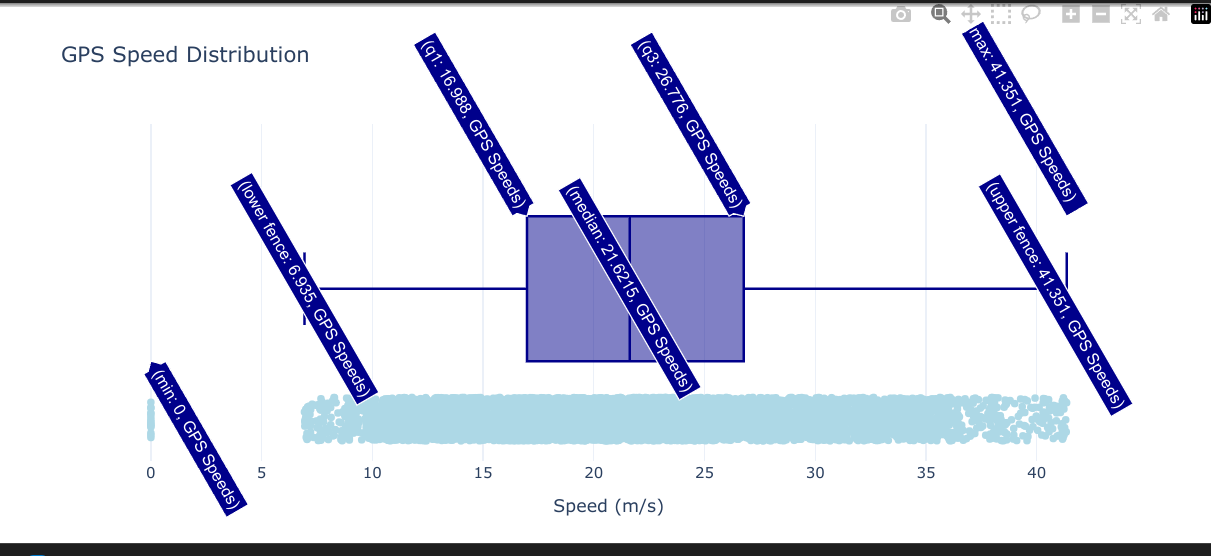 GoPro Metadata Speed trackday
Can you do something if you dont have bought the GoProTelemetryExtractor nor RaceChrono?
Grab my drink and see.
- Clone this repo:
git clone https://github.com/JAlcocerT/Py_RouteTracker
cd Z_GoPro
#cd overlayPreviously I was using:
- https://github.com/JAlcocerT/Py_RouteTracker/blob/main/Z_GoPro/gopro_explore_speeds.ipynb
- https://github.com/JAlcocerT/Py_RouteTracker/blob/main/Z_GoPro/gopro_explore_speeds_TrackDay.ipynb
You can also open it with Google Colab:
![]()
- Get exiftool ready: this allow to extract the GPS info from the MP4
#choco install exiftool -y
#choco install python -y

#extract the info
exiftool -ee ./GX030411.MP4 > output-kartdec-1a.txt
#exiftool -ee ./GX020410.MP4 > output-kart1.txt #here you will have all go pro data including the gps
Do this before joining the MP4’s with ffmpeg or you will loose the acelerations and gps info!
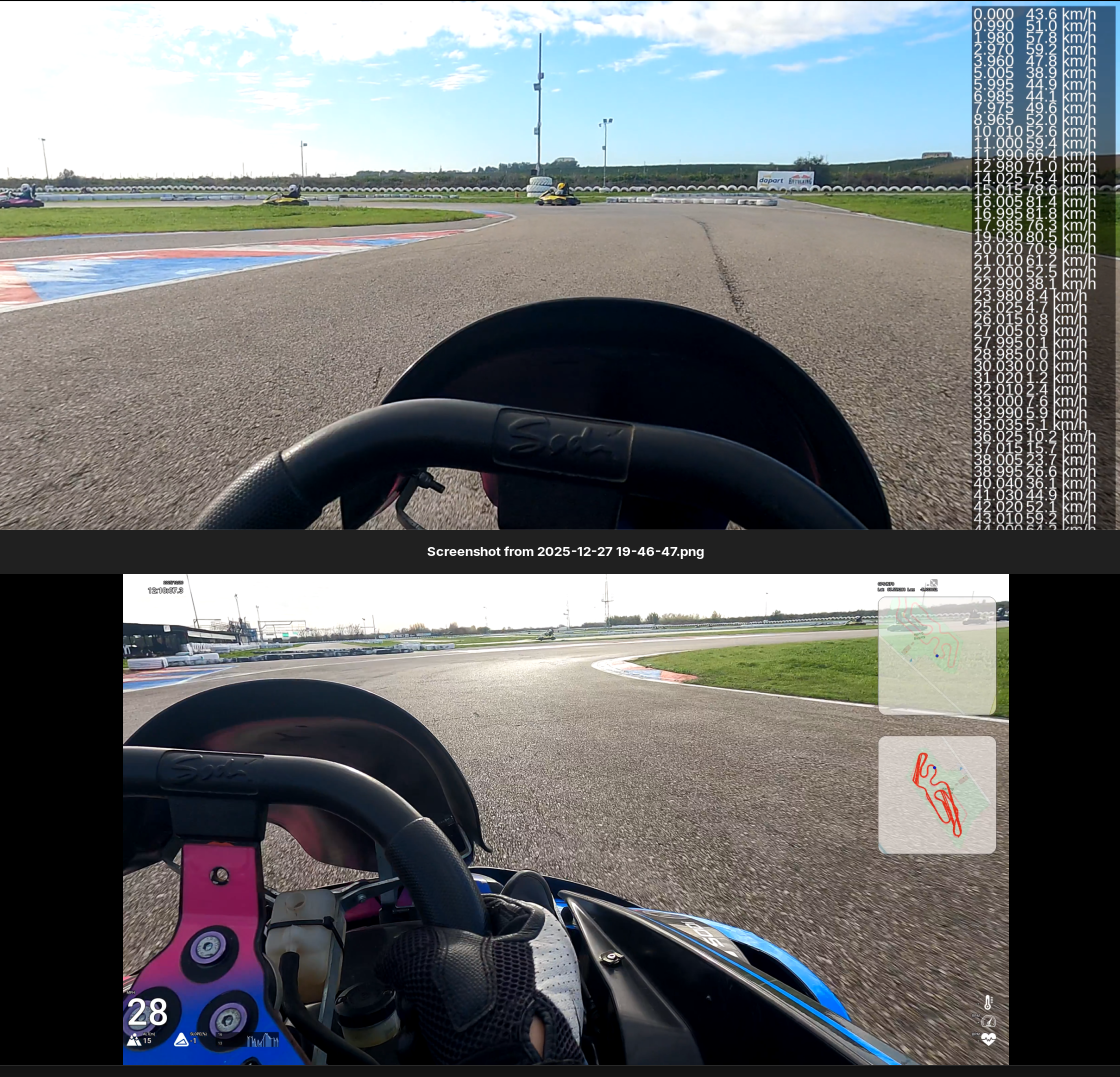
- Use Python to extract (and plot) GPS info from the txt:
Ive created a new ipynb with addititional matplotlib based this time graphs
Which looks very similar to what it was covered:
Its all about creating animations and embedding them:
 Matplotlib x YFinance
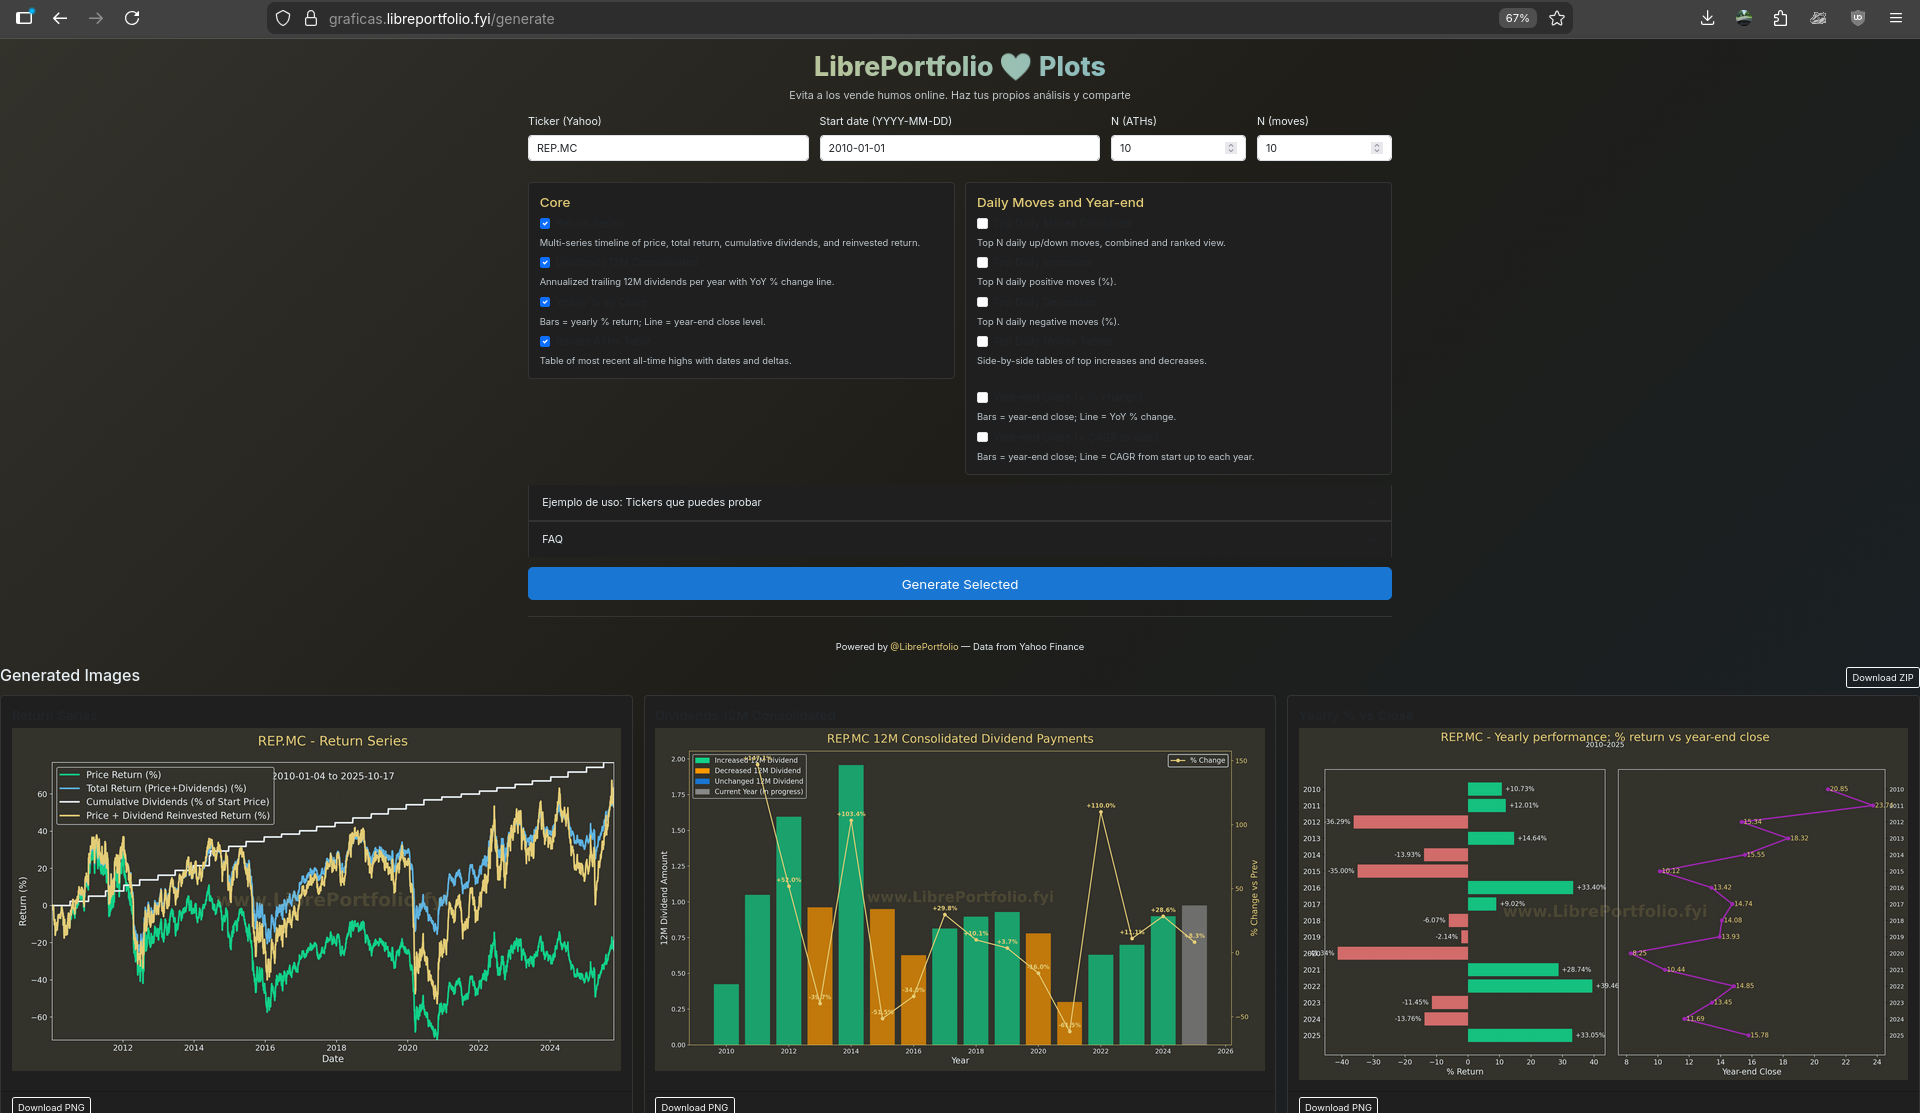 Matplotlib x Flask WebApp
Along the way I found about: https://github.com/time4tea/gopro-dashboard-overlay

GPL 3.0 | Programs to process GoPro MP4 & Generic GPX/FIT files and create video dashboards & maps
#python -m venv venv
#venv/bin/pip install gopro-overlay
uv init
uv add gopro-overlay  #https://github.com/time4tea/gopro-dashboard-overlay/tree/main
#pacman -S ttf-roboto
apt install truetype-roboto
apt install fonts-roboto
#venv/bin/gopro-dashboard.py --gpx ~/Downloads/Morning_Ride.gpx --privacy 52.000,-0.40000,0.50 ~/gopro/GH020073.MP4 GH020073-dashboard.MP4
uv run gopro-dashboard.py /home/jalcocert/Desktop/Py_RouteTracker/Z_GoPro/GX020410.MP4 /home/jalcocert/Desktop/Py_RouteTracker/Z_GoPro/GX020410-dashboard.MP4And it worked briliantly: with rencoding required, so sit back
But how could I not follow the suck-suck less approach: this is one of the first iterations
That was promising, but not so good looking.
So I made a smaller HUD and merge it to the original video:
Then I also tried the output of the gopro dashboard overlay: see the video
This is based on the gopro-dashboard-overlay:
This, on another iteration of my initial hud:
This is one of the best I got so far:
time python3.10 /home/jalcocert/Desktop/Py_RouteTracker/overlay/racing_hud_v3c.py
#https://youtu.be/pAhEI2xUxcM
ffmpeg -i /home/jalcocert/Desktop/Py_RouteTracker/Z_GoPro/GX020410.MP4 \
       -i /home/jalcocert/Desktop/Py_RouteTracker/overlay/racing_hud_v3c.mp4 \
       -filter_complex "[1:v]format=rgba,colorkey=0x000000:0.1:0.1[ckout];[0:v][ckout]overlay=W-w-50:H-h-50" \
       -codec:a copy \
       -preset superfast \
       racing_v3c_output.mp4
What else…maybe…automatic lap time?
python3.10 /home/jalcocert/Desktop/Py_RouteTracker/overlay/lap_timer.pyHaving the lap analyzed with man and mix speed was quite nice too:

And as I liked the look n feel of that graph, I brought it to the video overlay:
Conclusions
Improve your lap times with RaceChrono.
The Go Pro GPS’ Telemetry is great to get started anyways.
And now you can plot those onboard HUDs with garmin virb or with any of the seen custom ways:
python3.10 /home/jalcocert/Desktop/Py_RouteTracker/overlay/lap_timer_v5.py #extracts the telemtry txt on its own and you can use it to compare the best laps of a group of friends #https://youtu.be/Ae8CyefuxgY
ffmpeg -f concat -safe 0 \
  -i <(printf "file '$PWD/overlay/Best_Lap_4_81.33s.mp4'\nfile '$PWD/overlay/Best_Lap_1_78.61s_v5.mp4'") \
  -c copy overlay/Joined_Best_Laps.mp4
That will generate the exif telemetry into a GX020411_telemetry.txt kind of file.
And will also create a Matplotlib png with the speed profile and the max and min ones per lap.
Together with the video of the fastest lap.
To share your videos without loosing metadata, use localsend, snapdrop or pairdrop
After all: this has been so much fun
time python3.10 /home/jalcocert/Desktop/Py_RouteTracker/overlay/racing_hud_v7.pyAnd got the HUD rendered in ~20min for the 2 GoPro mp4’s (the full session) that I wanted to analyze:
As you can see, I ended up adding the 200HZ accerelometer data as well into a G-Circle to complete the HUD:

Then, added some comments via KDEnlive: these can probably be done automatically as well as per the timestamps
python3.10 /home/jalcocert/Desktop/Py_RouteTracker/overlay/lap_timer_v7.py
The result has been:

As you can see, the code is completely free and open.
If you got doubts or need a custom implementation, you can reach out:
Next steps
If anything, when doing sth related to racing + Data will probably be:
- Next GoPro videos will have the HUD + the kdenlive comments all in one
- A Desktop App to embed the cool telemetry seen here!
- The optimum Path thingy
- Go all in with embeded analytics and IoT with that u-blox GPS module and a micro-controller
Others
Lap Timer
I put together a script based on the Go Pro GPS telemetry to infer the lap times (based on the seconds when we are going through the start line the first time as reference):
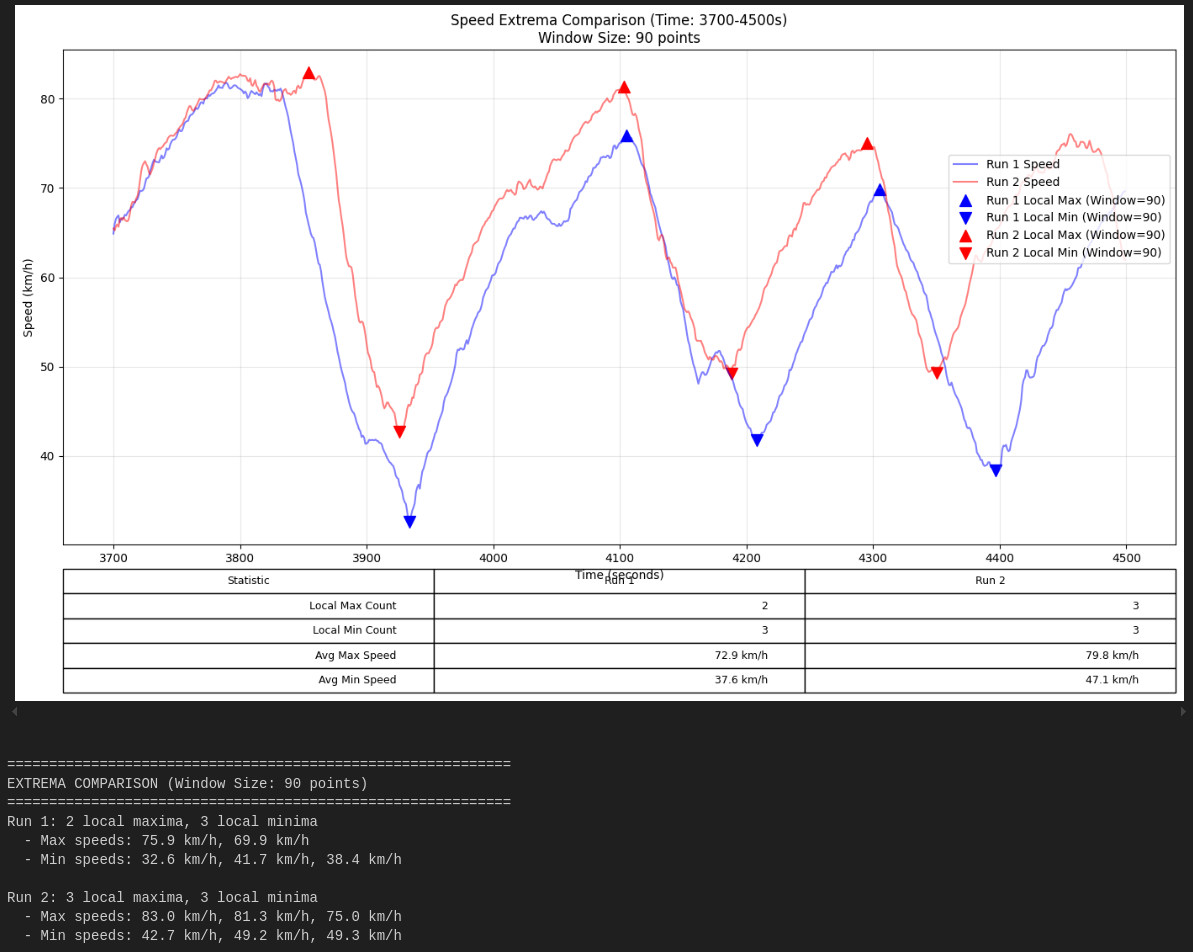
python3.10 /home/jalcocert/Desktop/Py_RouteTracker/overlay/lap_timer_v4c.pyIt will get you a Matplotlib based graph with the speed profile, the max and min ones per lap and also will cut the video +-5 seconds to give you the fastest lap!
It generates something like
Best_Lap_4_81.33s.mp4
So you can compare with your friends and see how to improve. Or just share it to youtube.
From v6, it also allows to compare 2 laps of the same video:
python3.10 /home/jalcocert/Desktop/Py_RouteTracker/overlay/lap_timer_v6.py
FAQ
Android Apps
- Torque
- inCarDoc
- Car Scanner
- ScanMaster-ELM
- https://github.com/fr3ts0n/AndrOBD/
Android OBD diagnostics with any ELM327 adapter
AndrOBD (Connect to your car’s OBD system)
OBD…CANBUS…? 📌
OBD-II (On-Board Diagnostics II):
OBD-II is a standardized system used in most cars since the mid-1990s. Its primary purpose is to monitor the vehicle’s emissions systems and report any faults.
When a problem is detected (like a misfiring engine or a faulty sensor), a Diagnostic Trouble Code (DTC) is stored, and the “check engine” light (or similar warning light) is illuminated on the dashboard.
OBD-II also provides access to a wealth of real-time data from the car’s various sensors and systems, such as engine speed (RPM), vehicle speed, coolant temperature, and more.
This data can be very useful for diagnostics, performance monitoring, and even custom applications.
CAN Bus (Controller Area Network):
CAN bus is a robust and efficient communication protocol widely used in vehicles.
It’s a serial communication system that allows different electronic control units (ECUs) within the car to communicate with each other.
For example, the engine control unit (ECU), transmission control unit, anti-lock braking system (ABS), and airbag control unit can all communicate over the CAN bus.
Think of CAN bus as the nervous system of the car, allowing different components to exchange information.
OBD-II typically uses CAN bus as its physical layer for communication.
So, when you access OBD-II data, you’re usually doing so by reading data transmitted over the CAN bus.
ELM327…ESP32? 📌
The ELM327 Chip:
The ELM327 is a popular microcontroller chip that acts as a bridge between a computer (or other device) and the car’s OBD-II port (and thus, the CAN bus).
It’s a pre-programmed chip that handles the complex task of translating OBD-II requests into CAN bus messages and vice versa.
- Ease of Use: The ELM327 simplifies OBD-II access significantly. It provides a standardized command set that makes it relatively easy to read data from the car’s systems. You don’t need to deal with the low-level details of the CAN bus protocol directly.
- Cost-Effective: ELM327-based devices are readily available and affordable. This has led to a proliferation of OBD-II scanners and software.
- Open Source and Community Support: There’s a large community of developers who have created open-source tools and libraries for working with the ELM327. This makes it easier to develop custom applications.
ELM327 vs. ESP32:
While both are microcontrollers, they serve different purposes in this context:
- ELM327: Specifically designed for OBD-II communication. It has built-in firmware to handle the intricacies of OBD-II protocols and CAN bus.
- ESP32: A general-purpose microcontroller with Wi-Fi and Bluetooth capabilities. It can be used for a wide range of tasks. To use an ESP32 for OBD-II communication, you would typically need to add a CAN bus transceiver chip (like the MCP2515) and write firmware to implement the OBD-II protocols.
Think of it this way: The ELM327 is like a specialized translator for OBD-II. The ESP32 is a more general-purpose computer that could be used for OBD-II communication, but it requires more setup and programming.
In summary:
- OBD-II is the standardized diagnostic system.
- CAN bus is the communication network used by OBD-II.
- The ELM327 is a chip that makes it easy to interface with OBD-II over CAN bus.
- The ELM327 is purpose-built for OBD-II, while the ESP32 is a general-purpose microcontroller that can be used for OBD-II with additional hardware and software.
TorqueLite and TorquePro
You can buy (or not) the Pro version.
I did so to support the project and see what else can i get from the OBD2.
Maybe one day…Dash from Torque Pro to PC?
CANBUS with UBUNTU
You can read and interact with a CAN bus using the Ubuntu command-line interface (CLI).
However, it requires some setup and the use of specialized tools.
1. Hardware Requirements:
CAN Interface: You’ll need a CAN interface device. This could be a USB-to-CAN adapter, a PCI card with CAN capabilities, or even a Raspberry Pi with a CAN shield. There are many options available. The key is that it needs to be compatible with Linux and have drivers available.
Cables: You’ll need the appropriate cables to connect your CAN interface to the CAN bus of your target system (e.g., a car, industrial equipment, etc.).
2. Software Installation (using apt):
The primary tools you’ll need are from the can-utils package:
sudo apt update  # Update package lists
sudo apt install can-utils
This package provides command-line utilities for working with CAN buses.
3. Configuring the CAN Interface:
- Bring Up the Interface: After connecting your CAN interface, you’ll need to bring it up. The exact command depends on your interface, but it’s often something like this (replace
can0with the actual interface name if different):
sudo ip link set up can0 type can bitrate 500000 # Set bitrate (adjust as needed)The bitrate (500000 in this example) must match the bitrate of the CAN bus you’re trying to connect to.
If you don’t know the bitrate, you might need to experiment or consult documentation.
You can find out existing interface names and their status by running ip a.
- Verify Interface: Check if the interface is up:
ip a # Look for the can0 (or your interface) and check its status. It should say "UP"4. Reading CAN Data:
candump: This utility displays CAN messages in real-time:
candump can0  # Listen on can0
candump can0 -c 10 # Listen on can0 for 10 messages
candump can0 -t a # Add timestamps to the messages
This will show you the CAN ID, data bytes, and other information for each message.
5. Sending CAN Messages:
cansend: This utility allows you to transmit CAN messages:
cansend can0 123#0102030405060708 # Send message with ID 123 and data 01 02 03 04 05 06 07 08Replace 123 with the CAN ID and the data bytes with the information you want to send.
An open source can bus analyzer with support for transmit/receive of standard and FD frames and DBC decoding of incoming frames
6. Other Useful Tools:
can-config: Used for configuring CAN interfaces.cananalyze: A simple GUI tool for analyzing CAN traffic (you might need to install it separately:sudo apt install cananalyzer).
Example Workflow:
- Connect your CAN interface.
sudo ip link set up can0 type can bitrate 500000(adjust bitrate).candump can0(to see what’s on the bus).cansend can0 123#...(to send messages).
Important Considerations:
- Bitrate: Getting the correct bitrate is crucial. If it’s wrong, you won’t be able to communicate.
- CAN ID: You need to know the correct CAN IDs to send messages to specific devices.
- Data Format: CAN data is raw bytes. You’ll need to understand the protocol used on the CAN bus to interpret the data correctly. This often involves looking at the documentation for the device you’re communicating with.
- Safety: When working with CAN bus, especially in vehicles, be very careful. Sending incorrect messages can have unintended consequences. Always double-check your commands and make sure you understand what you’re doing.
Python Integration (Optional):
You can also use Python libraries like python-can to interact with CAN buses programmatically.
This gives you more flexibility for processing and analyzing CAN data.
You would still need to install the can-utils and configure the interface as described above.
This information should get you started with reading and writing to a CAN bus using the Ubuntu CLI.
Remember to consult the documentation for your specific CAN interface and the device you’re communicating with.
CANBUS and Py
Interesting Racing Software
For bookings: