A boilerplate to create Landings for lead generation.
TL;DR
When thinking about ways to decouple time and value delivery…
How to create a landing page that converts the non so lazy and enables to create via a one time payment to adquire knowledge that is proven to work?
+++ A better Landing Page Architecture via components!
The launch strategy: aka, focus strategy
| Element | Decision |
|---|---|
| One Avatar | Undicided people w/o a clear way how to proceed |
| One Product | Simple knowledge to vibe code effectively |
| One Channel | Forums like reddit |
The Tier of Service: DIY (1a - leverages on knowledge)
The tech stack: see how it has been done on this section
- TAM: not calculated, if it helps someone, would be amazing
- LTV: not calculated
- CaC: ~0$ + the time cost of sharing on social media / forums from my time at this point
- Supply: unlimited, its an info product
So…if all of that is…undefined: whats the goal?
To move away from “selling time” (which caps your income) to “selling value” (which creates scale).
This might also be combined with the upcoming offers DIY x PaaS to enable people to have a wordpress going and the N ebooks / web/ook.
Intro
I saw sth interesting across social media and forums here and here
People need stg…
But are not able to articulate the what.
Having a website is so easy, everyone does that and If i would want to….id also do mine.
Specially with AI, its… 3 seconds.
No action.
So, as my BRD of doing these landings works so good.
Im moving towards productionazing it with the shape of…code + life time access and a landing.
Kind of…
People are using them to sell ebooks https://readmake.com/ or ways to code: https://codefa.st/#pricing, https://shipfa.st/?ref=indiepage
Or to sell simple microSaaS services like: https://poopup.co/
Lets get to it.
What should a landing have?
An effective landing page is less like a brochure and more like a focused conversation.
Since it usually has one specific goal—getting a visitor to sign up, buy, or download—every element needs to point toward conversion.
Here are the essential parts to consider, organized by how a user typically experiences them:
The “Above the Fold” Essentials
This is what users see before they even start scrolling. You have about five seconds to convince them to stay.
- Headline: This should be your Unique Value Proposition (UVP). Don’t describe what you are; describe the primary benefit the user gets.
- Sub-headline: A brief explanation that supports the headline by adding context or addressing a common pain point.
- Primary Call to Action (CTA): A high-contrast button that tells the user exactly what to do next (e.g., “Get Started for Free” vs. “Submit”).
- Hero Image/Video: A visual that shows the product in action or represents the “feeling” of the desired result.
Building Authority & Trust
People are naturally skeptical.
You need to prove you can deliver on your promises.
- Social Proof: Testimonials, customer logos, or “As Seen In” badges. Real faces and full names make testimonials much more believable.
- Trust Signals: Security badges, money-back guarantees, or data regarding your success (e.g., “Joined by 10,000+ professionals”).
The “Why” and “How”
Now that they are interested, you need to provide the logic to back up the emotional hook.
Features vs. Benefits: Don’t just list technical specs. Explain how those features solve the user’s problem.
Feature: “256-bit encryption.”
Benefit: “Your data stays private and secure, no matter what.”
The “How it Works” Section: A simple 1-2-3 step breakdown of the process to lower the perceived barrier to entry.
Friction Reduction
This is where you remove the final excuses a user might have for leaving.
- FAQ Section: Address the most common objections or “what if” questions right on the page.
- Simplified Form: If your goal is a lead, keep the form fields to a minimum. Every extra field reduces your conversion rate.
- Secondary CTA: A repeat of your main button at the bottom of the page so the user doesn’t have to scroll back up once they finish reading.
| Element | Purpose |
|---|---|
| Clarity | Can a stranger understand what you offer in 5 seconds? |
| Consistency | Does the page match the ad or link that brought them there? |
| Speed | Does the page load instantly? (Crucial for mobile users). |
| Singular Focus | Is there only one goal for the page? (Remove navigation menus). |
Landing Features x Components
As I will be doing this one via Astro SSR…
A clear distinction of “Application-first” vs. “Content-first…
Astro SSR or…NextJS? 🚀
Using Astro in SSR (Server-Side Rendering) mode—or more accurately, “Hybrid” mode—gives you the same dynamic capabilities as Next.js, such as user authentication, private dashboards, and real-time data fetching.
In 2025, the gap between the two has narrowed significantly. Here is how you achieve “Next.js-like” power in Astro.
A. The “Islands” vs. “Full App” Mental Model
In Next.js, the entire site is a React application. When you navigate, React handles the transition. In Astro, you are building a Multi-Page Application (MPA). Each page is a fresh HTML request. If you need “app-like” smooth transitions, you use the built-in View Transitions API, which makes an MPA feel like a Single Page App (SPA).
B. Server Actions
Next.js has a very mature “Server Actions” feature for handling form submissions. Astro recently introduced Astro Actions, which provide a type-safe way to define and call server-side functions from your client components (React, Vue, etc.) without manually fetch-calling an API.
- When to choose Astro SSR over Next.js?
Use Astro SSR if:
- You want better performance: Even in SSR mode, Astro often ships significantly less JavaScript than Next.js because it doesn’t force a “hydration” of the entire page.
- You want flexibility: You can use React for your dashboard, but Svelte for a lightweight contact form on the same site.
- You prefer simpler code: Astro’s frontmatter (the
---block) is just standard JavaScript/TypeScript that runs on the server.
Stick with Next.js if:
- Your app is extremely “state-heavy” (like a complex photo editor or a real-time collaborative doc) where maintaining a complex client-side state across navigation is critical.
- You are already deeply integrated into the Vercel/React ecosystem and use advanced features like Incremental Static Regeneration (ISR) extensively.
Using Astro in SSR (Server-Side Rendering) mode—or more accurately, “Hybrid” mode—gives you the same dynamic capabilities as Next.js, such as user authentication, private dashboards, and real-time data fetching.
Here is how you achieve “Next.js-like” power in Astro:
- How to Enable SSR
By default, Astro is static. To enable SSR, you need to add an adapter for your hosting provider (e.g., Vercel, Netlify, or Node.js for VPS) and set the output mode in astro.config.mjs.
// astro.config.mjs
import { defineConfig } from 'astro/config';
import vercel from '@astrojs/vercel/serverless'; // Example for Vercel

export default defineConfig({
  output: 'server', // Use 'hybrid' if you want most pages to stay static
  adapter: vercel(),
});- Feature Comparison: Astro SSR vs. Next.js
If you are coming from Next.js, here is how the core “app” features translate:
| Capability | Next.js (App Router) | Astro (SSR/Hybrid) |
|---|---|---|
| Data Fetching | fetch() in Server Components | Top-level await in .astro frontmatter |
| API Routes | app/api/route.ts | src/pages/api/endpoint.ts |
| Middleware | middleware.ts | src/middleware.ts |
| Auth | NextAuth / Clerk | Auth.js (for Astro) / Clerk / Lucia |
| Routing | File-based (page.tsx) | File-based (index.astro) |
| Layouts | layout.tsx (nested) | Standard components with <slot /> |
- Key Differences in “The Feel”
While the capabilities are similar, the execution differs in two major ways:
A. The “Islands” vs. “Full App” Mental Model
In Next.js, the entire site is a React application. When you navigate, React handles the transition. In Astro, you are building a Multi-Page Application (MPA). Each page is a fresh HTML request. If you need “app-like” smooth transitions, you use the built-in View Transitions API, which makes an MPA feel like a Single Page App (SPA).
B. Server Actions
Next.js has a very mature “Server Actions” feature for handling form submissions. Astro recently introduced Astro Actions, which provide a type-safe way to define and call server-side functions from your client components (React, Vue, etc.) without manually fetch-calling an API.
- When to choose Astro SSR over Next.js?
Use Astro SSR if:
- You want better performance: Even in SSR mode, Astro often ships significantly less JavaScript than Next.js because it doesn’t force a “hydration” of the entire page.
- You want flexibility: You can use React for your dashboard, but Svelte for a lightweight contact form on the same site.
- You prefer simpler code: Astro’s frontmatter (the
---block) is just standard JavaScript/TypeScript that runs on the server.
Stick with Next.js if:
- Your app is extremely “state-heavy” (like a complex photo editor or a real-time collaborative doc) where maintaining a complex client-side state across navigation is critical.
- You are already deeply integrated into the Vercel/React ecosystem and use advanced features like Incremental Static Regeneration (ISR) extensively.
For your specific goal—a high-performing landing page with a chatbot, a calendar, and an email capture—Astro is the superior choice.
It allows you to build the “brochure” parts of your site with zero JavaScript while “plugging in” a React component for the chatbot only where it’s needed.
Astro (The Performance King)
Astro uses Islands Architecture.
It renders your page as static HTML and only “hydrates” (loads JS for) the specific components you mark as interactive.
| Pros | Cons |
|---|---|
| Speed: Ships zero JS by default. This leads to perfect Lighthouse scores and better SEO out-of-the-box. | State Management: Sharing data between different islands (like a chatbot and a header) is slightly more manual than in Next.js. |
| Multi-Framework: You can use a React chatbot, a Vue calendar, and a Svelte form on the same page. | Not an SPA: By default, page changes are full refreshes (though “View Transitions” makes this feel like an app). |
| Simpler mental model: If you know HTML and standard JS, you’re 90% there. No complex React “Server vs. Client” component rules. | Smaller Ecosystem: While growing fast, there are fewer “all-in-one” enterprise templates compared to Next.js. |
| Lower Hosting Costs: Because it’s static-first, you can host it for free on almost any CDN (Cloudflare, GitHub Pages). | SSR Setup: Requires adding an “adapter” (like Vercel or Node) to enable backend features like your SQLite saving. |
Next.js (The Application Powerhouse)
Next.js is a full React framework.
It is designed for complex, state-heavy applications where the user stays on the site for a long time (like a dashboard).
| Pros | Cons |
|---|---|
| Deep React Integration: Access to the world’s largest library of pre-made UI components (like complex Chatbot UIs). | JS Overhead: Even a “static” Next.js page ships a React runtime (approx. 70-100kb), which can slightly hurt mobile SEO. |
| Server Actions: Extremely mature way to handle form submissions (like your email capture) without writing API routes. | Complexity: The “App Router” has a steep learning curve regarding caching, revalidation, and server/client boundaries. |
| Ecosystem: Almost every 3rd-party service (Calendly, Stripe, etc.) has a first-class Next.js “plug-and-play” library. | Vendor Lock-in: It is heavily optimized for Vercel. Hosting it elsewhere (like a private VPS) can be more difficult. |
| ISR (Incremental Static Regeneration): Updates static content in the background without a full rebuild—great for huge sites. | Build Times: As the project grows, Next.js build times can become significantly longer than Astro’s. |
The Verdict for Your Project
Go with Astro if:
- You want the fastest possible landing page (crucial for converting ads).
- Your “backend” needs are simple (saving an email to SQLite).
- You want to “plug and play” a Chatbot as an isolated widget.
Go with Next.js if:
- You plan to turn this landing page into a full SaaS product with a login area and a complex dashboard later.
- You are already a React expert and don’t want to learn a new file syntax.
How to start the Astro + SQLite + Chatbot setup:
- Initialize:
npm create astro@latest(Choose “Server” mode for SQLite). - Add React:
npx astro add react(To power your Chatbot). - Add Tailwind:
npx astro add tailwind(For your “plug and play” UI components). - Database: Install
better-sqlite3to handle your email collection.
Astro SSR Component x Firebase Auth 🌍
Using Firebase Authentication with Astro SSR is a very common and powerful pattern.
It allows you to have the performance of a static landing page while still protecting specific routes (like a /dashboard or /admin) using server-side logic.
In fact, because Astro is an MPA (Multi-Page Application), you actually get a very secure “session-based” flow that is often easier to reason about than the complex hydration rules in Next.js.
How it works in Astro SSR
To make this work, you typically use a “Double SDK” approach:
- Firebase Client SDK: Used on your Login/Register pages to handle the actual login (social login, email/password) in the browser.
- Firebase Admin SDK: Used in your Astro Middleware or API Routes to verify the session on the server before the page even reaches the user.
The Architecture: Firebase + Astro SSR
- The Login Flow
When a user logs in via your React/Vue chatbot or a standard form, you get an idToken from Firebase. You then POST this token to an Astro API route (e.g., /api/auth/signin).
- The Session (Server-side)
In that API route, you use the Firebase Admin SDK to verify the token and create a session cookie. This is much more secure than storing the token in localStorage.
// src/pages/api/auth/signin.ts
export const POST: APIRoute = async ({ request, cookies }) => {
  const idToken = await request.json();
  // Verify with Firebase Admin and set a 'session' cookie
  cookies.set("session", sessionCookie, { path: "/" });
  return new Response(JSON.stringify({ status: "success" }));
};- Protecting Routes (Middleware)
You can use Astro’s src/middleware.ts to check every request. If someone tries to access /dashboard without a valid Firebase session cookie, you can redirect them to the landing page immediately.
Astro vs. Next.js for Firebase Auth
| Feature | Astro SSR + Firebase | Next.js + Firebase |
|---|---|---|
| Logic Location | Mostly in middleware.ts and API routes. | Spread across Server Components and Actions. |
| Security | Easy to enforce “Server-only” auth checks. | Can be tricky with “Client vs Server” components. |
| Performance | Only loads the Firebase Client SDK on the login page. | Often bundles parts of the SDK into the main app. |
| Setup | Requires manual cookie handling or a library like astro-firebase. | Often uses next-firebase-auth-edge for similar results. |
If you want to build a high-converting landing page that later redirects a user to a private dashboard, Astro SSR is excellent.
You keep the landing page lightning-fast (no Firebase JS loaded) and only trigger the “heavy” auth logic when the user actually interacts with your login or chatbot.
Astro is uniquely suited for this because it can mix static content (for speed) with interactive islands (for the chatbot and calendar) seamlessly.
- Above the Fold (The Hook)
- The Component: Headline (Unique Value Proposition), Sub-headline, and the “Hero” Call to Action (CTA).
- Astro’s Role: These should be Static Astro Components. Since they are the first thing a user sees, rendering them as pure HTML (zero JavaScript) ensures they load instantly.
- Best Practice: Use a high-contrast button. In Astro, you can use a simple
<button>or a styled<a>tag with Tailwind CSS.
- Social Proof (The Trust)
- The Component: Logos of companies using your product, or a “Joined by 5,000+ users” badge.
- Astro’s Role: These are static. You can use Astro’s built-in
<Image />component to automatically optimize these logos into modern formats like.webp, ensuring they don’t slow down the page.
- The “How it Works” / Features (The Logic)
- The Component: A 3-step process or a grid of benefits.
- Astro’s Role: Use Astro Components with Props. You can create one
Feature.astrocomponent and reuse it across the page to keep your code clean. - 2025 Trend: Use “Scroll-linked animations.” You can add a tiny bit of JS to an Astro component to make elements fade in as the user scrolls.
- Interactive Islands (The Functionality)
This is where Astro shines compared to other frameworks. You can “plug in” different frameworks for specific needs:
- The Chatbot (React/Vue): Use the
client:idledirective. This tells Astro: “Load the chatbot’s JavaScript only after the main page is finished loading.” It keeps your initial load speed perfect. - The Calendar (React/Svelte/Vanilla): Use
client:visible. The calendar’s code won’t even download to the user’s phone until they scroll down to that section.
- Conversion Zone (The Goal)
- The Component: The Email Capture Form.
- Astro’s Role: Since you want to save to SQLite, you will use Astro Actions (introduced in late 2024/2025). This allows you to write a function that runs on the server to save the email safely without needing to set up a separate API.
- Firebase Auth: For the “Login” part of this zone, you’d use a small React component to handle the Firebase popup, then use Astro Middleware to redirect the user to the
/dashboard.
| Section | Component Type | Interaction Mode | Why? |
|---|---|---|---|
| Hero/Headline | .astro (Static) | None | Max speed for SEO and users. |
| Testimonials | .astro (Static) | None | Fast-loading images. |
| Chatbot | .jsx (React) | client:idle | Loads after the page is usable. |
| Calendar | .jsx or Embed | client:visible | Don’t load JS until needed. |
| Email Form | .astro + Action | SSR (Server) | Securely write to SQLite. |
To get started with “plug-and-play” components in Astro, I recommend checking out AstroWind or shadcn/ui for Astro.
They give you the blocks (Hero, Features, Pricing) ready to go, and you just add your custom Chatbot and SQLite logic on top.
To maximize conversions, your landing page needs to move the user from Curiosity to Trust and finally to Action.
The placement of your Calls to Action (CTAs) should follow the user’s “internal temperature”—putting a high-friction CTA (like “Buy Now”) too early can actually scare users away.
The Conversion Journey
| Component | Psychological Role | Conversion “Tactic” | CTA Strategy |
|---|---|---|---|
| Hero (Headline/UVP) | Attention | Hooks the user by promising a specific result in under 5 seconds. | Primary CTA: High-contrast button (e.g., “Get Started” or “Join Now”). |
| Social Proof (Logos/Stats) | Validation | Removes the “am I the only one using this?” fear. | None: Keep the focus on the logos to build credibility. |
| Features/Benefits | Education | Translates technical parts into “What’s in it for me?” | Secondary CTA: Small text link or button after the strongest benefit. |
| Chatbot (AI Assistant) | Engagement | Overcomes specific objections by answering questions in real-time. | Soft CTA: Chatbot can “suggest” signing up based on the conversation. |
| The Calendar | Commitment | Shifts the mindset from “maybe” to a specific date and time. | The Action: The “Schedule” button is the CTA here. |
| Testimonials | Trust | Uses “people like me” to prove the value proposition is real. | None: Let the praise speak for itself. |
| Email Lead Magnet | Low-Friction Entry | Captures users who aren’t ready to buy/login but want value. | Email CTA: “Send me the guide” or “Keep me updated.” |
| Final Closer (Footer) | The Last Chance | Catches the user after they’ve scrolled through all the info. | Repeat Primary CTA: Large button to prevent scrolling back up. |
CTAs Maximum Impact and AB Testing
An effective landing page uses two types of CTAs: Direct (hard) and Transitional (soft).
- The “Above the Fold” CTA (Direct)
- Location: Directly under your sub-headline.
- Goal: To catch the “high-intent” users who already know they want your service. Like the ones coming from ads.
- Design: The most vibrant color on the page.
- The “Sticky” or Repeating CTA (Convenience)
- Location: In your header (if you have one) or repeated after every major “value block.”
- Goal: To ensure that the moment a user is “sold” on your idea, they don’t have to look for the button.
- The “Exit Intent” or Email Capture (Transitional)
- Location: Middle of the page or as a final section before the footer.
- Goal: To save the lead in your SQLite database even if they don’t go to the
/dashboard. This allows you to follow up later.
How Astro Makes This “Conversion-Ready”: Astro’s ability to handle A/B testing easily is a secret weapon for conversions.
Since your page is divided into components, you can create two versions of your Hero component:
HeroA.astro(Focus on speed)HeroB.astro(Focus on ease of use)
Because Astro is SSR-capable, you can serve one or the other to different users and see which one populates your SQLite database with more emails.
My Journey creating Landings
Arriving up to this point…has not be one afternoon.
But it can be one hour for if you choose it to, jumping here.
Discovering AntiGravity
Or any agentic IDE :)
Got to know mailerlite
Wouldnt it be nice to capture email into a Email marketing platform (EMP)?
It is also possible by copy pasting snippets.
And via OSS with Listmonk.
Tested few ESP
From the email service providers tested here
I decided to continue with Mailtrap API due to its nice deliverability.
Specially via the API (SMTP tends to go to spam).
Why it is considered the best:
- Deliverability: Unlike other services, the author noted that with Mailtrap, the “email flows directly to your inbox” using a custom domain, whereas others (like Mailjet or Mailgun) often ended up in the spam folder during testing.
- Ease of Use: It is described as being “among the easiest to configure for developers,” especially for testing and sandboxing.
- Integration: It offers a wide range of integrations, including a native n8n node, Supabase, and even an MCP tool for VS Code, allowing you to send emails directly from your code editor.
- Reliability with Backends: The author successfully used it as the SMTP relay for PocketBase, confirming it works well for sending one-time codes and magic links.
| Service | Author’s Rank | Key Strength |
|---|---|---|
| Mailtrap | #1 | Best deliverability to inbox & developer-friendly testing. |
| Resend | #2 | Great API, Cloudflare integration, and can receive mail. |
| Mailjet | #3 | Ideal for high-volume marketing/transactional relay via Listmonk. |
Created a DWY landing page
With formbricks and cal.com support: consulting.jalcocertech.com done here.
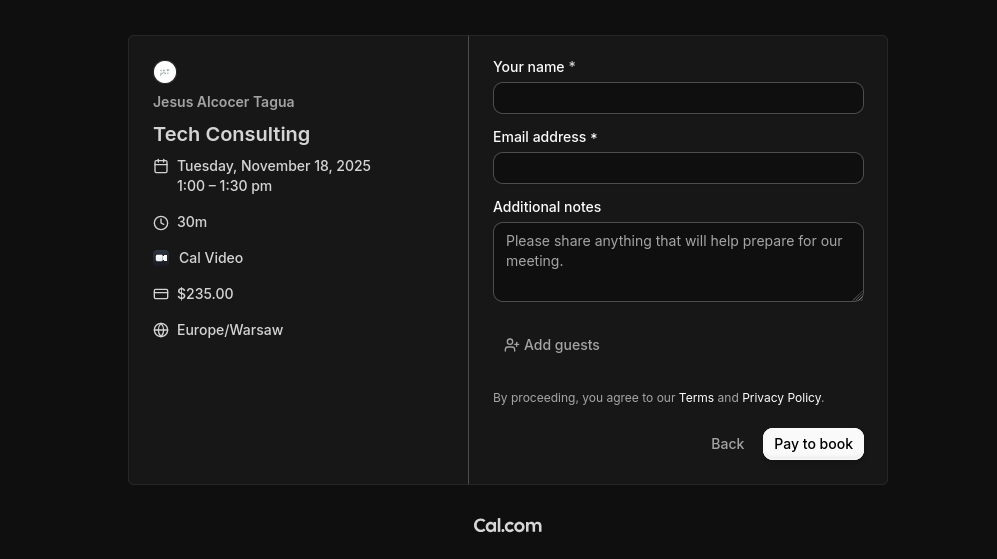
The only thing is that emails were not verfied, neither I was sending a thing to them.
Well, stripe emails are…,verified’ behind a paywall :)
Combined email capture with programmatic emails
If you got unverified emails from formbricks or from sth like the make-landing project that saves them into a .db or .csv
You can do programmatic emails via ESP to send them goodies: info, attachments, verifications, etc.
![]()
The good thing about programmatic stuff, is that you can customize email html templates with scripts via antigravity.
Email html vs mjml Templates
And…as asking qq’s you get to know nice things: html, mjml and maizzle templates…
python3 send_email.py

#npm install -g mjml
#mjml --version

python3 send_mjml_email.py #with mjml template
Those worked with my favicon: https://www.jalcocertech.com/favicon.ico
VibeCoded via BRDs
Because if a BRD is supposed to make things clear for a dev team, it can do the same for agents.
Adding features via Change Requests like this one, have also been great.
Now - Creating diy-landing-boilerplate
Enough about past, last fast forward to now and create:
git init && git add . && git commit -m "Initial commit: Starting DIY Web BoilerPlate" && gh repo diy-landing-boilerplate --private --source=. --remote=origin --pushTogether with this BRD as scope…after chatting with Gemini :)
see the brd on this repo, is the scope well defined enough? lets close the gaps firstAnd if this is not the first landing that you vibe code…you are very aware that the content has to be controlled and versioned via markdown!
the terms of service and privacy policy has to be controlled by a separated .md filesMarketing Brain vs Coding Brain 🚀
This is actually one of Astro’s greatest strengths.
It has a feature called Content Collections specifically designed for this.
Using Markdown to control your landing page is a brilliant move for a solo developer because it separates your “Marketing Brain” from your “Coding Brain.”
You can tweak your headlines and FAQ answers in a simple text file without touching a single line of HTML or CSS.
- The Strategy: “Component Mapping”
Instead of rendering one giant blob of Markdown, you can treat your main.md as a configuration file.
Each section of your Markdown file (using “Frontmatter”) tells Astro which UI component to load and what text to put inside it.
- How to Structure Your Files
The Content (src/content/landing/main.md)
You use the Frontmatter (the area between the ---) to store your structured data like headlines and CTA text.
---
title: "My Amazing Product"
hero:
  headline: "Stop wasting time on manual tasks."
  subheadline: "The AI-powered assistant that lives in your browser."
  cta: "Get Started for Free"
features:
  - title: "Fast Setup"
    desc: "Up and running in 2 minutes."
  - title: "Secure"
    desc: "Your data never leaves your VPS."
faq:
  - q: "Is there a free trial?"
    a: "Yes, 14 days, no credit card required."
---

Optional: Extra long-form content can go here.


**The Page (`src/pages/index.astro`)**

Astro reads that file and "injects" the data into your components.

```astro
---
import { getEntry } from 'astro:content';
import Hero from '../components/Hero.astro';
import Features from '../components/Features.astro';
import FAQ from '../components/FAQ.astro';

const entry = await getEntry('landing', 'main');
const { hero, features, faq } = entry.data;
---

<Layout>
  <Hero headline={hero.headline} sub={hero.subheadline} cta={hero.cta} />
  <Features items={features} />
  <FAQ items={faq} />
</Layout>- Legal Pages (
tos.mdandprivacy-policy.md)
For these, you don’t even need a mapping. Astro can just render the Markdown directly into a layout.
- File:
src/content/legal/tos.md - Dynamic Route:
src/pages/[slug].astro
When you go to /tos, Astro sees the tos.md file and converts the Markdown into clean HTML for you automatically.
- Pros & Cons of Markdown-Driven Landing Pages
| Pros | Cons |
|---|---|
| No “Code Fear”: You can fix typos in seconds without breaking the layout. | Initial Setup: You have to define a “Schema” so Astro knows what data to expect. |
| Version Control: Your marketing copy is tracked in Git just like your code. | Complexity: If you want a very custom layout for just one feature, Markdown can feel restrictive. |
AI-Friendly: You can tell an AI: “Rewrite the hero section of main.md to be more aggressive for a 20% discount sale.” |
Since we are focusing on UI/UX first, I recommend setting up your Content Schema now.
This acts as the “Contract” for your landing page.
See brd -> clarifications with a clear DoD!-> architectural walkthrough -> development plan.
graph TD
    %% Content Layer
    subgraph Content ["Content Layer (Markdown Files)"]
        M1[main.md] --> |Frontmatter| D1[Hero/Feature/FAQ Data]
        M2[tos.md] --> |Body Content| D2[Legal Text]
        M3[privacy.md] --> |Body Content| D3[Legal Text]
    end

    %% Astro Processing Layer
    subgraph Astro ["Astro Engine (Build/Server Time)"]
        direction TB
        C1{Content Collections}
        S1[Schema Validation]
        M1 & M2 & M3 --> C1
        C1 --> S1
    end

    %% UI Mapping
    subgraph Components ["UI Components (Tailwind CSS)"]
        H1[Hero.astro]
        F1[Features.astro]
        Q1[FAQ.astro]
        L1[LegalLayout.astro]
    end

    %% Data Flow to Components
    D1 -.->|Injects Data| H1
    D1 -.->|Injects Data| F1
    D1 -.->|Injects Data| Q1
    D2 & D3 -.->|Renders| L1

    %% Final Output
    subgraph Output ["Final Result"]
        P1[index.html]
        P2[tos/index.html]
        P3[privacy/index.html]
    end

    H1 & F1 & Q1 --> P1
    L1 --> P2
    L1 --> P3

    %% Styling
    style Content fill:#f9f,stroke:#333,stroke-width:2px
    style Astro fill:#fff4dd,stroke:#d4a017,stroke-width:2px
    style Components fill:#e1f5fe,stroke:#01579b,stroke-width:2px
    style Output fill:#e8f5e9,stroke:#2e7d32,stroke-width:2px
Content first architecture be like:
graph LR
    A[Marketing Team] -->|Edits| B[content/*.md]
    C[Dev Team] -->|Builds| D[src/components/*.astro]
    B -->|Validated by| E[Zod Schemas]
    D -->|Consumes| E
    E -->|Renders| F[Static HTML]

    style A fill:#fff4e6,stroke:#ff6f00
    style C fill:#e1f5fe,stroke:#01579b
    style B fill:#f1f8e9,stroke:#558b2f
    style D fill:#e8eaf6,stroke:#3f51b5
    style F fill:#e8f5e9,stroke:#2e7d32
The DIY Landing Project
This is a landing…that sells…ways to do landings (?! yyyea…)
Creating a DIY Landing BoilerPlate… 🚀
#git init && git add . && git commit -m "Initial commit: Starting N ebooks DIY" && gh repo create 1toN-ebooks --private --source=. --remote=origin --push
How hard was to code vibe code this?
I said 5 min - i meant of you telling next next next to antigravity.
The full process took ~30 min: dont trust me? see the video
| Section | Status | Purpose | Why it’s critical for Conversion |
|---|---|---|---|
| Navbar | ✅ Current | Navigation | Provides a consistent “Escape Hatch” to the CTA. |
| Hero | ✅ Current | Attention | Explains the “What” and “Why” in 5 seconds. |
| Tech Stack | ✅ Current | Authority | Proves the boilerplate is modern (Astro, Tailwind, Docker). |
| The “Problem” | ✅ Current | Empathy | Agitates the pain of WordPress/No-Code limitations. |
| Features | ✅ Current | Logic | Lists the technical capabilities of the tool. |
| Process (1-2-3) | ✅ Current | Clarity | Shows how easy it is to go from “Repo” to “Live.” |
| Comparison | ✅ Current | Value | Explicitly shows why your tool is better than the status quo. |
| Calendar | ✅ Current | Social Proof | Scarcity is a powerful motivator. |
| Testimonials | ✅ Current | Social Proof | Uses “Others are doing this” to reduce perceived risk. |
| FAQ | ✅ Current | Friction Removal | Answers the “What if?” questions that stop sign-ups. |
| Email Form | ✅ Current | Conversion | The primary goal: capturing the lead. |
| Legal/Footer | ✅ Current | Trust/Compliance | Proves this is a legitimate, professional project. |
| ChatBot | ✅ Current | Engagement | Interactive support with canned responses. Answers common questions instantly. |
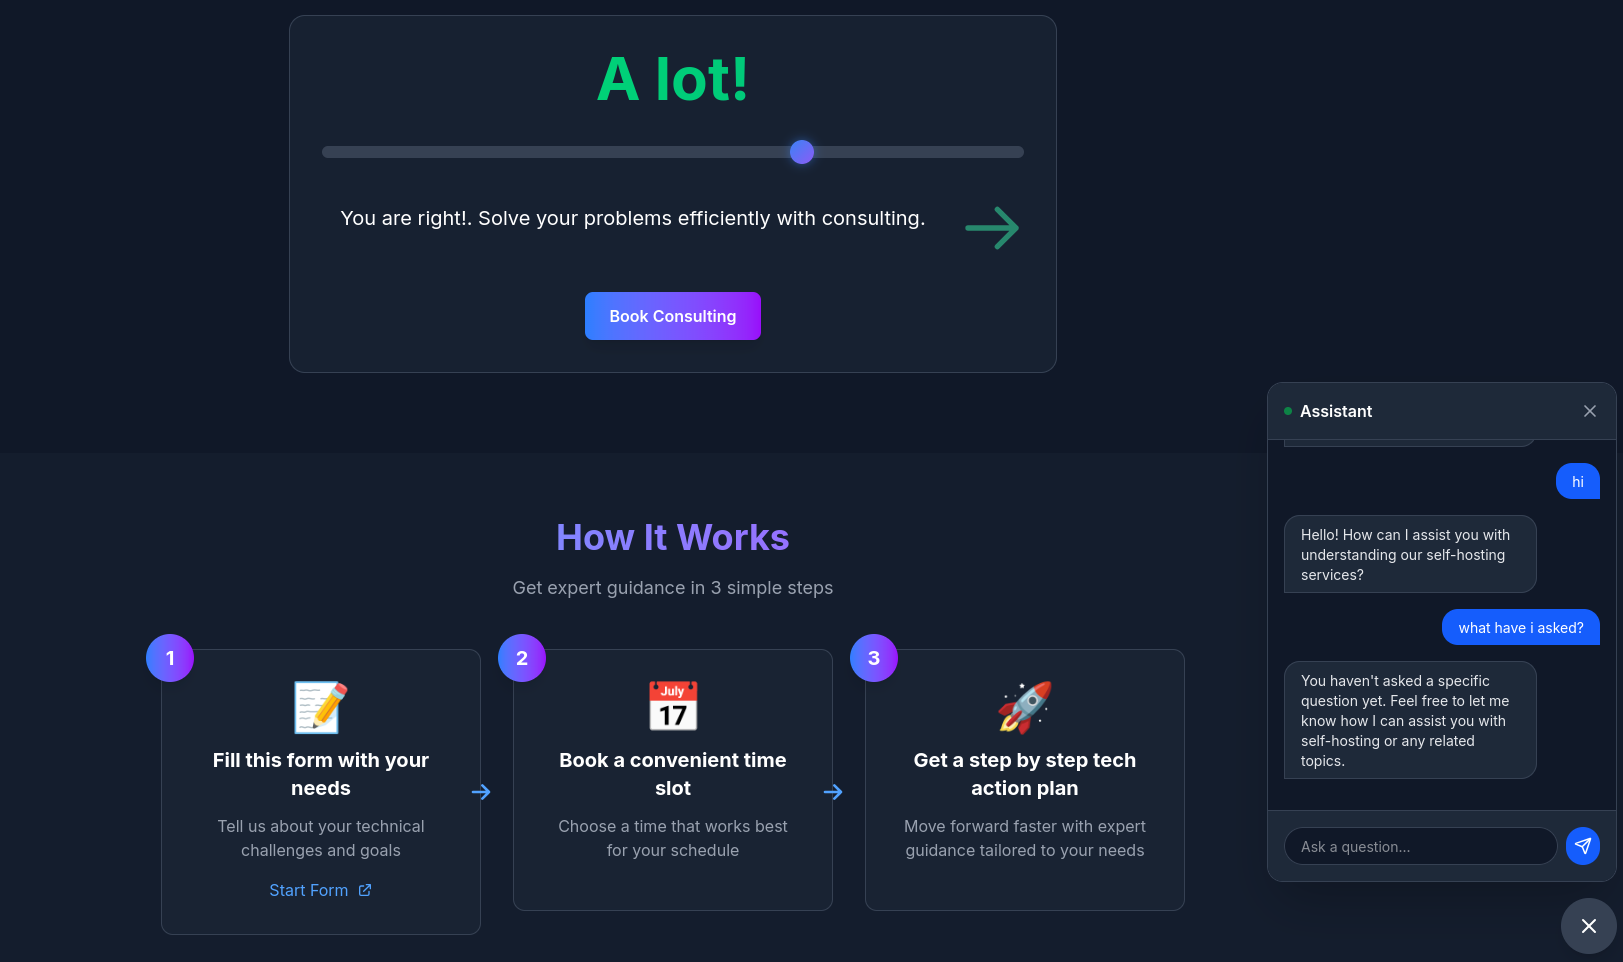
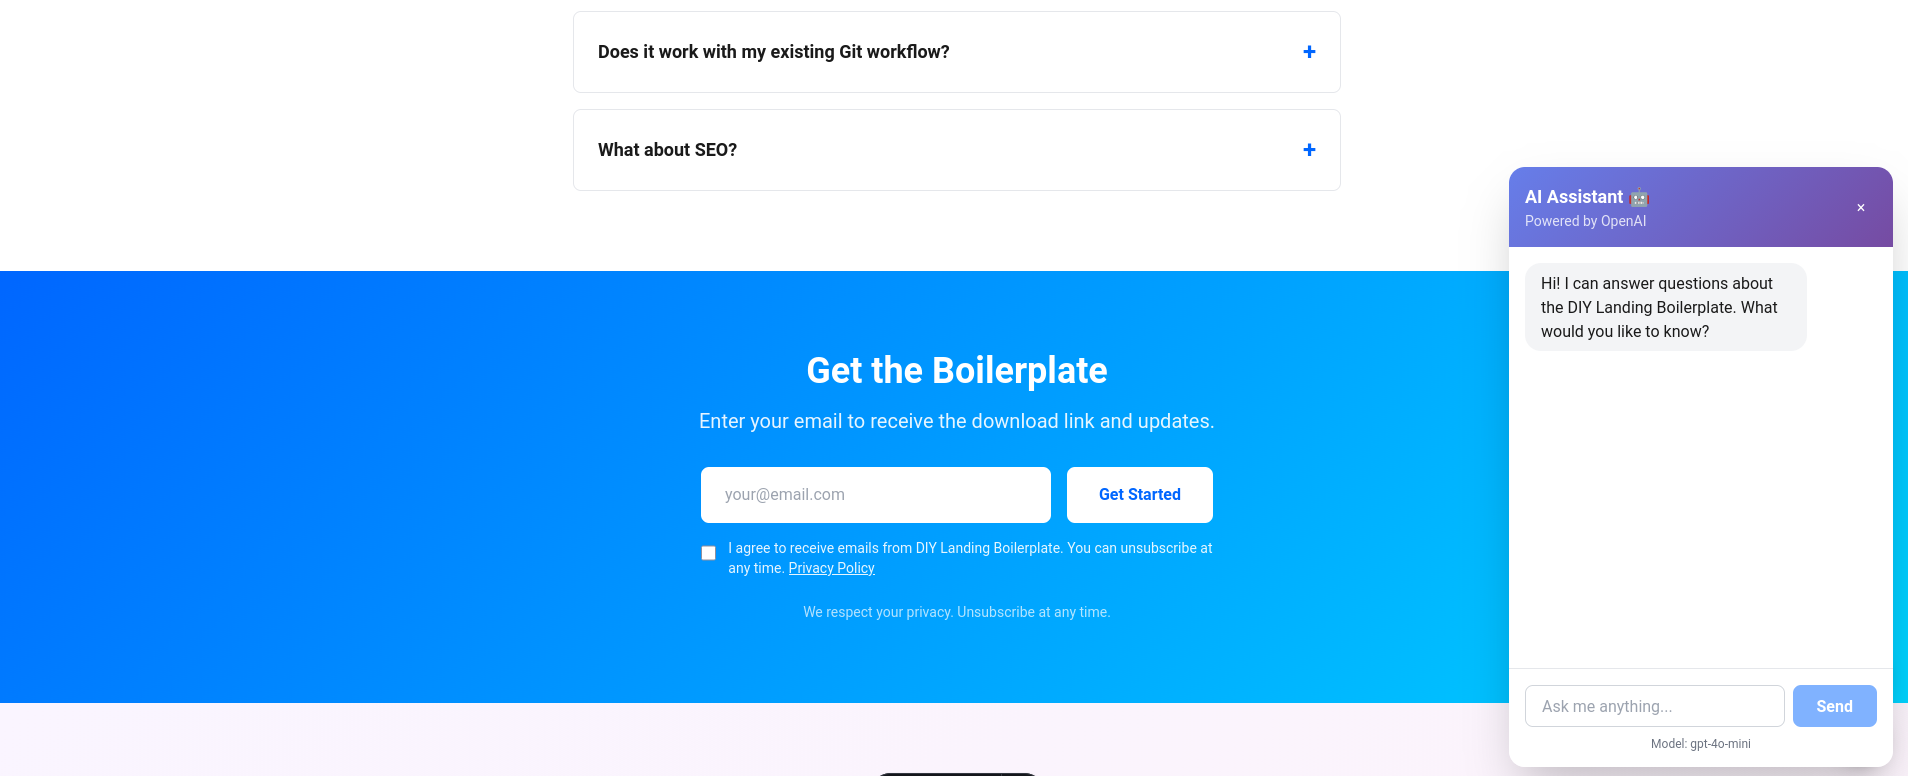
Typescript Custom ChatBot
How could I not…add the ChatBot funcionality.
With custom knowledge base, unlike the previous simpler FastAPI based one.
| Feature | TypeScript/Node | Python/FastAPI |
|---|---|---|
| LLM API Calls | ✅ Excellent | ✅ Excellent |
| Streaming | ✅ Native | ✅ Native |
| Type Safety | ✅ TypeScript | ✅ Pydantic |
| Deployment | ✅ Vercel/Netlify | ⚠️ Separate service |
| Cold Start | ✅ Fast | ⚠️ Slower |
| ML Libraries | ⚠️ Limited | ✅ Extensive |
| RAG/Embeddings | ⚠️ Fewer options | ✅ Mature ecosystem |
| Single Stack | ✅ Yes | ❌ No |
could we create a separated component called ChatWidgetLLM.tsx that would do the QnA via OpenAI calls, with typescript and having a way to specify what are the input markdown files that are the knowledge sources?

the system has to have those in context, as well as the previous questions asked in a single conversation

create a z-change-request-bot-llm.md with the plan first?
#npm install openai
npm run dev -- --host #make dev
#make docker-upDont forget to configure the site url via
astro.config.mjs!
Plug any new component, like the chatbot x openAI one, to the diy landing boilerplate index.astro:
<ChatWidgetLLM
  client:load
  knowledgeSources={['main', 'faqs']}
  model="gpt-4o-mini"
  systemPrompt="Your custom prompt here"
/>
graph TB
    subgraph "User Interface"
        A[User Types Question] --> B[ChatWidgetLLM.tsx]
        B --> C{Send to API}
    end

    subgraph "API Endpoint /api/chat"
        C --> D[chat.ts]
        D --> E[Parse Request]
        E --> F[Load Configuration]
        F --> G[Build Context]
    end

    subgraph "Configuration Sources"
        F --> H[src/lib/openai.ts]
        H --> I[DEFAULT_CONFIG
model: gpt-4o-mini
maxTokens: 200
temperature: 0.7]
        H --> J[DEFAULT_SYSTEM_PROMPT
Role & Guidelines]
    end

    subgraph "Knowledge Sources"
        G --> K[context-builder.ts]
        K --> L[main.md]
        K --> M[faqs.md]
        L --> N[Extract:
- Site info
- Features
- Process
- Comparison]
        M --> O[Extract:
- FAQ Q&A pairs]
        N --> P[Format Context]
        O --> P
    end

    subgraph "OpenAI API"
        P --> Q[Build Messages Array]
        Q --> R[System Prompt + Context]
        Q --> S[Conversation History]
        R --> T[OpenAI API Call]
        S --> T
        T --> U[Stream Response]
    end

    subgraph "Response Flow"
        U --> V[Readable Stream]
        V --> W[Chunk by Chunk]
        W --> X[Update UI in Real-time]
        X --> B
    end

    subgraph "Environment"
        Y[.env file] --> Z[OPENAI_API_KEY]
        Z --> D
    end

    style A fill:#e1f5ff
    style B fill:#fff3cd
    style D fill:#d4edda
    style K fill:#f8d7da
    style T fill:#d1ecf1
    style X fill:#e1f5ff
After knowing that this is as simple as its gets…
Why would a marketer or someone chasing automation bother with:
When they can have a DIY bot: with their knowledge sources and custom instructions
Where’s the code responsible for the bots?
In these 2 separated components, one with just UI, other with the Back-end logic:
- https://github.com/JAlcocerT/diy-landing-boilerplate/blob/master/src/components/ChatWidget.tsx
- https://github.com/JAlcocerT/diy-landing-boilerplate/blob/master/src/components/ChatWidgetLLM.tsx
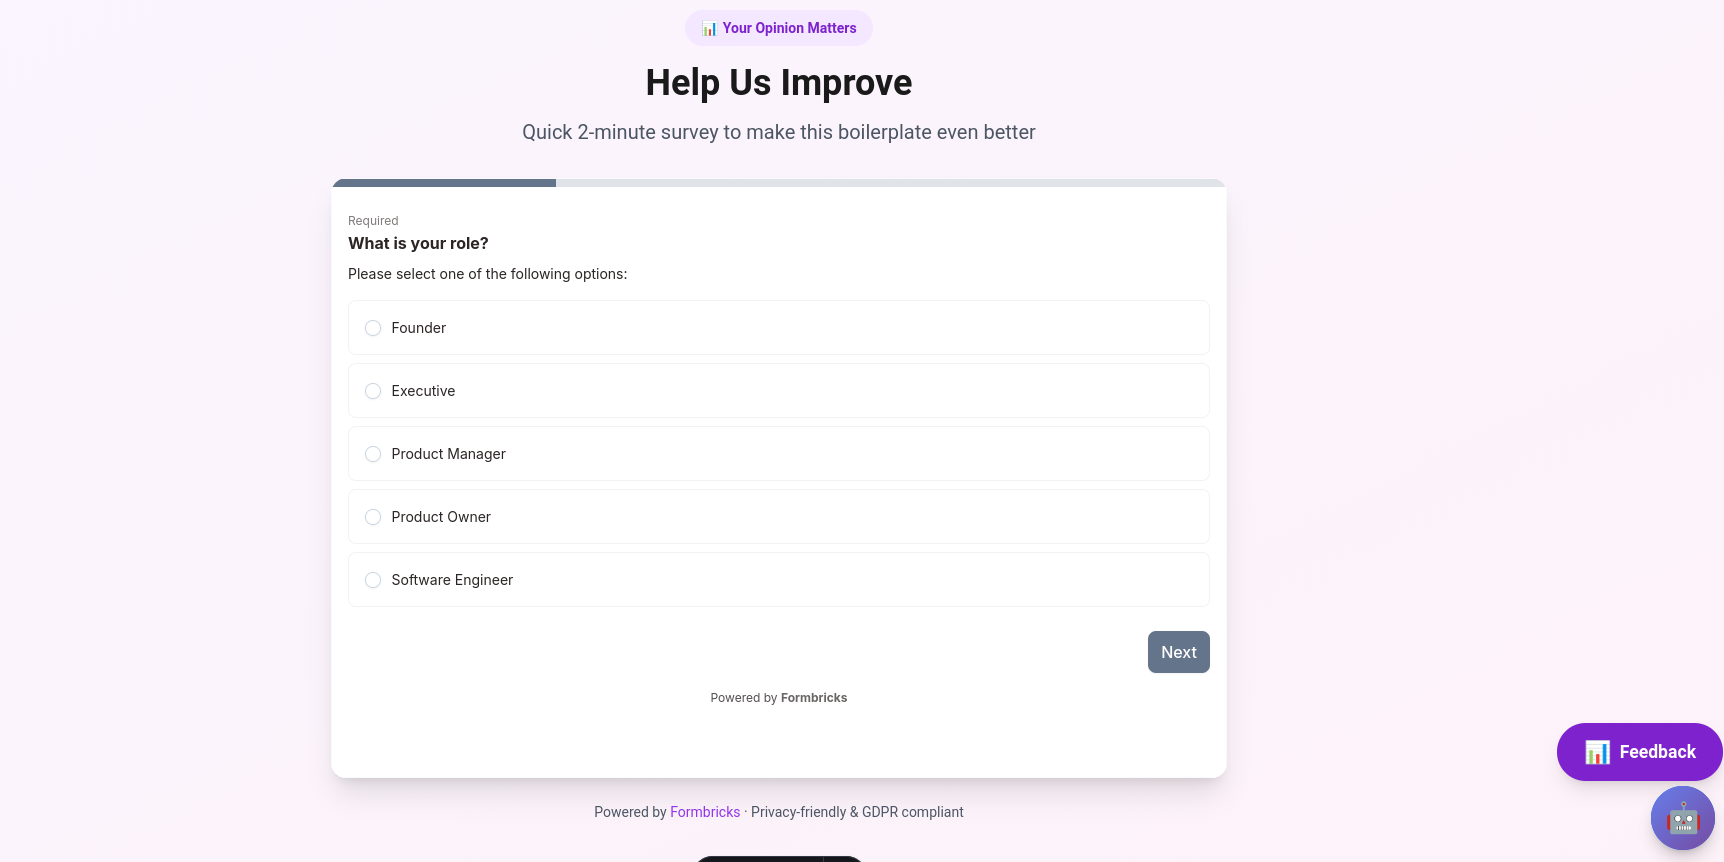
Custom Forms via Astro
Adding formbricks to our website is already known: via survey links
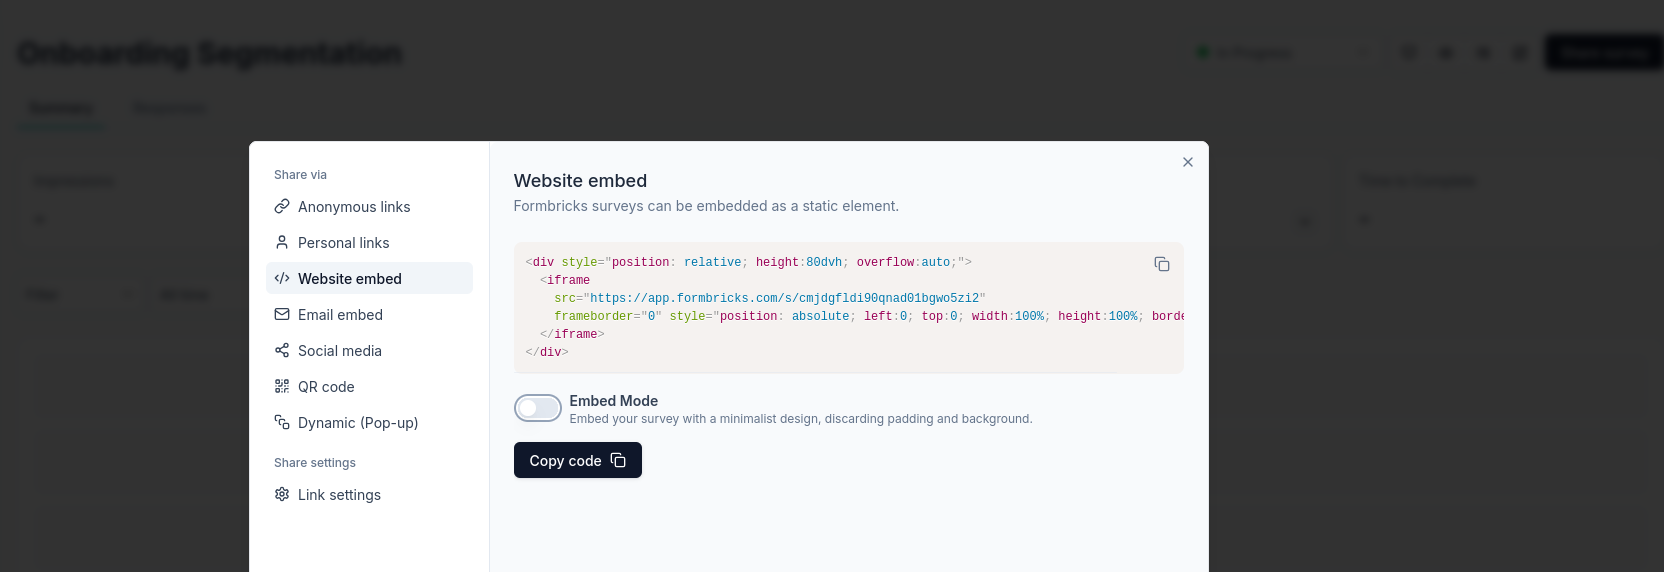
This time I added an astro component with a modal to open the survey:
https://github.com/JAlcocerT/diy-landing-boilerplate/blob/master/src/components/SurveyModal.tsx
Or just inline
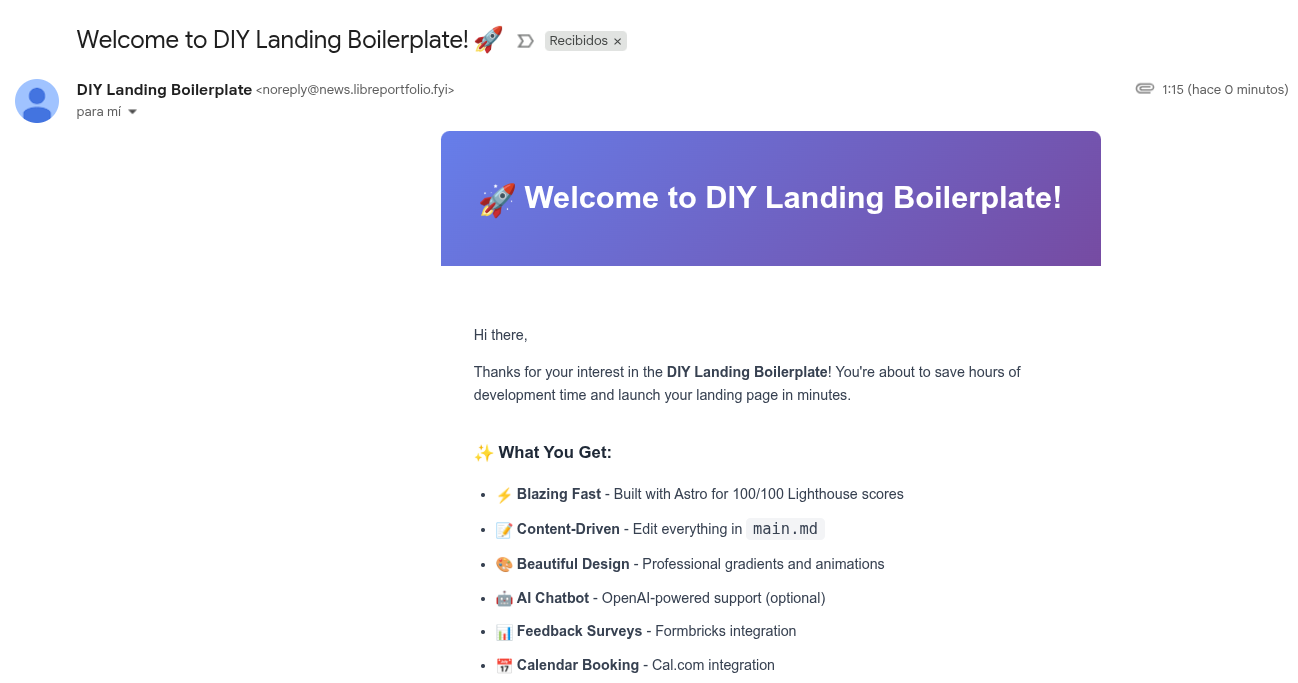
Sending via Mailtrap
As we did with such scripts.
But now with ts, you can have your astro component that sends emails:
npm install @mailtrap/api-clientMAILTRAP_API_TOKEN=your-token
MAILTRAP_SENDER_EMAIL=noreply@yourdomain.com #noreply@news.libreportfolio.fyiThere is a mermaid diagram of this on the associated CR2.
Aaaand…the templates work brilliantly: also with attachment!
You could add https://capjs.js.org/guide/alternatives.html as I tested here


Custom LogIns and Auth Guards
This could be driven via FireBase Auth.
But as this is supposed to be custom: I have tinkered here with my pocketbase instance and have an additional component that shows content if someone has logged in
But first…
In the context of web development, an Auth Guard is a security pattern that sits between a user’s request and a protected resource (like a dashboard, settings page, or an API).
Think of it as a digital bouncer standing at the door of a VIP lounge.
About Auth Guards… 🚀
Since you are using Astro, you have the choice of doing this on the Client (browser) or the Server (Middleware).
For a professional solo-dev project, you should almost always prioritize the Server approach.
- How the Auth Guard Works (The “Bouncer” Workflow)
The Auth Guard follows a four-step cycle to ensure your private data isn’t leaked:
- Intercept: The user tries to navigate to
/admin. - Inspect: The Guard looks for a “Proof of Identity” (usually a JWT Token or a Session Cookie).
- Validate: The Guard checks if that proof is valid and not expired.
- Decide: * Valid: The “Bouncer” opens the door (renders the page).
- Invalid: The “Bouncer” kicks them out (redirects to
/login).
- Types of Guards
Depending on how much security you need, you can implement different “levels” of guards:
A. The Route Guard (All or Nothing)
This protects an entire folder. If you aren’t logged in, you can’t see anything inside /admin/*.
- Best for: Admin panels, User Profiles.
B. The Feature Guard (Conditional UI)
This protects specific components inside a public page. For example, a “Delete” button that only appears if you are the owner of a post.
- Best for: Social features, Dashboards.
C. Role-Based Access Control (RBAC)
This is a more advanced guard. It doesn’t just ask “Who are you?”, it asks “What are you allowed to do?”
- Roles: Admin, Editor, Viewer.
- Best for: SaaS products with team permissions.
- Implementation Options in Astro
| Approach | Where it runs | Security Level | Pros | Cons |
|---|---|---|---|---|
| Middleware | Server | 🔒 High | No “flicker.” Secure against hackers. | Requires SSR (Server-Side Rendering). |
| Client-Side | Browser | ⚠️ Low | Easy to build with React/Vue. | Content “flickers” before the guard kicks in. |
| API Guard | Server | 🔒 High | Protects your database from direct attacks. | Only protects data, not the UI. |
- PocketBase vs. Firebase Auth Guards
Since you mentioned PocketBase and Firebase, here is how the guard pattern differs between them:
Firebase: Uses ID Tokens. The guard usually sends the token to Google’s servers to verify it. It’s very robust but can be slow because it requires an external “call” to Google.
PocketBase: Uses JWT Tokens. The guard can verify the token locally on your VPS very quickly. This makes your
/adminpages feel much faster.
- Why the “Auth Guard” is critical for your Admin Panel
Without an Auth Guard, your “Admin Panel” is just a URL that anyone can guess. Even if you don’t put a link to it on your homepage, a bot will eventually find yourdomain.club/admin.
By using an Astro Middleware Auth Guard, you ensure that the code for your admin panel is never even sent to an unauthorized user’s browser.
Would you like me to write a simple middleware.ts file that guards your /admin route using either Firebase or PocketBase?
Choosing where to store your data and how to handle users is the most important architectural decision for a solo dev.
Since you are using Astro SSR, you have the “superpower” of being able to swap these out later, but here is the breakdown of how they compare for a V1 launch.
- The “Auth Guard” Logic (Firebase vs. PocketBase)
Both allow you to protect routes (like /admin), but they feel very different to manage.
Firebase Authentication
Pros:
Zero Infrastructure: Google manages the servers; you just use the SDK.
Social Login: Adding “Login with Google” takes minutes.
Security: Industry-standard protection against brute force and leaks.
Cons:
Proprietary: You are “locked in” to Google’s ecosystem.
Complex SDK: The documentation can be overwhelming for a simple project.
PocketBase (Self-Hosted)
Pros:
All-in-One: You get a Database + Auth + File Storage in one single file.
Solo Dev Speed: The Admin UI is incredibly intuitive; you can see your users and data in a clean dashboard instantly.
Portability: Since it’s a single file, you can move your entire backend to a different VPS in seconds.
Cons:
Manual Scaling: You are responsible for keeping the server running and backed up.
Single-Threaded: It uses SQLite under the hood, so it’s not meant for millions of simultaneous users (though perfect for your boilerplate).
| Feature | Firebase + Sheets | Astro + SQLite/PocketBase |
|---|---|---|
| Philosophy | “Lego” (Connecting Services) | “Sovereign” (Owning the Stack) |
| Privacy | Shared with Google | 100% Private |
| Offline Dev | Hard (Needs internet) | Easy (Runs on your laptop) |
| Launch Speed | Faster for Auth | Faster for Custom Data |
| Cost | Free tier (can scale up) | Flat VPS cost (approx. $5/mo) |
Since your goal is a DIY Landing Boilerplate, the most “impressive” and “educational” stack to show off is:
- Astro + SQLite (for leads): It shows you know how to handle real data on a VPS.
- PocketBase (for the Admin Panel): It’s much more “indie-hacker” friendly than Firebase and fits the “DIY” theme perfectly.
- Google Sheets: Only use this if you want to show someone the leads without giving them access to your VPS.
Would you like me to show you the docker-compose.yml that runs both Astro and PocketBase together so they can talk to each other?
PB Login and Obfuscated Components
As I have my pb instance at: https://pocketbase.jalcocertech.com/_/
It was all a matter of another CR to bring an AuthForm based on PB and another component with protected content that only logged in people can see.
npm install pocketbase
#npm run dev -- --hostPOCKETBASE_URL=http://127.0.0.1:8090 #https://pocketbase.jalcocertech.com/ #without /_/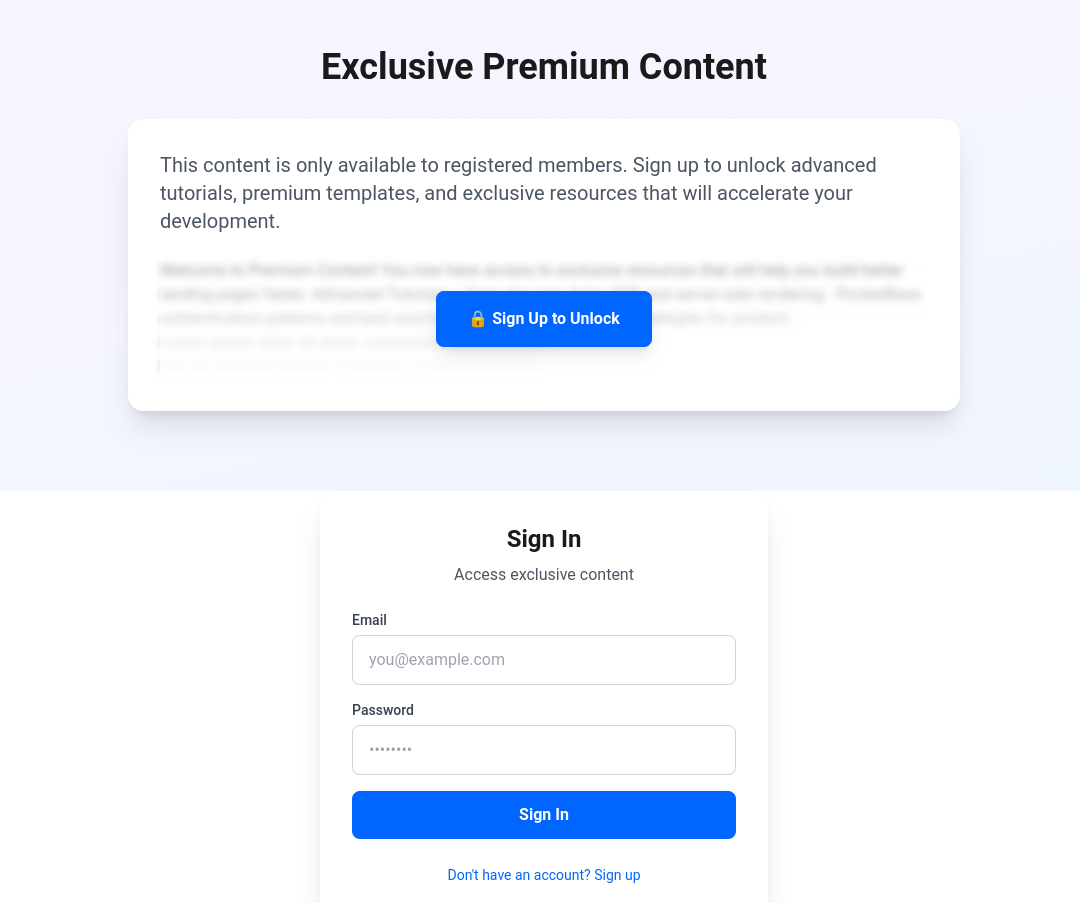
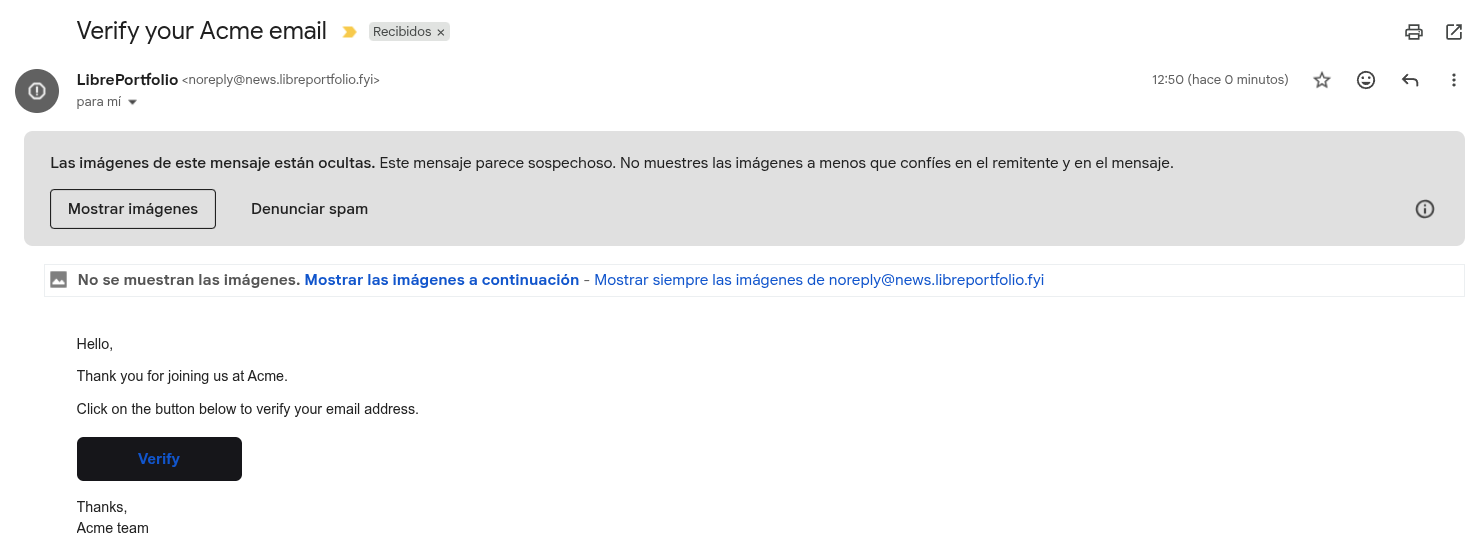
If you configured Pocketbase Mail settings, you can get emails verified as well.
- https://pocketbase.jalcocertech.com/_/#/settings/mail
- https://jalcocert.github.io/JAlcocerT/email-verification-pocketbase/
- https://docs.stripe.com/products-prices/pricing-models
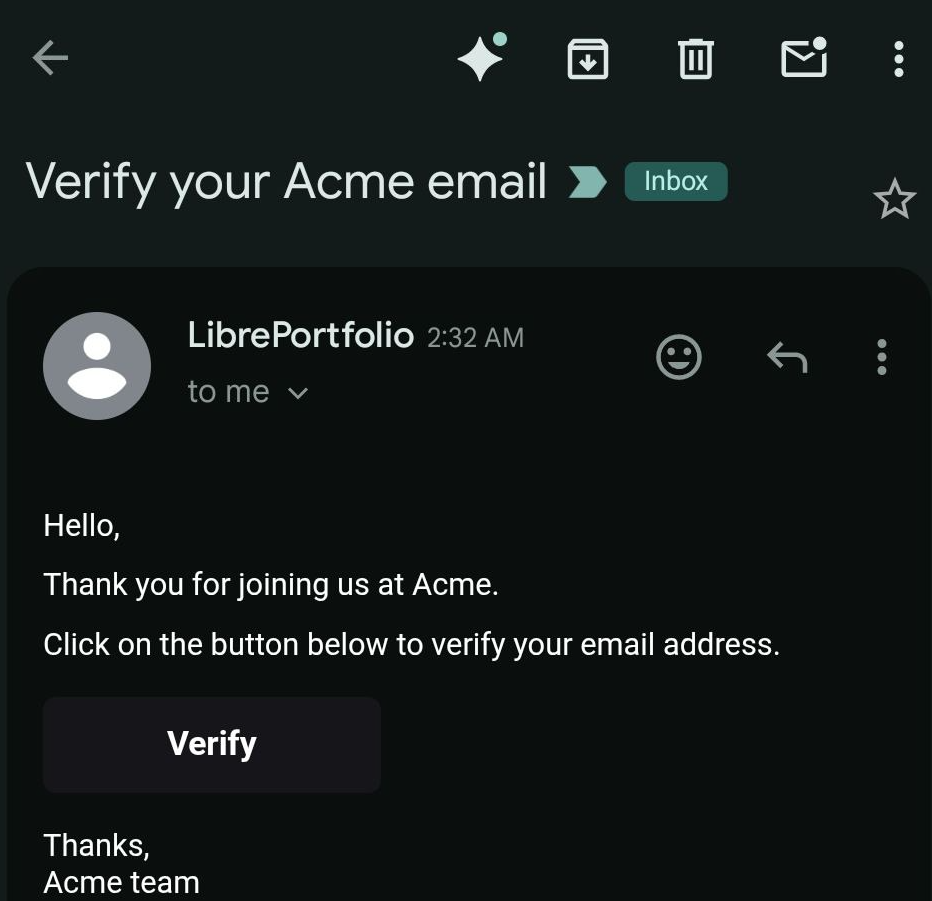
{APP_URL}/_/#/auth/confirm-verification/{TOKEN}<p>Hello,</p>
<p>Thank you for joining us at {APP_NAME}.</p>
<p>Click on the button below to verify your email address.</p>
<p>
<a class="btn" href="{ACTION_URL}" target="_blank" rel="noopener">Verify</a>
</p>
<p>
Thanks,<br/>
{APP_NAME} team
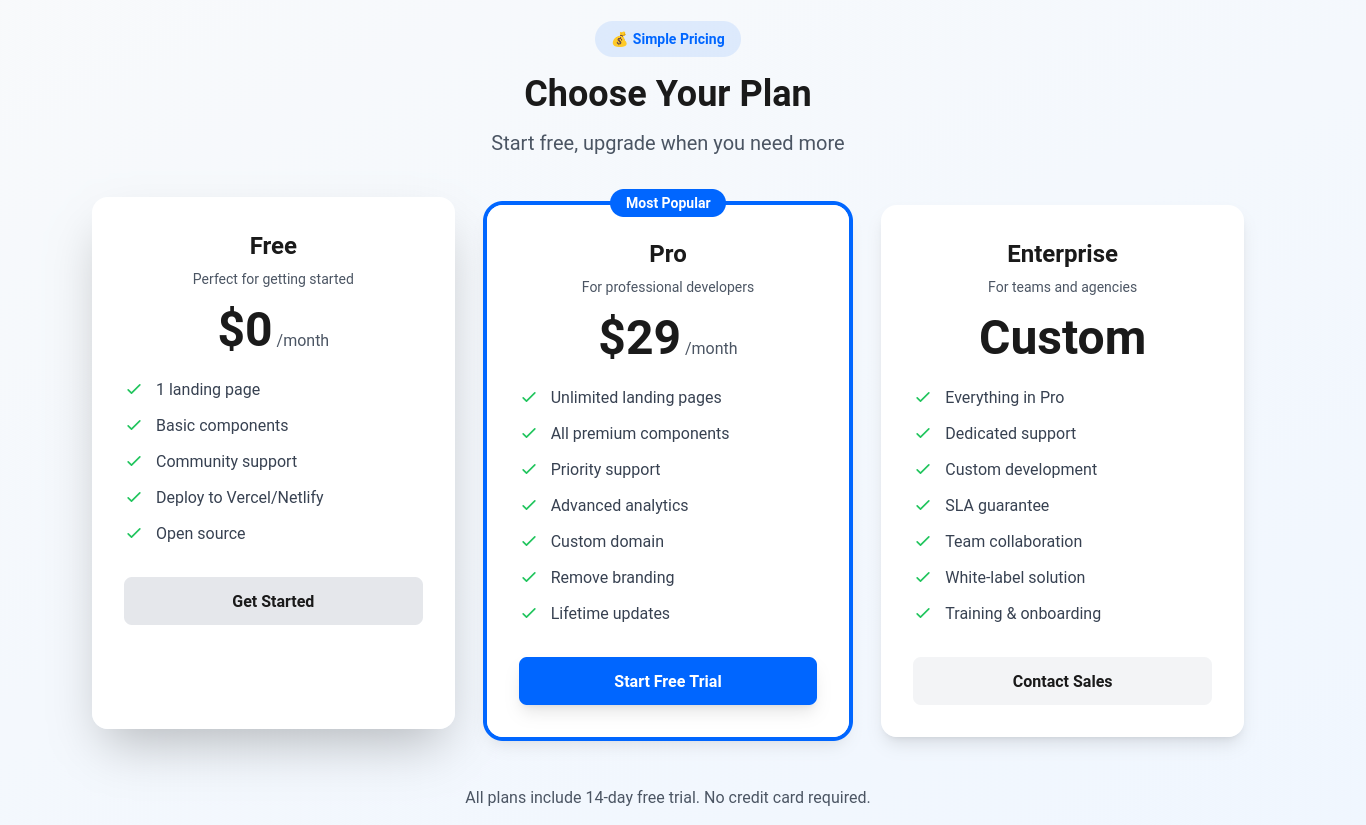
</p>A Pricing Component with Stripe Info
So…what else are we missing?
How about making easy to configure the copy of your offer?
And let you configure those magic numbers via stripe for each tier?
As they will be separated products with a link, why not pulling such data dynamically?
You modify in Stripe, and it flows to your site :)
This would do a similar trick as configuring forms or cals via their SaaS.
It scales pretty nicely.
For now, all main.md based pricing component:
Other Components
trusted by and logos
stats/metric section
yt video component and cloudflare r2 video component
before & after slider
a sticky cta banner or…a not so trol slider this time!

- e-book ~ page driven by markdown
So that you can replicate such lead magnets https://mailchi.mp/8bf0b0f59967/crowdlending-para-novatos
And get that better diy.jalc or real output from ebook-ideas.
- A short ~ 30s video Sales video like
https://thebigschool.com/master-ia/
Conclusions
You can think of it this way: Listmonk (the EMP) is your operating system for managing lists…
Mailjet (the ESP/SMTP) is your high-performance engine that ensures your emails actually reach the inbox.
And your landing page is what your potential clients see and get to know about you within 5 seconds.
For me, getting this ready is just a matter of:

git clone https://github.com/JAlcocerT/diy-landing-boilerplateAnd you can get working too: if you really have the need
SelfHosted Landing Repo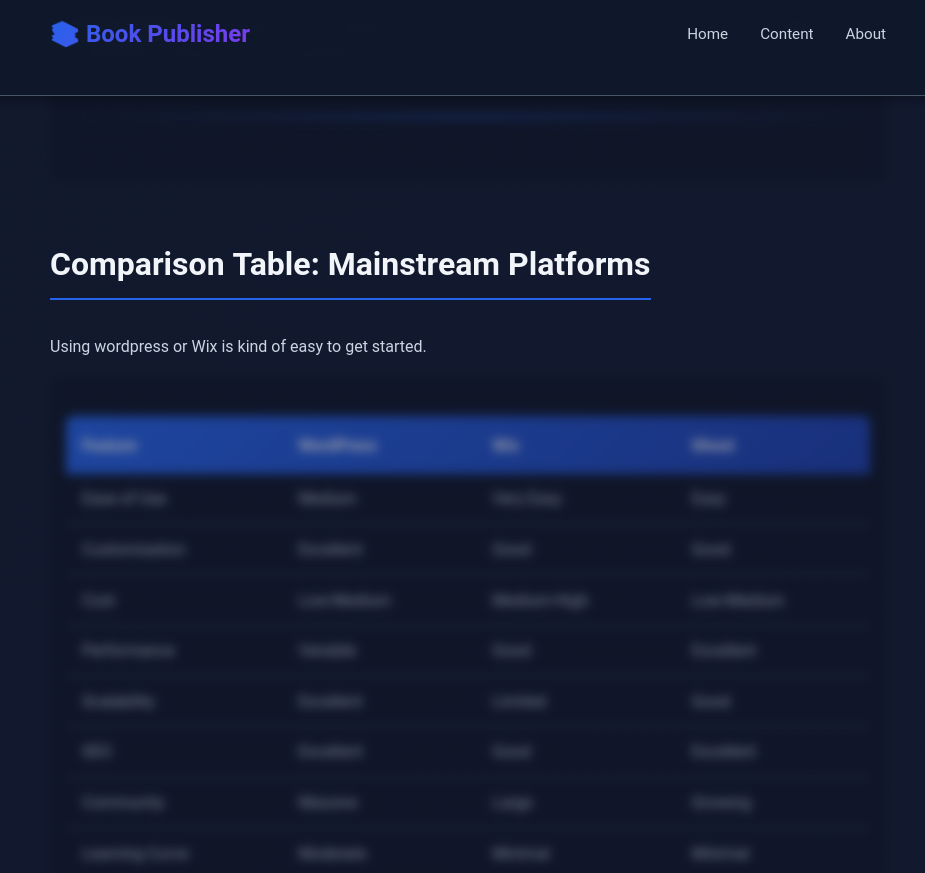 DIY webs via webook
flowchart LR
    %% --- Styles ---
    classDef landing fill:#E3F2FD,stroke:#1976D2,stroke-width:3px,color:#0D47A1;
    classDef steps fill:#F3E5F5,stroke:#7B1FA2,stroke-width:2px,color:#4A148C;
    classDef slider fill:#FFF3E0,stroke:#F57C00,stroke-width:2px,color:#E65100;
    classDef free fill:#E8F5E9,stroke:#388E3C,stroke-width:3px,color:#1B5E20;
    classDef consult fill:#FFECB3,stroke:#FFA000,stroke-width:3px,color:#FF6F00;
    classDef dfy fill:#FFCDD2,stroke:#D32F2F,stroke-width:3px,color:#B71C1C;

    %% --- Nodes ---
    START("🏠 Landing Page
(Hero + Value Prop)"):::landing
    STEPS("📋 Read Process
(3-Step Guide)"):::steps
    SLIDER("🎚️ Interactive Slider
(Assess Time Value)"):::slider

    FREE("📚 FREE Path
(DIY Guides)"):::free
    CAL("📅 Consulting
(Book Session)"):::consult
    DFY("💎 Done For You
(Premium Service)"):::dfy

    %% --- Flow ---
    START --> STEPS
    STEPS --> SLIDER

    SLIDER -->|"0%
I'm Learning"| FREE
    SLIDER -->|"1-74%
A lot!"| CAL
    SLIDER -->|"75-100%
Lambo Money"| DFY

    %% --- Outcomes ---
    FREE -.->|"Explore FAQ"| END1["📖 Self-Learn"]
    CAL -.->|"Book Time"| END2["🤝 Get Guidance"]
    DFY -.->|"Check Resources"| END3["⚡ Fast Track"]
My Offer after DIY Landing
This diy landing based on astro components is enhancing my DIY and will be promoted towards the PaaS offering:
flowchart LR
    %% --- Styles ---
    classDef free fill:#E8F5E9,stroke:#2E7D32,stroke-width:2px,color:#1B5E20;
    classDef low fill:#FFF9C4,stroke:#FBC02D,stroke-width:2px,color:#F57F17;
    classDef mid fill:#FFE0B2,stroke:#F57C00,stroke-width:2px,color:#E65100;
    classDef high fill:#FFCDD2,stroke:#C62828,stroke-width:2px,color:#B71C1C;

    %% --- Nodes ---
    L1("Free Content
(Blog/YT $0)"):::free
    L22("DIY
(diy ebook $0) "):::free
    L2("DIY NEW
(Boilerplate/Template) one time $"):::free
    L3("Done With You
(Consulting) $$"):::free
    L4("Done For You
(Services) $$$"):::low
    L44("DIY (1b)
Slubne - 0 to one time $"):::low

    %% --- Connections ---
    L1 --> L2
    L1 --> L22
    L1 --> L44
    L2 --> L3
    L3 --> L4
Tech Talk - Shipping Apps as a BA
I cant believe more BAs / non technical users are not creating/shipping like crazy.
git clone https://github.com/JAlcocerT/slidev-editor
#git branch -a
#git checkout -b logtojseauth main
FAQ
Lead Generation vs Long Form Sales
Yes, what you are building is essentially a long-form sales page, though in the tech world, we often call it a Product Landing Page.
The difference between a “short” page (just a headline and an email box) and a “long” page (like yours) is the level of education required.
Since you are asking someone to change their workflow (from WordPress to Astro), you need the extra length to handle their objections and build trust.
What is a Click-Through?
In marketing, a Click-Through (CT) is the physical act of a user clicking a link or a button that takes them from where they are (an ad, an email, or your Hero section) to the next step in your funnel.
1. Click-Through Rate (CTR)
This is the math behind the click. It is the percentage of people who saw your button and actually clicked it.
- Example: If 100 people visit your landing page and 5 people click “Get the Boilerplate,” your CTR is 5%.
2. The “Click-Through” vs. “Conversion”
It is important to distinguish these two:
- Click-Through: “I’m interested enough to see what’s next.” (e.g., clicking a ‘Learn More’ button).
- Conversion: “I have completed the goal.” (e.g., actually submitting the email form or booking the calendar).
Is your page a “Long Form Sales” page?
Yes, and here is why that is the right choice for a DIY Boilerplate:
High Consideration: Switching tech stacks is a big decision. A short page doesn’t give a developer enough “meat” to trust the tool.
Objection Handling: Developers are skeptical. You need the long form to explain why Docker is used, how Zod works, and why SQLite is enough.
The “Scroll” is the Filter: In long-form sales, the further a user scrolls, the more “qualified” they become. If they reach the Email Form at the very bottom after reading everything, they are a much higher-quality lead than someone who just clicked a popup.
| Element | Optimization Goal |
|---|---|
| Primary CTA Button | Use a contrasting color (e.g., Bright Orange or Green) so it’s the first thing the eye sees. |
| Button Copy | Instead of “Submit,” use action-oriented words like “Claim my Boilerplate” or “Start Building.” |
| Micro-Copy | Add a small note under the button like “No credit card required” to reduce the “fear” of clicking. |
Since you have the “long form” structure ready, the most important thing is to make sure your Primary CTA (the one in the Hero) and your Final CTA (the Email Form) stand out visually.