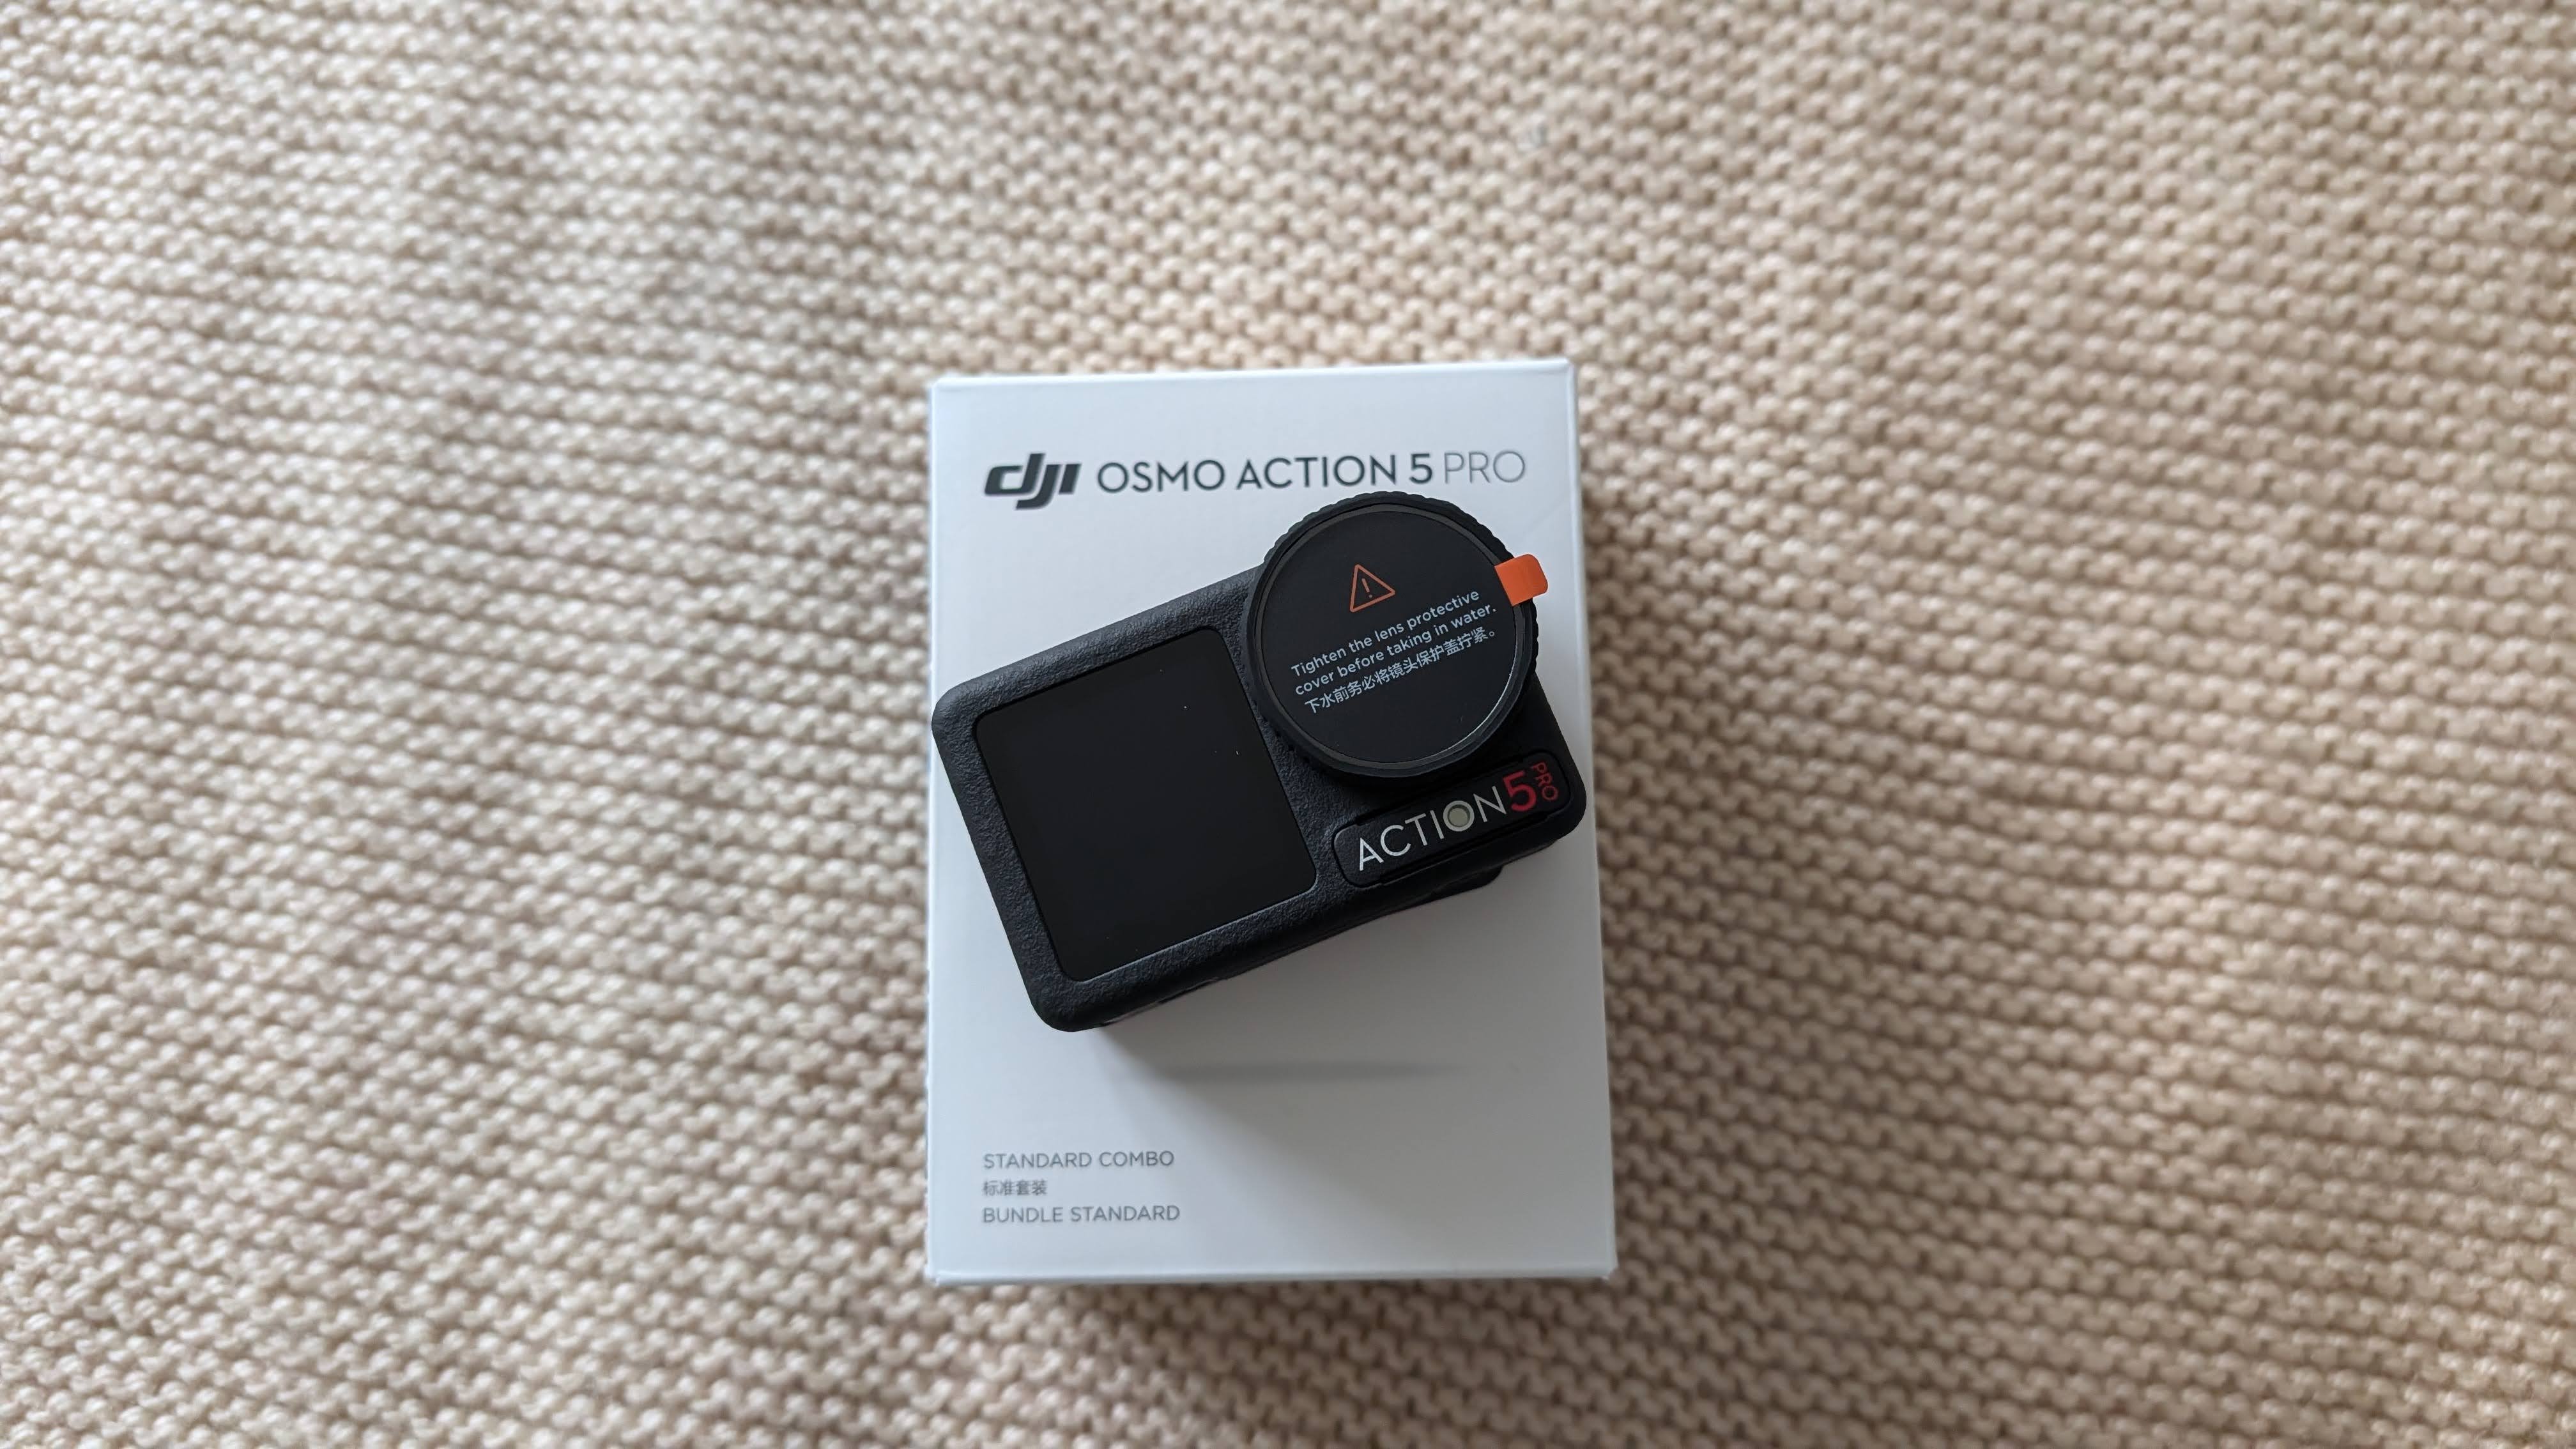
DJI OA5 pro Firmware Updates
Intro
I made a quick firmware updates to the osmo action 5 pro.
The idea is to enable the bit rate selection.
Updating OA5Pro Firmware
Bitrates Improvements
Bit rate refers to the amount of data processed or transmitted over a period of time, usually measured in bits per second (bps) or its larger units like kilobits per second (kbps) or megabits per second (Mbps).
For example, in video or audio, the bit rate determines the quality and file size:
- A higher bit rate generally means better quality (because more data is used to represent the video/audio) but also a larger file size.
- A lower bit rate typically results in poorer quality but a smaller file size.
It controls how much detail is retained in the video or audio, and it directly affects how large the file will be and how smooth it will play.
About OA5Pro Videos
Before firmware update (only one, default bit rate):
| Image Quality | Space (per second) | Space (30min) | Bit Rate | Battery |
|---|---|---|---|---|
| 1080p@30fps | 4MB/s | 7200MB | To be filled | — |
| FHD - 1080@60fps/RS+/UW | 5MB/s | 9000MB | To be filled | — |
| 2.7k@30fps/RS/UltraWide | 5.6MB/s | 10080MB | To be filled | — |
| 2.7k@30/RS+/UW | — | — | To be filled | — |
| 4K@25/RS/UW | — | — | To be filled | — |
| 4K@48 | 7.5MB/s | 13500MB | To be filled | — |
| 4k@100/RS+/UW | — | — | To be filled | 10% for 10min |
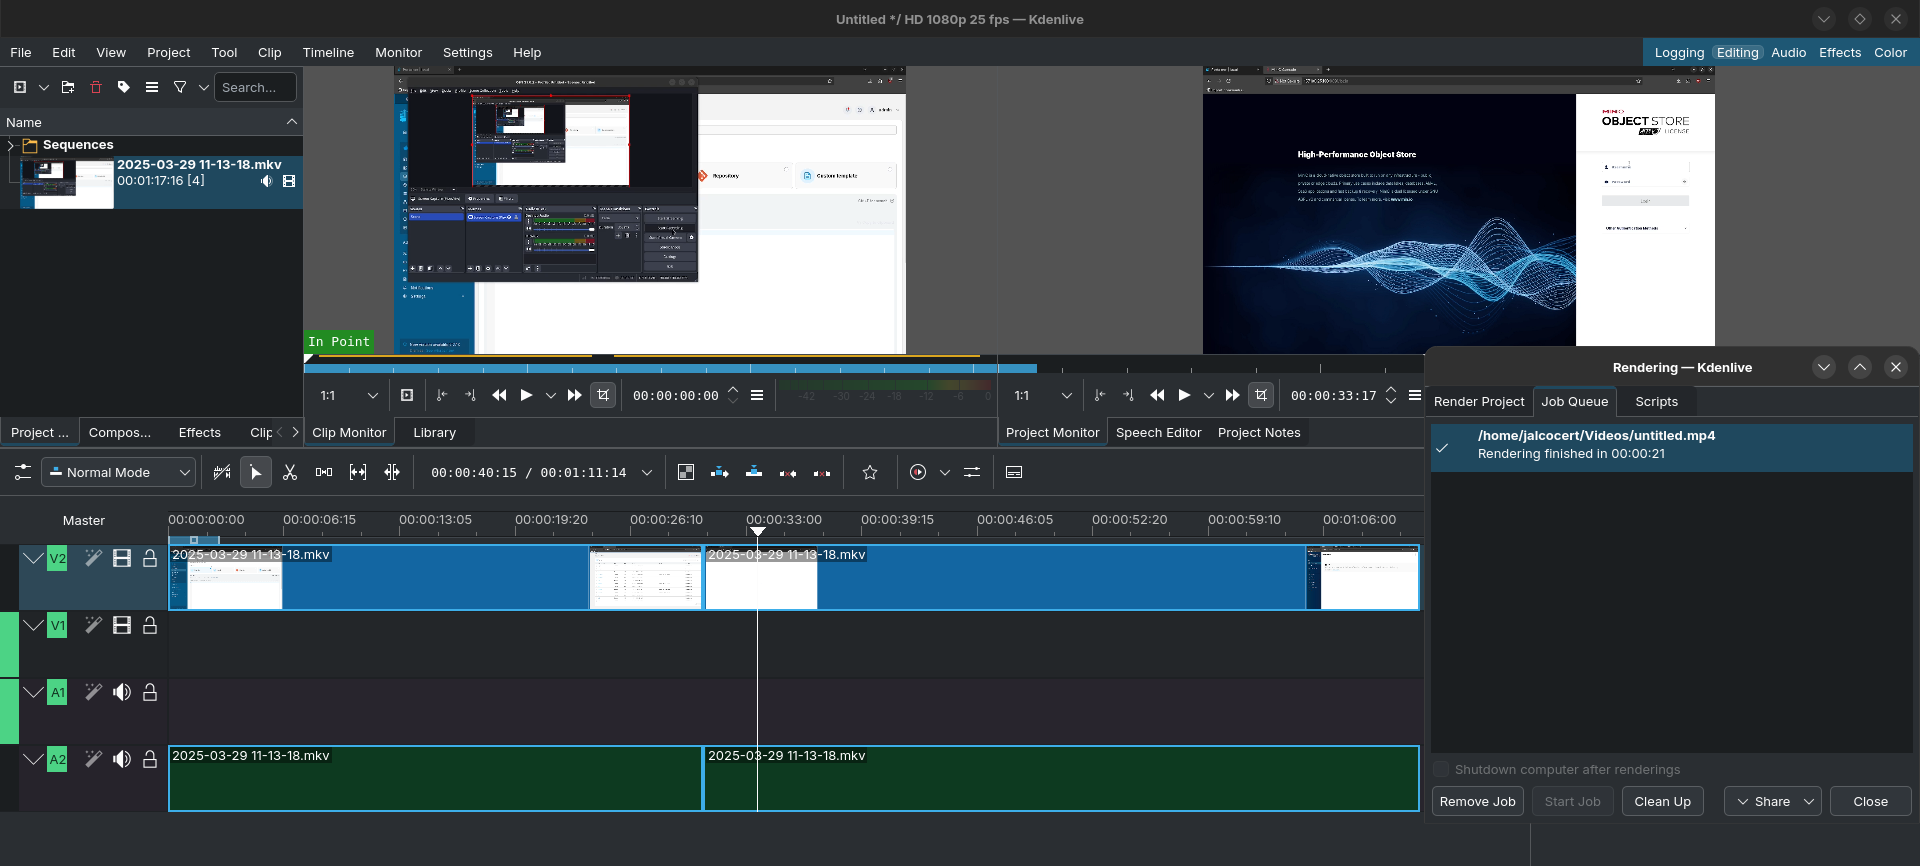
Video Workflow
But there is live beyond the CLI.
And I have been getting pretty confortable with KDEnlive for basic usage.
KDEnLive
Cutting a Video:
Sto selectXto activate the slicer to cut video when selected the timeframe
And here you have few more tricks I found interesting.
CTRL + Shift + G- to ungroup and being able to remove audio only from a video- Audio fade out is a good choice to finish the audios
Once muted, you can use Youtube free licensed music for your videos - https://www.youtube.com/audiolibrary
Rotate & Zoom in KDenLive 📌
1. Using the “Rotate” Effect:
- Import your video: Drag and drop your video clip onto the Kdenlive timeline.
- Apply the “Rotate” effect:
- Right-click on the video clip in the timeline.
- Select “Apply an Effect” >
Transform. - The “Properties” window will open. Select the “Rotate” tab.
- Adjust the rotation:
- Use the slider or enter “900” in the “Rotate X / Y / Z” field. (Note: Kdenlive uses units of 1/10th of a degree).
- Preview and adjust:
- Play the video to preview the rotation.
- Adjust other parameters like scaling or cropping as needed.
- Render your video:
- Once you’re satisfied, render the project to export the rotated video.
Overlay a Video in KDenLive 📌
1. Place Videos on the Timeline
- Main Video: Drag and drop your main video clip onto the bottom video track.
- Overlay Video: Drag and drop the overlay video clip onto the top video track.
2. Adjust Overlay Position and Size
- Select Overlay Clip: Click on the overlay video clip in the timeline.
- Transform Effect: Right-click on the overlay clip and select “Add Effect > Video Filters > Transform.”
- Adjust Parameters: In the “Transform” effect settings, you can:
- Resize: Adjust the width and height of the overlay video.
- Position: Move the overlay video within the frame using the X and Y coordinates.
- Rotation: Rotate the overlay video if needed.
3. Control Overlay Appearance (Optional)
- Opacity: Adjust the opacity of the overlay video in the “Transform” effect settings to make it more or less transparent.
- Blending Modes: Experiment with different blending modes (e.g., “Screen,” “Overlay,” “Multiply”) in the “Transform” effect settings to achieve various visual effects.
Key Considerations:
- Video Formats: Ensure that both videos have compatible formats and frame rates for smooth playback.
- Timeline Order: The video on the top track will appear on top of the video on the bottom track.
- Keyframing: Use keyframes within the “Transform” effect to animate the position, size, or opacity of the overlay video over time.
Adding Text in KDenLive 📌
1. Create a Title Clip
- Right-click in the “Project Bin” and select “Add Title Clip.”
- This will open a new window for you to design your text.
2. Add Your Text
- Click anywhere within the canvas area of the title window.
- Type your text.
3. Customize the Text
- Font: Choose from a variety of fonts installed on your system.
- Size: Adjust the font size to suit your needs.
- Color: Select a color for your text.
- Alignment: Align the text (left, center, right).
- Effects:
- Bold/Italic: Apply bold or italic styles.
- Outline: Add an outline around the text for better visibility.
- Shadow: Create a shadow effect behind the text.
4. Adjust the Title Clip
- Duration: Control how long the text appears on the screen by adjusting the duration of the title clip in the timeline.
- Position: Move the title clip within the timeline to determine when it appears in your video.
- Effects (Optional):
- Transitions: Apply transitions (like fade in/out) to the appearance of the text.
- Animations: Use keyframes to animate the position, size, or opacity of the text over time.
5. Place the Title Clip in the Timeline
- Drag and drop the title clip from the “Project Bin” onto the timeline.
- Make sure it’s on a track above your video clips.
6. Preview and Render
- Preview your video with the added text to see how it looks.
- Render your project to export it as a finished video file.
Tips:
- Keep it Simple: Avoid overly complex text overlays that can distract viewers.
- Readability: Choose font sizes and colors that are easy to read on your video background.
- Less is More: Use text sparingly and only when it adds value to your video.
By following these steps, you can effectively add text overlays to your videos in Kdenlive to convey information, enhance storytelling, or add visual interest.
Speed Up video in KDenLive 📌
Using the “Speed” Effect:
- Right-click on the video clip in the timeline.
- Select “Apply an Effect” > “Motion” > “Speed.”
- Adjust the speed:
- Use the slider or enter a value in the “Speed” field.
You can also record an audio voice cover on KDEnlive:
And blur some area thanks to the Obscure effect
CTRL+Enter to render the video.Rendering 3 files 4K60fps@60,2Mbit/s (3840x2160) 9.1GB video (~20 min video) from the GoPro took ~3h with the X300.
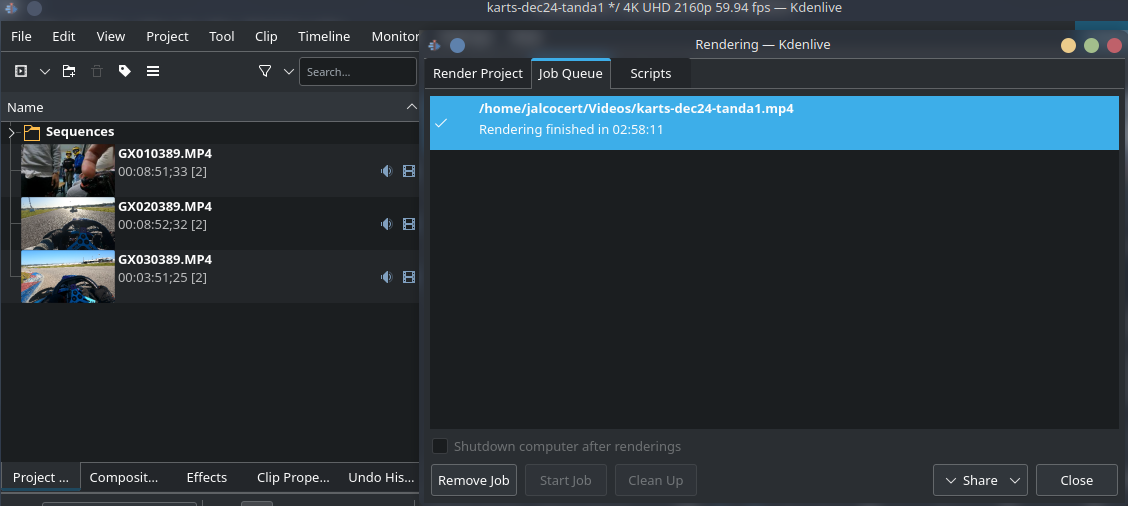
It was rendering at ~6fps, so be patience, these depeneds on your CPU.
ShotCut
As an alternative to KDenLive.
flatpak install flathub org.shotcut.ShotcutOBS
flatpak install flathub com.obsproject.StudioIm recording on a Dell 25` (2560x1440 16:9).
OBS Settings -> Output MPEG4
.mp4and codec x264.
Youtube Tricks
Text2Speech, Speech2Text…
Get the mp3, make it text and then AI audio with OpenAI 📌
If you have rendered it as .mp4:
sudo apt install ffmpeg
ffmpeg -i video.mp4 audio.mp3
Then, pass that .mp3 to OpenAI, to get the speech:
Finally, do Text2Speech, also with OpenAI:
Descriptions
Youtube descriptions allow to use some kind of simplified markdown, like this:
You can also get some diagram help from MermaidJS and include it in your video:
YT Description Example 📌
timeline title Local LLMs with Ollama Pre-Requisites : Install VSCode : Install Docker 🐋 : Install Portainer Covered in This Video : Ollama Project Context : Deploy Ollama with Docker : Ollama with Orca LLM 🐬 : Extra Ideas - Ollama with Python Enjoy! : Chat with your fav LLMs 🐔 🦙 🐬 …
In this video I will show you how to use LLMs locally the way a DevOps would.
We are going to use the Ollama project, and we are going to SelfHost it with Docker. Then, we will choose a Free Large Language Model (Orca mini) and see how to interact with it in different ways:
- Through containers terminal
- With http request
- With Python with the help of LLama-Index
Ollama Project Overview 0:00 Important mentions 1:27 A summary without spoilers The video 2:20 The mystery The video 4:37 The end! Outro 5:00 Full summary
The Ollama image is ready to work in bot x86 and ARM64 devices, so we can apply all what we learn today on regular laptops, servers or SBC.
🔗 Gist with All Code and Commands used in the video: https://gist.github.com/JAlcocerT/5c406a4f1d18a57469815fa0ef9d6a07
💻 The Project Official Web : https://ollama.ai/ LLM used: https://ollama.ai/library/orca-mini
Project Source Code: https://github.com/jmorganca/ollama Project Docker Image 🐋: https://hub.docker.com/r/ollama/ollama
🌟 Resources you might be Interested 🌟
SelfHost NGINX to provide https to Ollama: https://fossengineer.com/selfhosting-nginx-proxy-manager-docker/
LLama-Index (Pypi): https://pypi.org/project/llama-index/
LogSec: https://github.com/logseq/logseq
Home Assistant: https://github.com/home-assistant
👉 What Software have I used during the video?

It is all Free Software that you can install in Windows/Mac/Linux:

Docker: https://docs.docker.com/get-docker/
Portainer to manage the containers with UI: https://fossengineer.com/selfhosting-portainer-docker/
VSCodium to create the Dockerfile: https://vscodium.com/
Fixed Comment
Image Caption
You can use inkscape, gimp to create a catchy image:
#https://flathub.org/apps/org.inkscape.Inkscape
flatpak install flathub org.inkscape.Inkscape
or, if you have an image already but it is bigger than 2.5mb, you can use CLI to reduce the image:
#sudo apt install imagemagick
convert too_big_image.jpg -quality 50% output_image.jpg #ok to upload to YT
Conclusions
At OA5Pro settings, after the firmware update, I have:
- Firmware Version
01.03.02.10 - And Camera Firmware Version
10.00.11.62
OA5Pro vs GoProHero9
I was testing together with a friend our action cams.
We both recorded at 4k60
- GoPro cuts the files at ~3.7GB (the OA5Pro at ~17GB)
Files has an interesting naming with the GoPro: GX010389, then it would go the GX020389…
- The bit rate when recording at 4K60 is ~60.2Mbit/s with a GPH9.
The OA5Pro now is ~100Mbit/s (when bit rate is selected as high.)
- The GoPro has GPS - Which allow us to do cool analysis with python
Extracting Telemetry Data from GPH9
Extracting data from action camera .MP4 files.
It all started with PhyPhox and PyRouteTracker
- Telemetry With CLI
sudo apt-get install libimage-exiftool-perl
exiftool -ee ./GX030390.MP4
#exiftool -ee ./GX030390.MP4 > output.txt
If you do similarly with a OA5Pro video, the output is much more reduced
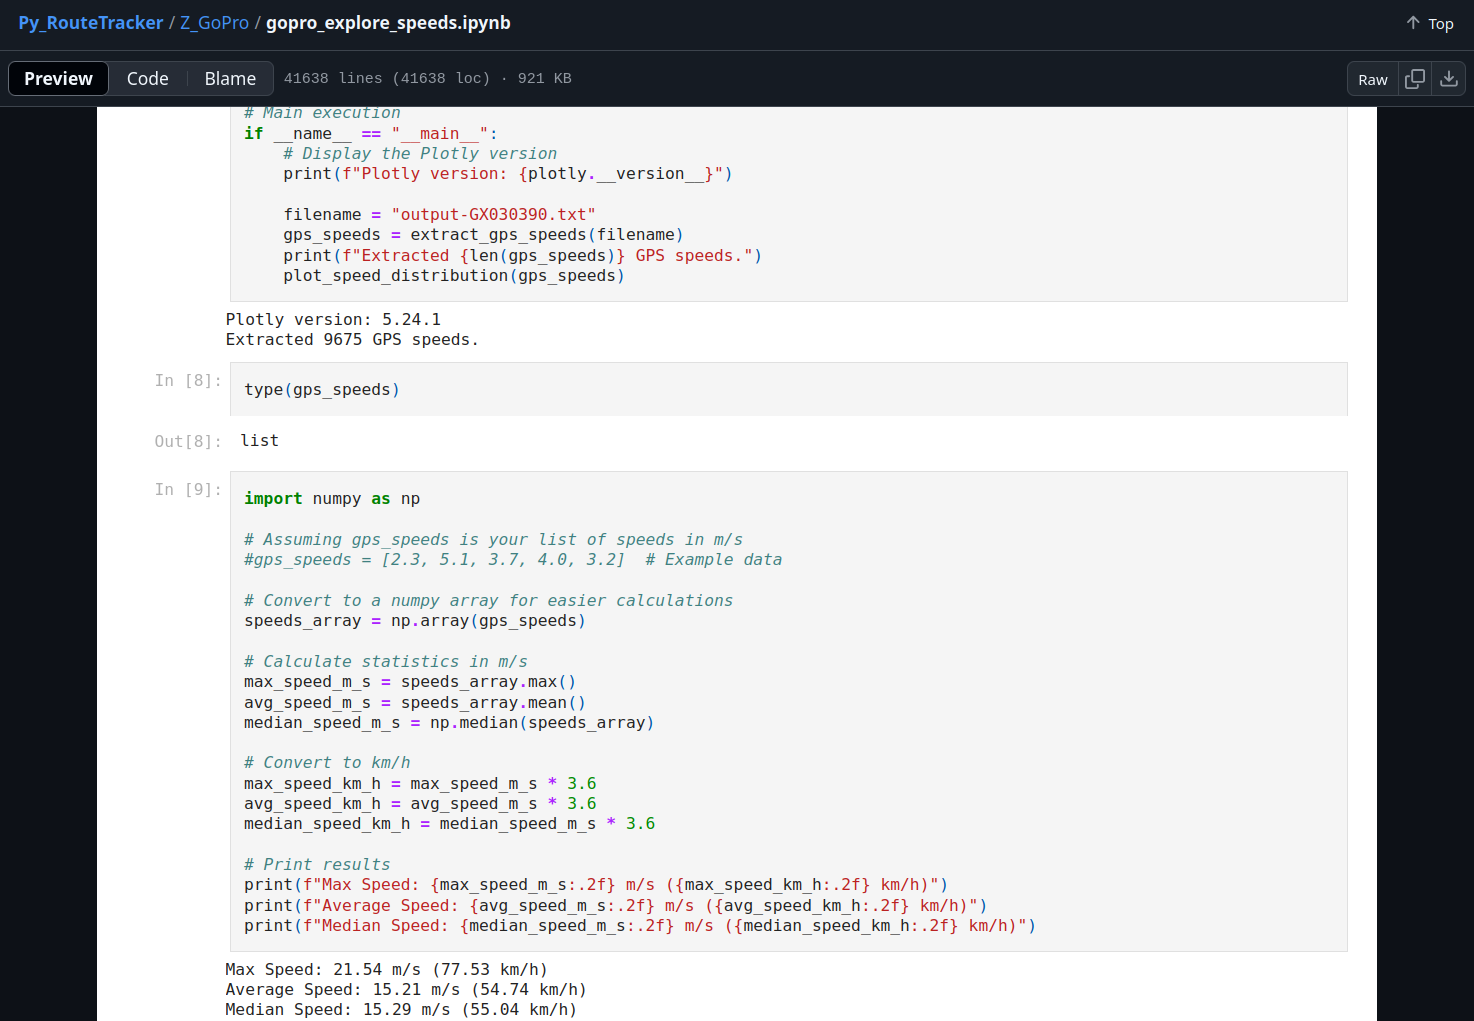
exiftool -ee ./DJI_20241008163958_0031_D.MP4 #no GPS - no partyYou can play with the output.txt with Python and Plotly, to get such graphs from the GoPro:
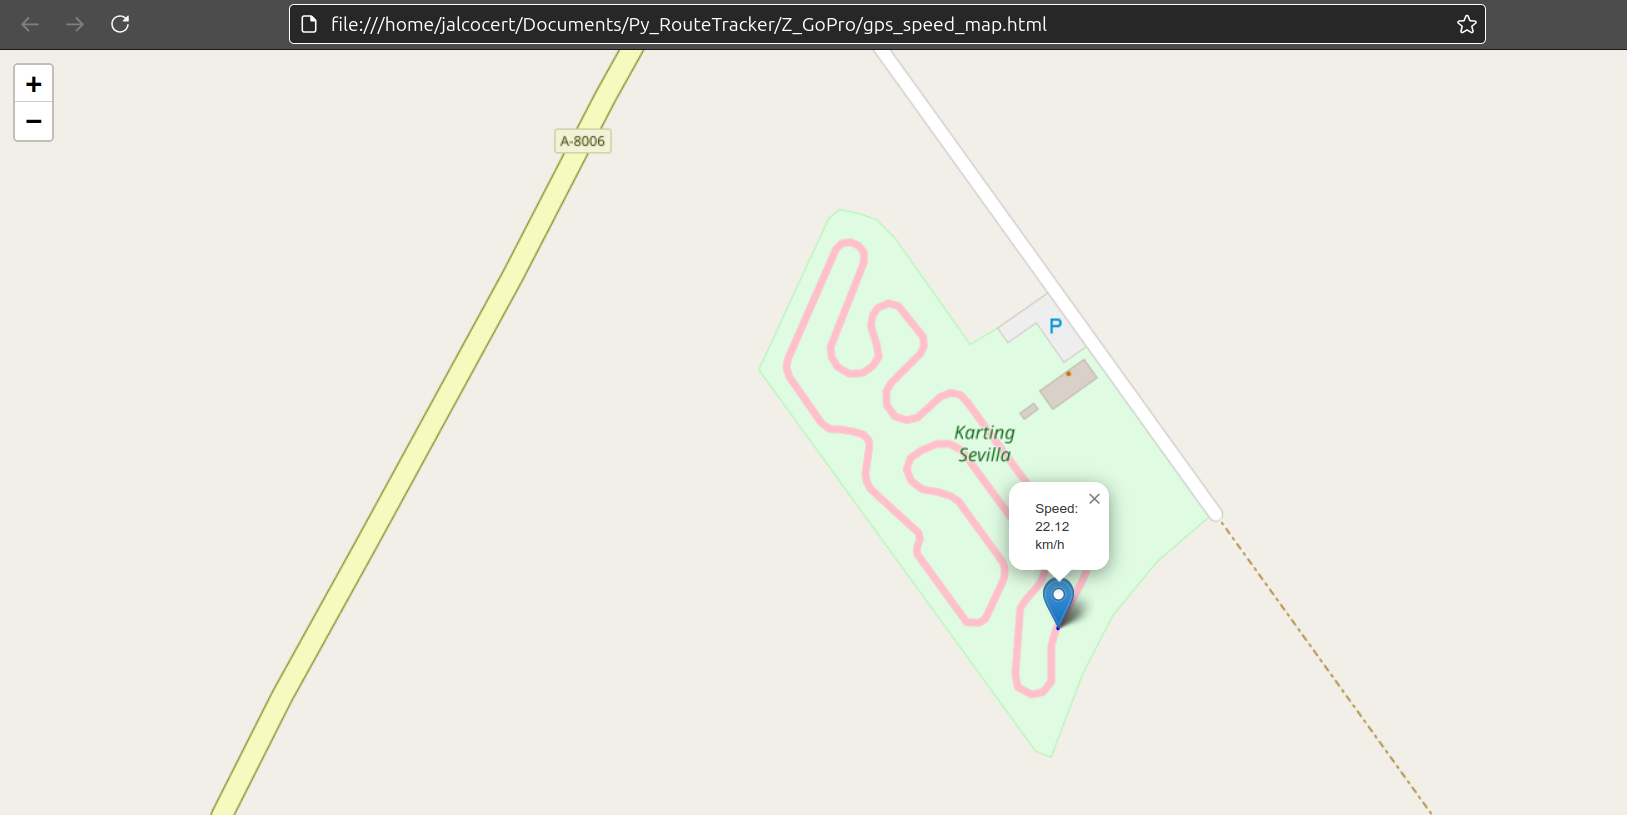
Having a look to the metadata extracted as txt, you will find:
- Time Stamp: 1064.147904 (GPS Date Time: 2024:12:27 15:27:07.070)
- GPS Latitude : 37 deg 33’ 29.53" N GPS Longitude : 5 deg 55’ 58.86" W GPS Altitude : 0.707 m GPS Speed : 13.204 GPS Speed 3D : 13.14 Camera Temperature
Time Stamp : 1066.12768
Between each timestamp, there are ~13 on avg records of GPS speed.
![]()
- You can also try with GoPro’s VIRB editor and with GyroFlow. Both Apps with GUI.
Thanks to
For explaining the OA5 Pro firmware update process:
FAQ
Out of Space?
df -h | awk '$5 > "5G" {print $0}' #list the partitions greater than 5GBTransfer Speeds
The USB-c on my x13 laptop can transfer ~250mb/s to an external ssd 2280 nvme drive.
But, when pulling video from the OA5Pro:
- via USB ~25mb/s
- via USB-c ~28mb/s
You can also see them with rsync CLI
SD Card Speed is important! 📌
V10 and V30 are ratings that refer to the write speed of a memory card, specifically SD cards. This is important for recording video and capturing photos, as it determines how quickly data can be stored on the card.
You might also see the Class 10 (C10), similar to V10 at ~10MB/s (previous standard for FHD video - 1080/30)
- V10: This means the card has a minimum sustained write speed of 10 MB/s (megabytes per second). It’s suitable for recording Full HD (1080p) video and taking photos, but might struggle with higher resolutions or faster frame rates.
I have a Samsung Evo Plus stating its V10
- V30: This means the card has a minimum sustained write speed of 30 MB/s. It’s better suited for recording Full HD video at higher frame rates and can handle basic 4K video recording.
In simpler terms: V30 cards are faster than V10 cards. This means they can handle more data being written to them in a given time, which is important for higher quality video and photos.
Here’s a table summarizing the key differences:
| Feature | V10 | V30 |
|---|---|---|
| Minimum write speed | 10 MB/s | 30 MB/s |
| Suitable for | Full HD video, photos | Full HD high frame rate, basic 4K video |
Which one should you choose?
- If you mainly take photos and record standard Full HD video, a V10 card might be sufficient.
- If you record Full HD video at high frame rates or want to start recording 4K video, a V30 card is recommended.
Keep in mind that other factors like card capacity and read speed also play a role in overall performance.
The limitant is the internal memory / the SD card im using with the osmo camera.