Engineering 102 with fpv kpis
Tl;DR
Putting together an iot-dashboard v2 that now also controls a BLDC waterpump
Intro
- Why Im writting this post: bc I want to consolidate the 0-6-0 oss mbsd fwk notes, the electronics x water and these fpv kpi learnings
- What Ive learnt with it: Ive ended up sending for manufacturing STLs for the first time
Coming from this post.
npm install -g @openai/codex@latestI found https://github.com/qunabu/Gravity
which is statically deployed to https://qunabu.github.io/Gravity/ with narration and smooth transitions powered by TypeScript + Three.js + Vite. It reminded my to some nice physics animations
Thought around escape velocity and optionality, anyone?
Now tell me thats not inspiring and superseeding my poincare lab: https://the-poincare-lab.pages.dev or my solar trajectory tracker
#git clone /ThreeBodies
cd ./ThreeBodies/ThePoincareLab

make deploy #https://the-poincare-lab.pages.dev/
MBSD
This year I tinkered within this repo: https://github.com/JAlcocerT/mbsd
First migrating matlab to python for mbsd, later with some NVH, 0D thermodynamics and fluid mechanics applied to a ICE.
To the initial renders with cadquery, i upgraded:
cd ./mbsd/integrated-engine-lab
make render
#cd ./build/renders
Recently made a recap with some improvements on the flow:
scp "jalcocert@192.168.1.2:/home/jalcocert/mbsd/integrated-engine-lab/build/renders/*.mp4" .
#ffmpeg -stream_loop 4 -i "engine_lab.mp4" -c copy "engine_lab_looped_5x.mp4"
scp "jalcocert@192.168.1.2:/home/jalcocert/mbsd/integrated-engine-lab/extensions/build/renders/*.mp4" .
#ffmpeg -stream_loop 10 -i "layout_ar_atlas.mp4" -c copy "layout_ar_atlas_5x.mp4"
How could i not output some videos
This was a good oportunity to use Typst > Latex to recap what I did.
Then, I wanted to make this available:
Have been progressing with the roadmap: https://multibodysystemsdynamics.com/roadmap
Last week I release v0.5.0 here, and now, its time for v0-6-0
#scp jalcocert@192.168.1.2:/home/jalcocert/multibody-tests/*.md . #v-0-5-0-concerns.md
scp jalcocert@192.168.1.2:/home/jalcocert/multibody-tests/v-0-5-0-concerns.md .
For the 0-6-0 was like 🚀
The existing 0.6.0-dev roadmap already calls for:
- configuration and Jacobian diagnostics
- residual and velocity-level metrics
- singular/under/overconstrained regression coverage
- stronger planar solver failure reporting
- diagnostics-focused examples
- backward compatibility with existing planar simulations and exports
The concerns complement this rather than conflict with it. 0.6.0 can combine:
- The planned diagnostics API and examples.
- Spatial vocabulary contract hardening.
- Planar dynamics safety fixes.
- Packaging and documentation improvements.
That produces a coherent theme: 2D solver and foundational contract hardening before further 3D work.
The only practical issue is branch history.
The current v0.6.0-dev branches contain useful diagnostics work but do not inherit the finalized 0.4.0 and 0.5.0 releases.
We should merge main into each v0.6.0-dev branch first, resolve version/documentation conflicts in favor of 0.6.0.dev0, and then implement every concern.
It is more work than the original weekly scope, but no technical reason prevents it. The release should happen when those gates pass, even if that takes longer than one week.
v0.6.0-dev is implemented across both repositories.
Core commit: ae6fb7f Examples commit: 538bf93
Covered concerns:
- Correct spatial frame/export conventions
- Truly immutable spatial vectors and metadata
- Automatic quaternion normalization
- Collection type and unique-name validation
- Physical principal-inertia validation
- Shared offset-COM guard across dynamics APIs
- Genuine RK45 integration preserving initial velocity
- Explicit model classifications
- Healthy, underconstrained and rank-deficient diagnostics example
- Distribution builds and wheel smoke tests in CI
- Corrected README positioning
- Aligned OSS and private-PWA roadmaps
Verification:
- Core: 41 tests
- Examples: 20 tests
- All examples and gallery generation pass
- Ruff and lockfile checks pass
- Wheels and sdists build
- Twine checks pass
- Clean wheel installation tested
- Both branches inherit v0.5.0
- Both repository working trees are clean
cd /home/jalcocert/Desktop/mbsd-framework/mbsd-core

git switch main
git merge --ff-only v0.6.0-dev
git tag -a v0.6.0 -m "MBSD Core v0.6.0"
git push origin main
git push origin v0.6.0

awk '
  /^## v0\.6\.0 / { found=1; next }
  /^## / && found { exit }
  found { print }
' CHANGELOG.md | gh release create v0.6.0 \
  --repo JAlcocerT/mbsd-core \
  --verify-tag \
  --title "MBSD Core v0.6.0 - Experimental 3D Vocabulary" \
  --notes-file - \
  --latest
Then examples:
cd /home/jalcocert/Desktop/mbsd-framework/mbsd-examples

git switch main
git merge --ff-only v0.6.0-dev
git tag -a v0.6.0 -m "MBSD Examples v0.6.0"
git push origin main
git push origin v0.6.0

awk '
  /^## v0\.6\.0 / { found=1; next }
  /^## / && found { exit }
  found { print }
' CHANGELOG.md | gh release create v0.6.0 \
  --repo JAlcocerT/mbsd-examples \
  --verify-tag \
  --title "MBSD Examples v0.6.0 - Diagnostics and Validation" \
  --notes-file - \
  --latest
v0.6.0-devis complete across both repositories, covering spatial conventions, immutability, quaternion normalization, and collection validation. Commits: core ae6fb7f and examples 538bf93.
The remaining roadmap:
- 0.7.0: spatial transforms, point kinematics and residual validation.
- 0.8.0: limited unconstrained, fixed-orientation translational dynamics.
- 0.8.1: Mechanism.spatial() constrained-kinematics preview.
- 0.8.2: fixed-orientation constrained translational dynamics.
- 0.9.0: real rotational dynamics and orientation integration.
- 0.9.1: rotational joints, forces and torques.
- 0.9.2: 2D/3D API symmetry, documentation and API freeze.
- 1.0.0: stable minimal 2D/3D kinematics and dynamics.
- https://github.com/JAlcocerT/mbsd-core/releases/tag/v0.6.0
- https://github.com/JAlcocerT/mbsd-examples/releases/tag/v0.6.0
Put together also couple of free non-walled godies:
- https://ebooks.jalcocertech.com/books/mechanism-analytics/
- https://jalcocert.github.io/JAlcocerT/understanding-batteries/#w-engine-simulation
Energy
Recently a friend told me that skoda (superb) got a diesel under 3L/100km
Thats crazy when we compared it on how things were with cars not so long back
Not sure how we avoided to think in terms of energy so far
How come we dont know that a typical laptop for wfh will consume ~150wh (~18w avg) while 9-5’ing?
Call it ~350wh-400wh a day if for any reason you have 2 laptops while WFH.
A laguna has a a 660Ah 12V battery while a bluetti its 288wh (or 18ah) a sper the conversion
Aka, with one bluetti you will survive couple of days or one while moonlighting
Or that a 5inch dron betaflight energy analysis when properly scaled tells that hoovers at ~90W, with session avg 130W and peaks of 1KW+?
A x300 homelab + my CM needed ~600Wh a month, or 0.6kwh, a ~1% of your utility bill
Isnt energy the currency of the universe to make things happen?
Or was it enthropy?
pie title Monthly Electricity Expenses (PLN) ~105 PLN Total
    "Kitchen & Major Appliances (Fridge, Cooking, Dishwasher)" : 37.80
    "Work Laptops & Monitors" : 20.48
    "Homelab & Cable Modem / Wi-Fi" : 18.90
    "Washing Machine & Laundry" : 11.03
    "Lighting & Electronics Standby" : 9.45
    "Other / Occasional Loads" : 6.30
In copper wires, the difference between signal and power is not the wave itself, but its purpose, current, and impedance.
Both power and electrical signals travel along wires as electromagnetic waves through the copper’s electrical field, but they are handled completely differently:
Power vs. Signal on a Wire 🚀
Power (Energy Delivery):
- Goal: Maximize energy transfer to do mechanical or thermal work (e.g., spinning a pump motor).
- Current: High (amperes).
- Impedance: Very low source and line resistance to avoid burning voltage off as heat ($P = I^2R$).
- Waveform: Usually steady DC (0 Hz) or a low-frequency power sine wave (50/60 Hz).
Signal (Information Delivery):
- Goal: Convey a state, command, or data stream ($0$ or $1$) to an input that reads it.
- Current: Negligible (microamps to a few milliamps). An ESP32 input pin has extremely high internal resistance (megaohms), meaning it drinks virtually zero current—it simply senses whether the electric potential is at 0V or 3.3V.
- Amplitude: Fixed logic levels (e.g., standard 3.3V or 5V pulses). It isn’t necessarily smaller than battery voltage; rather, it carries almost no physical energy.
What About Over the Air (RF)?
When an ESP32 broadcasts Wi-Fi or Bluetooth, the signal is converted by the antenna into a true free-space electromagnetic wave (radio frequency at 2.4 GHz). In that context:
- It is identical in nature to light, X-rays, or microwaves—just at a specific frequency.
- The amplitude (field strength) is indeed tiny: the ESP32 transmits around 20 dBm (~100 milliwatts), and by the time that wave reaches your router, it has attenuated down to fractions of a microwatt.
You are thinking of characteristic impedance ($Z_0$), which is indeed an inherent geometric property of the medium (like a 50 $\Omega$ coaxial cable or a 100 $\Omega$ twisted pair).
When engineers talk about the impedance difference between power and signal circuits, they are referring to source impedance and load impedance—how the circuit is designed at its ends to manage energy versus information.
- Power Delivery: Minimum Impedance Everywhere
In a power system (like your 3S battery driving the 20W pump), the goal is pure energy transfer with zero waste.
- Source Impedance (Battery): Must be as close to $0\ \Omega$ as possible. A healthy 18650 cell has an internal resistance of only around $0.02\ \Omega$ ($20\ \text{m}\Omega$).
- Load Impedance (Pump Motor): Low (around $6\ \Omega$ to pull $2\text{A}$ at $12\text{V}$).
- Why: If the source or trace impedance were high, current flowing through it would drop voltage and turn your battery power into unwanted heat ($P = I^2R$) before it ever reached the pump.
- Logic Signals: Mismatched, High-Impedance Receivers
In digital logic (like the ESP32 pin reading a button or driving a MOSFET gate), the goal is sensing a voltage level, not moving power.
- Load Impedance (ESP32 GPIO Input / MOSFET Gate): Designed to be enormous—often $10\ \text{M}\Omega$ to $100\ \text{M}\Omega$ or more.
- Why: Because the input impedance is so high, virtually zero current flows ($I = V / R$).
- You can sense that the line is at “3.3V” without loading down or draining the circuit that created the voltage.
- The tiny tactile buttons in your kit don’t melt because they only switch a few microamps into that high-impedance input.
- High-Frequency Signals: Characteristic Impedance ($Z_0$)
This is where the property of the medium does come in.
When a signal changes so fast that the wire acts like a transmission line (such as the 2.4 GHz Wi-Fi trace on the ESP32, or high-speed USB data lines):
- The geometry of the trace, its width, and the fiberglass PCB material define a fixed characteristic impedance (typically $50\ \Omega$).
- Here, both the transmitter and receiver are intentionally matched to that exact $50\ \Omega$ value. If they don’t match, the electromagnetic wave reflects backward off the end of the wire, creating echoes that corrupt the data.
While the wire itself has a characteristic wave impedance, power circuits prioritize near-zero impedance to push current without heat, whereas logic signal inputs use massive impedance so they can read a voltage without drawing any current at all.
They are fundamentally different in how they travel, how they represent data, and how you must design the circuit for them.
| Characteristic | Logic Signals (GPIO, I2C, UART, SPI) | High-Frequency RF Signals (Wi-Fi, Zigbee, ELRS) |
|---|---|---|
| Physical Medium | Confined entirely inside a copper wire or PCB trace. | Radiated out through an antenna into open space as true electromagnetic radiation (radio waves). |
| Frequencies | DC to tens of megahertz (0 Hz to ~40 MHz). | Gigahertz range: 2.4 GHz (Wi-Fi, BLE, Zigbee, ELRS) or 868/915 MHz (Sub-GHz ELRS). |
| Waveform | Square waves: sharp transitions between discrete DC voltage levels (0V and 3.3V). | High-frequency continuous sinusoidal carrier waves modulated with data. |
| How Data is Encoded | Direct levels: 0V = 0, 3.3V = 1. | Modulation: Small shifts in the carrier wave’s phase, frequency (e.g., LoRa chirp in ELRS), or amplitude. |
| How the Circuit Sees It | A simple DC voltage potential. Traces act like plain conductive lines; wire length rarely matters at low speeds. | A transmission line and wave phenomenon. Trace geometry, ground planes, and wave reflections dominate circuit performance. |
Why the Difference Matters on a Board 🚀
1. The Wave vs. Wire Threshold
- For a logic signal running at modest speeds, the electrical pulse travels across the board far faster than the signal changes state. The entire wire reaches 3.3V practically instantaneously. You do not need to worry about wave reflection; you only care that the wire makes contact.
- For RF signals (like 2.4 GHz Wi-Fi), the wavelength is only about 12.5 cm in air (and around 6 cm inside PCB fiberglass). If your trace is even 1 or 2 cm long, different points along that trace are at completely different phases of the wave simultaneously.
2. Antenna & Impedance Constraints
- If you hook a stray wire or a loose breadboard jumper to a logic GPIO pin, the ESP32 still reads the 3.3V level fine.
- If you hook a loose breadboard jumper to an RF output (like the antenna pin on an ESP32 or an ELRS transmitter), the wave will reflect back off the wire, fail to radiate, and can easily overheat or blow the radio frequency power amplifier (PA). RF paths require an exact 50 $\Omega$ controlled-impedance trace directly into a tuned antenna.
Logic signals are basic DC voltages switched on and off through wires to talk across a board, while Wi-Fi, ELRS, and Zigbee are high-frequency radio waves engineered to detach from conductors and fly through the air.
Termodinamics
Wrote about thermodynamics some time back here.
Whats new?
Boyle, exergy, Petela-Landsberg radiation exergy equation…
What can this help with?
How about sizing your house AC system? :)
Heat Transfer
You can do very cool projects around this.
Want to transfer some heat from pipes?
Not a problem, get it simulated:
Electronics
If electrical engineering is about power, we can say that electronics is about logic.
Both are energy anyways :)
Notice that as soon as you step into this field, you start to find links.
Like:
- All MOSFETs are transistors
- Behind every DC-DC buck there is a MOSFET
- Every buck performs PWM, just like some cheaper solar panels setup do instead of MPPT
See MOSFET Id vs Vds and https://github.com/JAlcocerT/poc/tree/main/physics-electronics
Remember to counter-clockwise CCW to decrease the output voltage.
The XL4015 is a higher-power step-down (buck) converter.
XL4015 vs MP1584EN vs LM2596
While the LM2596 and MP1584EN max out around 2A to 3A, the XL4015 is built for up to 5A continuous output (with appropriate heatsinking) and frequently comes in variants with adjustable current limiting (constant current / constant voltage).
| Feature | LM2596 (Blue Module) | MP1584EN (Green Module) | XL4015 (Common Red/Blue Module) |
|---|---|---|---|
| Size | Bulky (~43 × 21 mm) | Ultra-compact (~22 × 17 mm) | Largest footprint (~54 × 24 mm to 65 × 36 mm) |
| Max Practical Current | ~1.5A continuous (3A peak with heatsink) | ~1.5A continuous (3A short burst) | 4A continuous, 5A max (with heatsink) |
| Efficiency & Tech | Older bipolar tech, 150 kHz | Modern CMOS, ~1.5 MHz | Modern MOSFET-based, 180 kHz, ~96% peak efficiency |
| Adjustment Dial | Multi-turn pot (CV only) | Single-turn pot (CV only, very twitchy) | Multi-turn pot (often dual pots for both CV and CC) |
| Max Input | ~40V | ~28V | ~36V to 38V (dropout ~1.5V) |
| Current Limiting (CC) | No (voltage regulation only) | No (voltage regulation only) | Yes, on dual-pot models (can charge batteries or drive LEDs) |
Real 4A–5A Muscle: The LM2596 and MP1584EN will thermal-throttle or fail if pushed past 2A for prolonged periods. The XL4015 uses an internal low-$R_{DS(on)}$ power MOSFET instead of an old bipolar transistor, meaning significantly lower heat dissipation at 3A–4A.
True Constant Current (CC / CV): Most common XL4015 boards feature two multi-turn trimmers (and often three onboard LEDs: Constant Current, Constant Voltage, and Fully Charged).
This makes the XL4015 a functional, benchtop-style CC/CV charger for lithium packs, lead-acid batteries, or high-power LED strings, whereas the LM2596 and MP1584EN simply shut down or brown out under overcurrent.
- Thermal Overhead: Because it is designed to push up to 75W, almost all XL4015 boards ship with or require an aluminum stick-on heatsink over the IC.
LM2596 and MP1584EN modules are normally adjustable constant-voltage power supplies: set an output voltage and they try to hold it for electronics.
You can know in advance which one you’ll need by simulating your circuit:
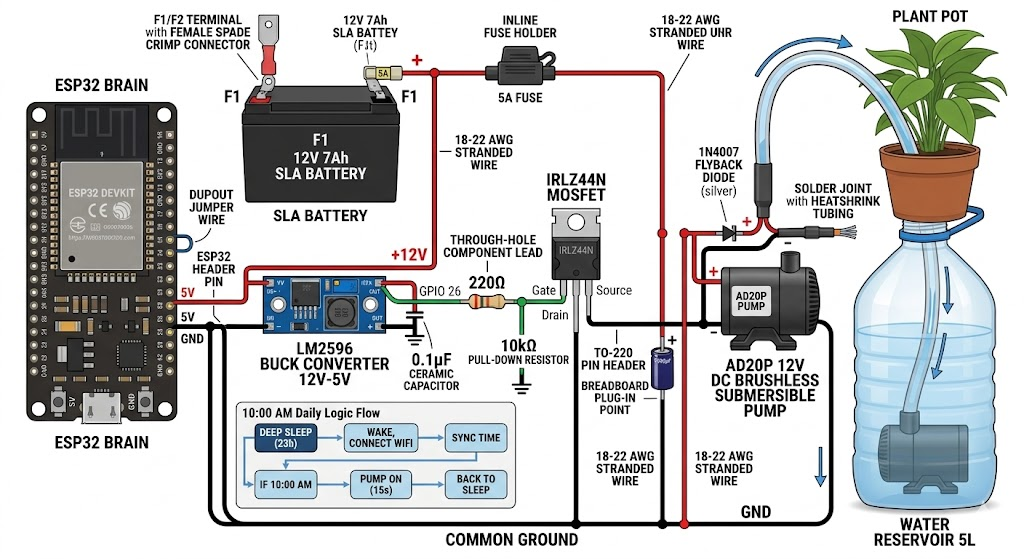
docker run --rm --network host eclipse-mosquitto:2 \
  mosquitto_pub -h 192.168.1.2 \
  -t esp32/pump/cmd \
  -m 'pulse:3000'
To recreate the wifi password file safely:
#read -rsp "Wi-Fi password: " WIFI_SECRET
printf '%s' "$WIFI_SECRET" > /tmp/iot-water-wifi-pass
unset WIFI_SECRET
chmod 600 /tmp/iot-water-wifi-pass
  # - Wi-Fi password expected at /tmp/iot-water-wifi-pass
  # - SSID is automatically detected with iwgetid
Then connect the ESP32, keep the pump-positive switch OFF, and run:
#cd /home/jalcocert/Desktop/poc/iot-esp-water/esp32-bms-prepwork/esp32-bms-mosfet
make board-list
make upload PORT=/dev/ttyUSB0
make clean
Use the port reported by make board-list if it differs.
Make sure that Arduino CLI is already installed.
Created and uploaded the WiFiManager demo successfully.
Files:
- esp32-wifi/Makefile
- esp32-wifi/wifi_manager_demo/wifi_manager_demo.ino
Test it:
- Keep the pump-positive switch OFF.
- On your phone, join the open Wi-Fi network:
WaterPump-Setup-E342A8
- Accept the “no Internet” warning.
- The portal should open automatically. Otherwise visit http://192.168.4.1.
- Select your home Wi-Fi and enter its password.
- The setup network should disappear and the ESP32 should reconnect to your Wi-Fi.
- Press the ESP32 reset button. It should reconnect automatically without reopening the portal.
Watch logs with:
cd /home/jalcocert/Desktop/poc/iot-esp-water/esp32-wifi
make monitor
The combined firmware is uploaded and working:
- Wi-Fi connected: three quick flashes
- EMQX connected: two longer flashes
- Ready: short heartbeat every two seconds
- Pump active: rapid blinking
- Pulse completes: GPIO23 returns LOW
The safe MQTT status test succeeded; ESP32 is 192.168.1.17.
When supervised and ready, enable the physical pump switch and run:
cd /home/jalcocert/Desktop/poc/iot-esp-water/esp32-wifi
make pub-pulse PULSE_MS=3000
Or use your original Docker command. The pump should run for three seconds and stop locally.
Files:
- Combined firmware (esp32-wifi/wifi_manager_pump/wifi_manager_pump.ino)
- Testing instructions (esp32-wifi/wifi_manager_pump/readme.md)
- esp32-wifi/Makefile
The provisioning-only sketch remains untouched.
MQTT is currently unauthenticated and unencrypted, suitable only for this local prototype.
WiFiManager stores the Wi-Fi SSID and password in the ESP32’s persistent NVS flash—not inside the .ino file.
Uploading a new sketch replaces the application firmware but normally preserves NVS. Therefore, the new sketch found the previously saved credentials and connected automatically.
Credentials are removed only when you:
- Type r in this sketch’s serial monitor.
- Call WiFiManager.resetSettings().
- Erase the ESP32’s entire flash.
- Upload with an operation that explicitly clears NVS.
This is exactly what you want for future firmware/OTA updates: firmware changes without forcing clients to configure Wi-Fi again.
An unlimited command could leave the pump running if the off message is lost.
The firmware now accepts 1–60000 ms and compiles successfully.
It is not uploaded yet because the physical switch state is unknown.
With the pump switch OFF:
cd /home/jalcocert/Desktop/poc/iot-esp-water/esp32-wifi
make pump-upload
Then test progressively:
make pub-pulse PULSE_MS=10000
make pub-pulse PULSE_MS=30000
make pub-pulse PULSE_MS=60000
For water, a 60-second test gives approximately:
weight gained in grams ≈ flow in mL/min
Keep the pump wet and check its duty-cycle rating.
Made some updated firmware: esp32-wifi/wifi_manager_pump/wifi_manager_pump.ino. so that it asks your for WIFI pwd instead of having to bake it with the esp32 firmware.
docker run --rm --network host eclipse-mosquitto:2 \
  mosquitto_pub -h 192.168.1.2 \
  -t esp32/pump/cmd \
  -m 'pulse:3000'

docker run --rm --network host eclipse-mosquitto:2 \
  mosquitto_pub -h 192.168.1.2 \
  -t esp32/pump/cmd \
  -m 'off'

#Or from esp32-wifi:
# make pub-offHydraulic output is and always was for any pump: ρgQH
Measure & Simulate | Before buying the Diode Resistors and Mosfet 📌
- http://192.168.1.2:3034/hermesagent/electronics-101/src/branch/master/samples-motors
- https://github.com/JAlcocerT/hermesagent/tree/tinker/hermesagent/electronics-101
cd ./electronics-101On top of all the above, the DHTs keep feeding data to a sqlite in the homelab:
#cd ./poc/iot-rpi-dht
sqlite3 /home/jalcocert/poc/iot-rpi-dht-insulation/ingester/data/readings.sqlite "WITH ranked AS (SELECT device, metric, topic, value, received_at, received_ms, strftime('%Y-%m-%d %H:00:00',received_at) AS hour_bucket, ROW_NUMBER() OVER (PARTITION BY device, metric, strftime('%Y-%m-%d %H', received_at) ORDER BY received_ms ASC) AS rn FROM readings WHERE received_ms >=(strftime('%s','now') - 24*60*60)*1000) SELECT device, metric, hour_bucket, topic, value, received_at FROM ranked WHERE rn = 1 ORDER BY hour_bucket, device, metric;"
To get the latest temperature and humidity from ESP32 and Pico W, excluding Pico’s internal temperature:
sqlite3 -header -column \
  /home/jalcocert/poc/iot-rpi-dht-insulation/ingester/data/readings.sqlite \
  "WITH ranked AS (
    SELECT *,
      ROW_NUMBER() OVER (
        PARTITION BY device, metric
        ORDER BY received_ms DESC
      ) AS rn
    FROM readings
    WHERE device IN ('esp32', 'pico')
      AND metric IN ('temperature', 'humidity')
      AND topic NOT LIKE '%/internal'
  )
  SELECT device, metric, value, topic, received_at
  FROM ranked
  WHERE rn = 1
  ORDER BY device, metric;"
Current result:
esp32 humidity 78.0 esp32/humidity/dht11 esp32 temperature 16.1 esp32/temperature/dht11 pico humidity 60.3 pico/humidity/dht22 pico temperature 20.6 pico/temperature/dht22
And ive combined all that:
#cd ./poc/iot-dashboard
cd ./poc/iot-dashboard-v2 #that takes prior version (shown at the tech talk)
#and adds the watering capabilities via mqtt ./poc/iot-esp-waterMore about DRONS
Before going to FPVs, Ive been doing some tinkering around the DJI tello lately.
The Tello communicates through raw UDP:
| Port | Direction | Purpose |
|---|---|---|
8889 | App ↔ drone | Commands and responses |
8890 | Drone → app | Flight telemetry |
11111 | Drone → app | Raw H.264 video stream |
A browser can use HTTP, WebSocket, WebRTC, and WebTransport, but none exposes an arbitrary UDP socket that can communicate directly with these Tello endpoints.
Thats why I put together a desktop app that works for the Tello:
#ssh -T git@gitlab.com #Edit profile → Access → SSH keys
git clone git@gitlab.com:fossengineer1/dron.git
cd dron
make run-pyqtNow, for FPVs:
- https://app.betaflight.com/
- https://blackbox.betaflight.com
- https://fpv-logs.pages.dev/
- When you fry a VTX module, you cna actually learn stg https://github.com/JAlcocerT/poc/tree/main/physics-stationary-wave
cd ./poc/fpv-buildFuture post ideas in the same drone/firmware lane:
- INAV: Betaflight-adjacent, but more navigation/GPS/fixed-wing/long-range focused.
- ArduPilot: huge OSS autopilot stack, missions, rovers, planes, copters, boats, simulation.
- PX4: professional/research autopilot stack, MAVLink-heavy, SITL/dev workflow.
- Bluejay / BLHeli_S / AM32 ESC firmware: the motor-control layer after Betaflight.
- MAVLink: protocol post tying ArduPilot/PX4/ground stations together.
- QGroundControl / Mission Planner: UI/configuration layer for autopilot stacks.
- INAV Configurator: good comparison with Betaflight App.
- Multi-Protocol TX Module firmware: relevant to EdgeTX/OpenTX radios and non-ELRS receivers.
- OpenHD / RubyFPV: open digital video/telemetry/control stack for FPV.
- Cleanflight / Baseflight history: useful “where Betaflight came from” context.
https://www.youtube.com/watch?v=1lfVKcKQ5BI https://www.youtube.com/watch?v=C0KBu2ihp-s&t=19s https://www.youtube.com/watch?v=lvcPUcZ9wAA https://www.youtube.com/watch?v=BoLeQCqns5A
FPV KPIs
Made recently a battery KPI checks for the drons based on betaflight logs:
Drop a Blackbox log. Get the electrical story: https://fpv-logs.pages.dev/
- https://github.com/JAlcocerT/meteor-dron/blob/main/betaflight-energy-check/z-hovering-learnings.md
- https://github.com/JAlcocerT/meteor-dron/blob/main/betaflight-energy-check/z-motors-learnings.md
- https://github.com/JAlcocerT/meteor-dron/tree/main/betaflight-energy-check/cf-pages
#cd ./poc/fpv-kpiscan you put a brd for an agent to put an interactive html explaining all the concepts we have seen in this conversation?Done with hyperframe btw and OSS TTS model KoKoRo
After talking about energy/thermodynamics, batteries and aerospace/propulsion/aerodynamics, it was time to land some KPIs for a 5inch dron:
FPV KPI table for my 5inch dron 🚀
| KPI / Metric | Category | What It Measures / Tells You | Your Value / Status | Benchmark / Expected Value |
|---|---|---|---|---|
| All-Up Weight (AUW) | Mass | Total flight mass (drone + battery) | 550 g (0.55 kg) | 500 – 650 g (typical 5" quad) |
| Hover Specific Thrust | Aerodynamics | Lift generated per watt of electrical hover power | 4.23 g/W | 3.5 – 5.0 g/W (5" tri-blade) |
| Disk Loading | Aerodynamics | Mass per swept rotor area; predicts floatiness vs wind resistance | 1.08 g/cm² (10.85 kg/m²) | 0.9 – 1.3 g/cm² |
| Peak Power Loading | Propulsion | Peak electrical power pushed through the rotor disk | 1.97 W/cm² (19.7 kW/m²) | 1.5 – 2.5 W/cm² |
| Specific Excess Power ($SEP$) | Dynamics | Power headroom per kg for vertical acceleration & dive pullouts | 1,582 W/kg (1.58 kW/kg) | 1,200 – 2,000 W/kg (freestyle) |
| Dynamic Range Factor | Agility | Ratio of max punch-out power to hover power ($P_{\text{max}} / P_{\text{hover}}$) | 7.69 : 1 | 6:1 – 9:1 (freestyle/race) |
| Total Pack Resistance ($R_{\text{pack}}$) | Battery | Internal DC resistance of all 4 cells combined | 20 mΩ (5 mΩ / cell) | 12 – 25 mΩ (healthy 4S pack) |
| Peak Battery Voltage Sag | Battery | Instantaneous voltage drop at full punch ($71.4\text{ A} \times 0.02\ \Omega$) | 1.43 V | 1.2 – 1.8 V (healthy) |
| Peak Thermal Loss ($I^2R$) | Efficiency | Electrical power burned internally as heat inside pack cells | ~102 W (~10.2% of punch) | 8 – 15% of peak power |
| Hover Thermal Loss ($I^2R$) | Efficiency | Battery heating loss during static hover | ~1.5 W (~1.1% of hover) | < 2% (negligible) |
| Ideal Induced Hover Power ($P_i$) | Aerodynamics | Theoretical minimum power required to hover under Momentum Theory | 35.6 W | — |
| Hover Figure of Merit ($FoM$) | Aerodynamics | Aerodynamic rotor efficiency relative to theoretical limit ($P_i / P_{\text{hover}}$) | 27.4% | 25% – 35% (mini-rotor systems) |
| Hover Motor RPM | Propulsion | Rotor speed needed to generate 550 g of static thrust | Missing (need Bidirectional DShot log) | 11,000 – 12,200 RPM |
| Hover Throttle % | Control | Throttle stick position required to maintain steady altitude | Missing (read in Blackbox log) | 28% – 34% |
| In-Flight Dynamic Resistance | Battery | True total loop IR (cells + XT60 + wires) via Blackbox $\Delta V / I$ | Missing (calculate from log punch) | 22 – 26 mΩ |
| Wh Turnaround Efficiency | Power System | In-flight energy consumed vs wall energy delivered to recharge | Missing (compare log Wh to charger Wh) | 85% – 90% |
| Specific Energy per Distance | Range / Cruise | Energy consumed per kilometer traveled in forward flight | Missing (requires GPS speed) | 2.2 – 3.0 Wh/km (140–190 mAh/km) |
| Best Cruise Speed | Flight Envelope | Forward ground speed yielding minimum Wh/km | Missing (requires GPS speed) | 55 – 70 km/h (15–19 m/s) |
| Safe Out-and-Back Radius | Navigation | Maximum operational return distance using 80% usable pack Wh | Missing (derived from GPS Wh/km) | ~2.2 – 2.6 km (for 1300–1500mAh) |
My 5inch dron has
CAD x Design
Design for manufacturing was an interesting book.
But before manufacturing, you have to design:
git clone https://github.com/JAlcocerT/3Design
#cd ./poc/blender/dron-standing-v102
I got my first couple of 3d prints orders done as a code here and here with validations at blender.
Just recently I got to know about: https://sketchforge3d.com which is oss https://github.com/Formsmith746/SketchForge-3D and ive forked here for further exploration at some point.
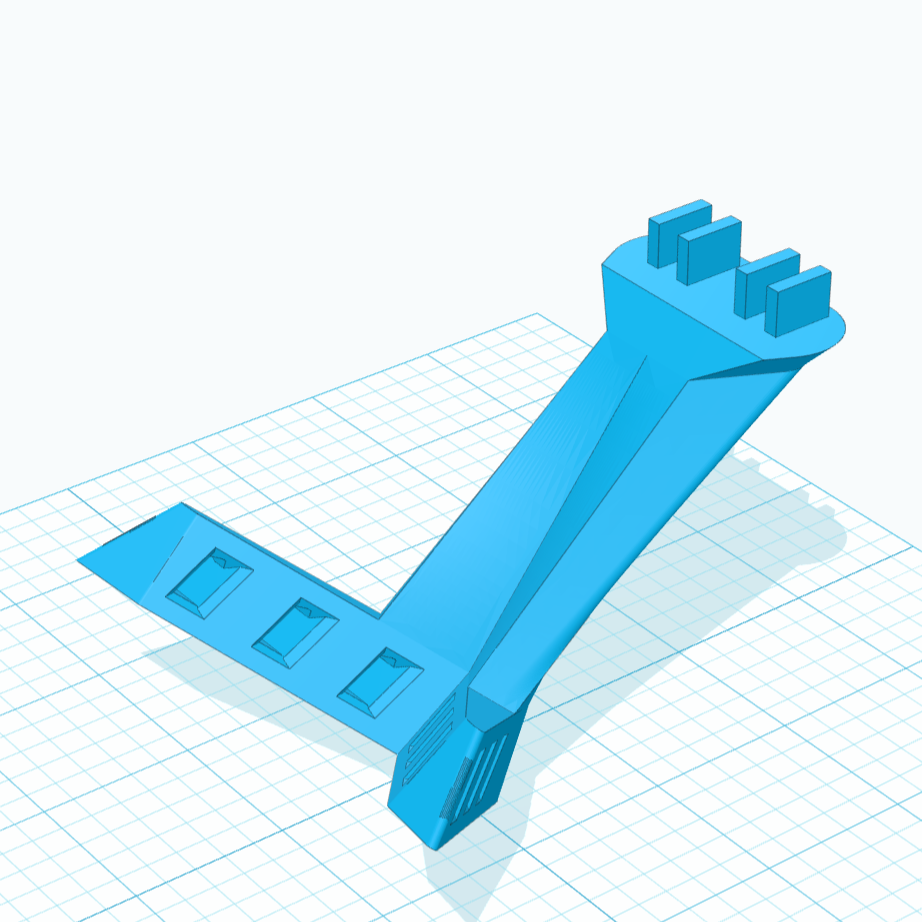
You can import such STLs and it renders in the browser
Get inspired:
- Weather Vane
- Windturbine
- Interesting box and holder
- meshtastic box or 2- wtf is meshtastic https://meshmap.net/
- solar tracker 1
- solar furnace
- OpenSCad box
- birdcamera
- rc car
FEM x FEA
Yes—the local FEA workflow is operational on this PC: got it done here, after the fpv stand 3d printed
- FreeCAD → BRep reconstruction
- Gmsh tetrahedral meshing
- CalculiX solving
- JSON summaries and VTU visualization output
- Coarse/fine screening cases
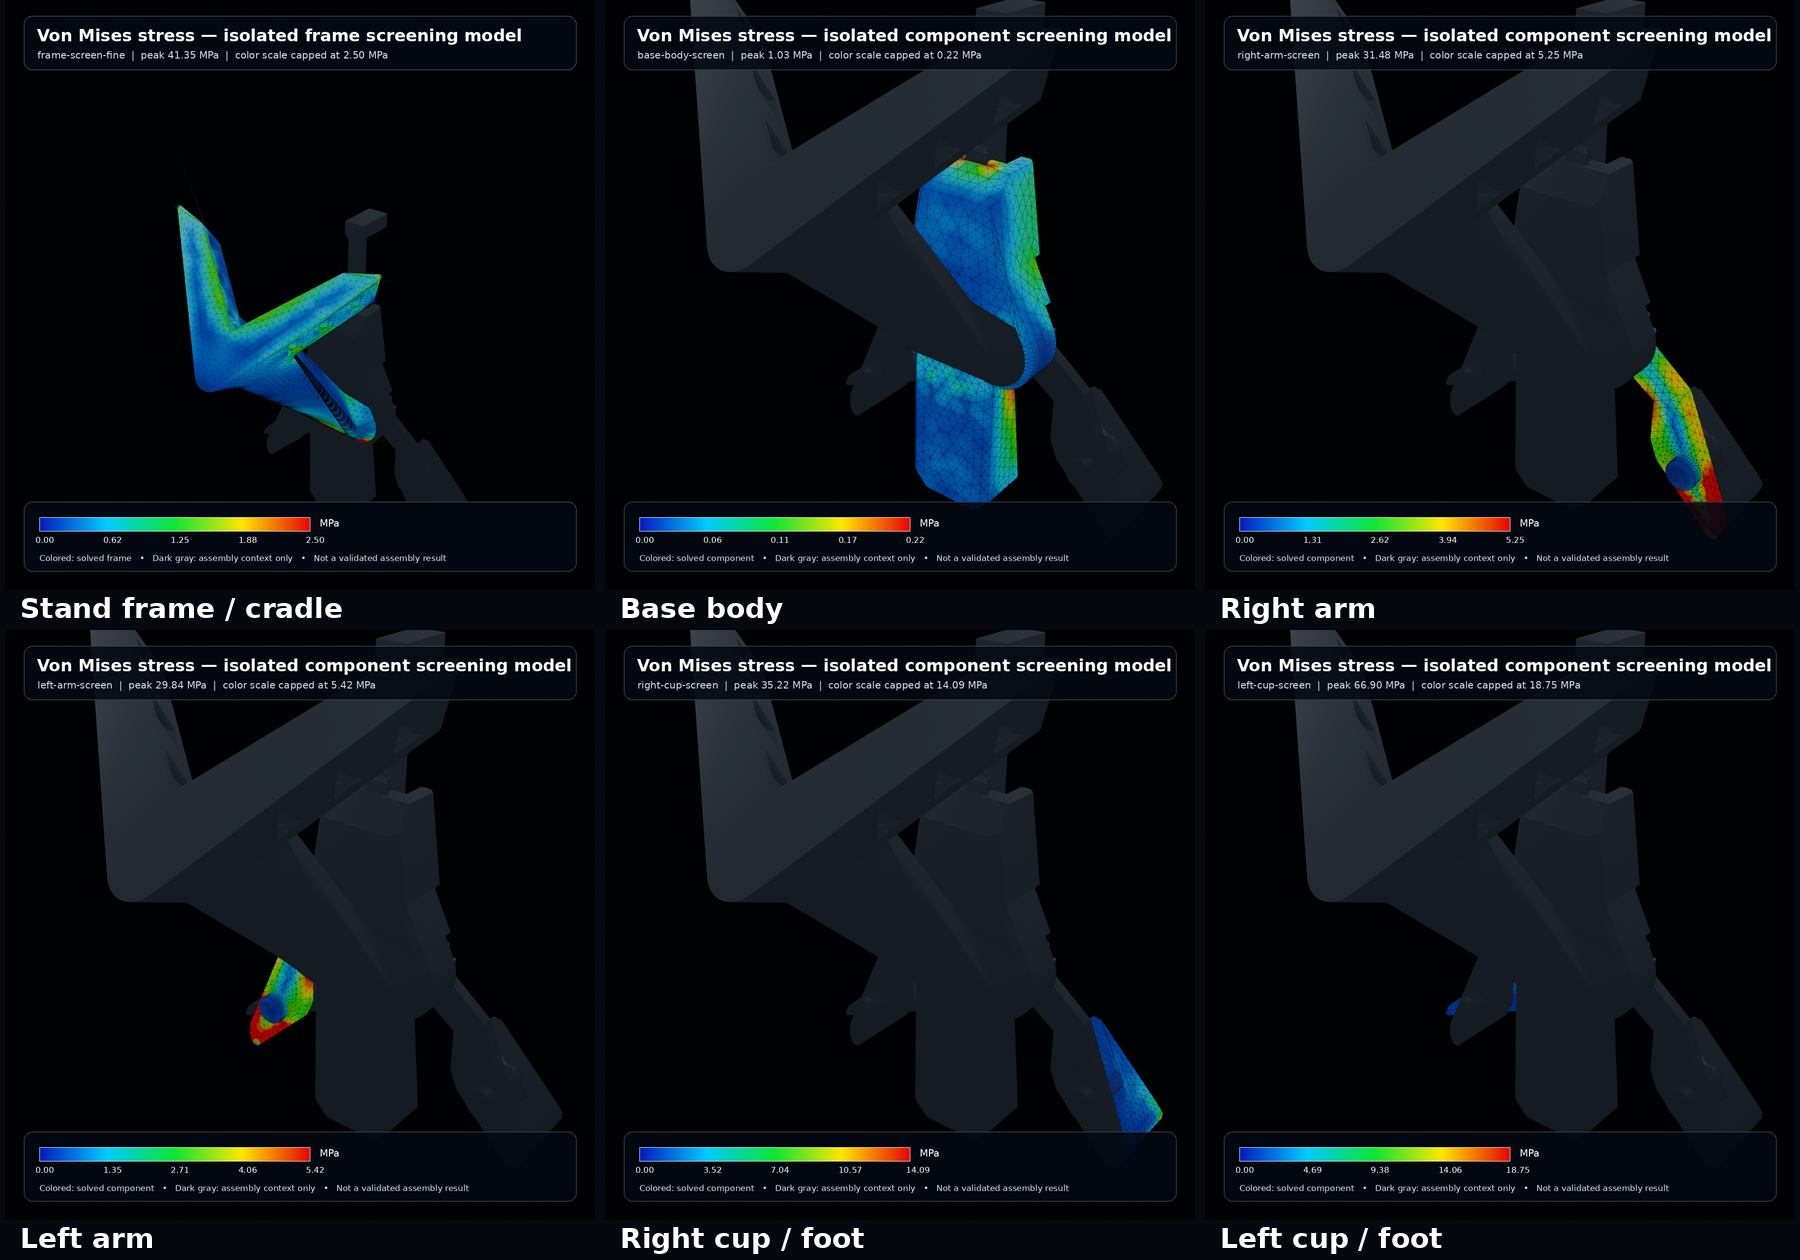 FPV Standing x FEA
 Local Deep Researcher Repo
Upgrading my Desk
I got an IKEA MITTZON desk, with DELL U2518D upgraded to U2724DE with KVM included and ERGOTRON MXV gas desk mount for the VESA 100x100.
How about simulating the tensions?
DIY Solar Tracker
To better be sure that winds dont take away my solar panel :)
Some time back https://solar-trajectory.pages.dev/
#cd ./poc/go-solar-trajectory
#npm run build
#npx wrangler pages deploy dist --project-name=solar-trajectory
CFD
- Can we predict lift?
- Prop Wash science
- Robotics meets Fluid Dynamics: A Characterization of the Airflow below a Drone as a Turbulent Jet
- Torsional Rigidity test on Formula Student Chassis/Frame using Solidworks FEA | FSAE | DP DESIGN
Generative Design
You can get started with Calculix x Beso
And you have them both in FreeCAD!
Conclusions
The automatic watering setup worked with the 3sx18650 and custom power stage pcb autonomously with these components 3W and 20W with 3 diodes in paralel
But there was a piece missing: adding solar with a CN3791 IP2326 and a voltage divider
For which Im considering IP2326 or CP
So I took this DIY IoT Dashboard and made:
cd ./poc/iot-dashboard-v2It includes all the goodies, from the sonoff/zigbee integration, the DHT with deepsleep and mqtt for esp32 and also picoW support
Original vs New Ingester 🚀
The original ingester project is located at: poc/iot-rpi-dht-insulation/ingester
Main script: poc/iot-rpi-dht-insulation/ingester/server.js
Live SQLite database: poc/iot-rpi-dht-insulation/ingester/data/readings.sqlite
Inside the container, that data folder is mounted as:
Host: /home/jalcocert/poc/iot-rpi-dht-insulation/ingester/data Container: /app/data
You can open it with: sqlite3 /home/jalcocert/poc/iot-rpi-dht-insulation/ingester/data/readings.sqlite
The -wal and -shm files beside it are normal while SQLite is active.
Yes, it is containerized:
Container: iot-ingester Image: ingester-ingester Port: 3011
It includes both the MQTT/SQLite backend and a simple Web UI:
http://192.168.1.2:3011
API endpoints:
http://192.168.1.2:3011/api/status http://192.168.1.2:3011/api/series?hours=24
The frontend files are in poc/iot-rpi-dht-insulation/ingester/public, while poc/iot-rpi-dht-insulation/ingester/server.js handles MQTT, SQLite, API endpoints and static files.
ompatibility:
Data Current schema Current ingester ━━━━━━━━━━━━━━━━━━━━━━━━━━━━━━━━━━━━━━━━━ ━━━━━━━━━━━━━━━━━━━━━━━━━━━━━━━━━ ━━━━━━━━━━━━━━━━━━━━━━━━━━━━━━━ ESP/Pico numeric T/RH Compatible Supported ───────────────────────────────────────── ───────────────────────────────── ─────────────────────────────── Zigbee numeric T/RH Compatible Not supported ───────────────────────────────────────── ───────────────────────────────── ─────────────────────────────── Smart-plug power/voltage/current/energy Compatible Not supported ───────────────────────────────────────── ───────────────────────────────── ─────────────────────────────── Plug on/off, availability, errors Needs an events table Not supported ───────────────────────────────────────── ───────────────────────────────── ─────────────────────────────── Zigbee2MQTT JSON payloads Must be split into numeric rows Current parser cannot do this
The main limitation is the ingester, not SQLite. It currently:
- Subscribes to only six hard-coded topics.
- Expects each payload to be a single number.
- Derives the device from the first topic segment.
Created iot-dashboard-v2 to preserve the original functionality while improving compatibility with additional sensors and topics.
Added a comprehensive poc/iot-dashboard-v2/Makefile and documented it in the README (poc/iot-dashboard-v2/readme.md).
Implemented and running at http://192.168.1.2:3038.
- Project: poc/iot-dashboard-v2
- SQLite: poc/iot-dashboard-v2/data/readings.sqlite
- MQTT mappings: poc/iot-dashboard-v2/config/ingest.json
- Documentation: poc/iot-dashboard-v2/readme.md
Key results:
- Dashboard and ingester run together in iot-dashboard-v2.
- SQLite is a bind-mounted file, not a Docker volume.
- Migrated 395,932 historical rows after deduplication.
- Current count is already 395,953 and growing from live MQTT.
- Supports ESP32, Pico W, Zigbee2MQTT sensors, battery/LQI and smart-plug power fields.
- Unknown Zigbee devices are automatically discovered and graphed.
- The old volume contained only ESP/Pico topics—no Zigbee or smart-plug history was available there.
- Lint, TypeScript, production Docker build, SQLite integrity and dependency audit all pass.
- Existing dashboards and ingesters remain untouched and running.
Power data is ingested automatically, but its dashboard panel requires FEATURE_POWER=true.
Starting with this code with such makefile:
cd /home/jalcocert/poc/iot-dashboard-v2
make help
#docker stop iot-ingester iot-dashboard
http://192.168.1.2:3038/?range=90d
Useful examples:
make db-latest
make db-frequency DAYS=7
make db-hourly-presence DAYS=7
make db-hourly-diff DAYS=7
make db-events
make mqtt-live
make health
make ingest-status
make db-query SQL="SELECT COUNT(*) FROM readings"
All SQLite/help targets were tested successfully.
I didn’t modify or restart any containers.
Added poc/iot-dashboard-v2/docker-compose-zigbee.yml. It:
- Runs only Zigbee2MQTT—no Mosquitto or port 1883 conflict.
- Publishes directly to EMQX at 192.168.1.2:1883.
- Maps the Sonoff dongle using its stable device path.
- Uses the correct ember adapter.
- Exposes the Zigbee2MQTT UI on port 8081.
- Persists pairing/network state under data/zigbee2mqtt/.
When ready:
cd /home/jalcocert/poc/iot-dashboard-v2
make zigbee-init
make zigbee-up
make zigbee-logs
Then open: http://192.168.1.2:8081
sudo docker stats iot-dashboard-v2- SSH client: installed
- SSH server: not installed
- Port 22: not listening
- LAN address: 192.168.1.10
To enable it:
sudo apt install openssh-server
sudo systemctl enable --now ssh
sudo ufw allow OpenSSH
Then connect from another device with: ssh jalcocert@192.168.1.10
Run this on the new server (192.168.1.2):
cd /home/jalcocert/poc/iot-dashboard-v2

mkdir -p data/zigbee2mqtt

rsync -av --progress \
  jalcocert@192.168.1.10:/home/jalcocert/Desktop/Home-Lab/zigbee2mqtt/data/ \
data/zigbee2mqtt/Then verify and start:
make zigbee-state-check
make zigbee-config
make zigbee-up #sudo docker network rm da0100acf963
make zigbee-logs
And zigbee UI flows to
http://192.168.1.2:8081but im not using the mqtt function not to collide with my emqx
Ensure Zigbee2MQTT is stopped on the old PC before starting the new instance. The frontend will be at:
http://192.168.1.2:8081
does any of the makefile sqlite clis shows whats the last readings per sensor?
make db-latestLatest values for one sensor:
make db-latest DEVICE=zigbee.snzb_02d_laptop
make db-latest DEVICE=zigbee.forta_igz_k_plug
make db-latest DEVICE=esp32-dht11-01
make db-latest DEVICE=picow-dht22-01
For the newest raw rows across all sensors:
make db-tail LIMIT=20 #db-tail refreshes every two secondshttps://github.com/JAlcocerT/poc/blob/main/iot-dashboard-v2/z-learnings-migration.md
https://github.com/JAlcocerT/poc/blob/main/iot-dashboard-v2/docker-compose-zigbee.yml
FAQ
This (\sigma(z) = \frac{1}{1 + e^{-z}}) is an inline expression.
then
$$F(\omega) = \int_{-\infty}^{\infty} f(t), e^{-j \omega t} , dt$$
more
$$ \begin{aligned} \nabla \cdot \mathbf{E} &= \frac{\rho}{\varepsilon_0} \ \nabla \cdot \mathbf{B} &= 0 \ \nabla \times \mathbf{E} &= -\frac{\partial \mathbf{B}}{\partial t} \ \nabla \times \mathbf{B} &= \mu_0 \left( \mathbf{J} + \varepsilon_0 \frac{\partial \mathbf{E}}{\partial t} \right) \end{aligned} $$
$$ \begin{aligned} 2x + 3 &= 7 \ 2x &= 4 \ x &= 2 \end{aligned} $$
The logistic function: $$\sigma(z) = \frac{1}{1 + e^{-z}}$$
The Fourier Transform: $$F(\omega) = \int_{-\infty}^{\infty} f(t), e^{-j \omega t} , dt$$
Analogies
Heat and Electr can be compared, but so can fluids
If you can visualize water flowing through a pipe, you can understand a circuit or a heat exchanger.
| Electrical | Thermal | Fluid Mechanics |
|---|---|---|
| Voltage ($V$) | Temperature ($T$) | Pressure ($P$) |
| Current ($I$) | Heat Flow ($q$) | Volumetric Flow Rate ($Q$) |
| Resistance ($R$) | Thermal Resistance ($R_{th}$) | Hydraulic Resistance ($R_h$) |
| Capacitance ($C$) | Thermal Mass ($C_{th}$) | Compliance / Tank Volume |
| Inductance ($L$) | (No direct simple analog) | Inertance (Fluid Mass/Inertia) |
In all three systems, Power is calculated by multiplying the “Push” (Across variable) by the “Flow” (Through variable):
- Electric Power: $P = V \cdot I$
- Thermal Power: $P = \Delta T \cdot q$ (Though $q$ is already a power unit, Watts)
- Fluid Power: $P = \Delta P \cdot Q$
Prep ULM x PPL
After watching some motivating videos about ppl who can already fly
I decided its time to get LLMs to help me with the prep of the ULM exam
The static version: https://ulm-ppl-test.pages.dev/
cd ./poc/ulm-pplAnd I got a PWA ready: https://jalcocertech.com/ulm-ppl
#git init
claude --dangerously-skip-permissions -p """i want to prepare for the ULM and PPL flight exams and have thought to make a simple web app that sources qna from a markdown
with the options and will help me prepare for the exam, if i fail, it should show an explanation in the end of the reasoning""" #yolo
#.\serve.ps1
Verified on the built dist/ (served locally, headless Edge):
- /ulm-ppl/ renders: 103 questions, 9 banks, 3 generators, Ready to start, no load error
- 200 on /ulm-ppl/sw.js, manifest.webmanifest, questions/manifest.json, assets/icon-192.png
- _headers and _redirects present at dist/ root where Cloudflare reads them
- Site root unaffected — 200, title JAlcocer|Tech Made Simple
Not verifiable locally: the _headers/_redirects rules themselves — the Python test server ignores them; only Cloudflare applies them.
Check after deploy that jalcocertech.com/ulm-ppl (no slash) 301s to the slash form.
Remaining on your side: commit and push, and confirm Rocket Loader is off on the zone.
C:\Users\j--e-\Desktop\ulm-ppl untouched — still the source of truth. When you edit questions there, re-copy questions/ into public/ulm-ppl/questions/.
http://localhost:8080/oh I meanjalcocertech.com/ulm-ppl