Quick SaaS Websites with user login. Workers + PB.
TL;DR
Putting together a quick and OSS Template with Astro/Flask/PB
Because…we want to launch fast: Would a simpler SSG x PB SDK work?

See the result first: https://fast-payroll-theme.pages.dev/login/
+++ New CLI tools + Thoughts on CF Workers +++ Gitea Container Setup and CLI tricks. Can Gitea become your SaaS user/pwd registry? +++ Recap on Callbacks / Hooks / RestAPIs
Intro
- This is great for a personal portfolio https://free-astro-template.netlify.app/
But this is for a saas https://github.com/ctrimm/astro-payroll-solution-theme
https://github.com/larry-xue/astro-sassify-template is also great as seen on this other post
The book a demo we already know how to do via cal.com or formbricks.
But how about having a SSG for content + real auth and different content for logged in users?
Has it come the moment to mix SSG with Flask or FastAPI?
The Stack
- Python for BE, particularly FastAPI connected with PB
- Astro to serve good looking static content
FastAPI
If you create with Python, FastAPI is one of the ways to do webapps.
PocketBase Auth with FastAPI
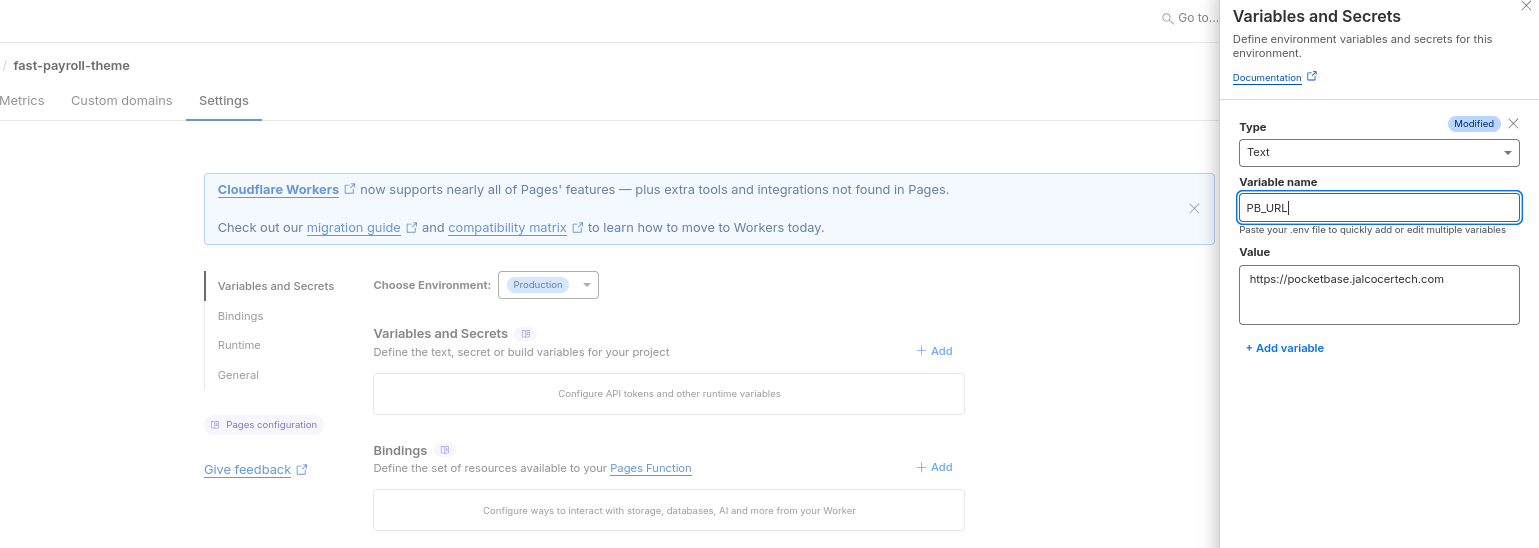
export PB_URL="http://localhost:9000"
export TEST_EMAIL="test3@test.com"
export TEST_PASSWORD="testpasswd"
export TEST_NAME="Test User"

echo "🔧 Testing Prompt Library API Endpoint"
echo "======================================"
echo "PocketBase URL: $PB_URL"
echo "FastAPI URL: $FASTAPI_URL"
echo "Test Email: $TEST_EMAIL"
echo ""

# Step 1: Create a test user
echo "📝 Step 1: Creating test user..."
USER_RESPONSE=$(curl -s -X POST "$PB_URL/api/collections/users/records" \
  -H "Content-Type: application/json" \
  -d "{
    \"email\": \"$TEST_EMAIL\",
    \"password\": \"$TEST_PASSWORD\",
    \"passwordConfirm\": \"$TEST_PASSWORD\",
    \"name\": \"$TEST_NAME\"
  }")

echo "🔑 Step 2: Getting authentication token..."
TOKEN_RESPONSE=$(curl -s -X POST "$PB_URL/api/collections/users/auth-with-password" \
  -H 'content-type: application/json' \
  -d "{
    \"identity\": \"$TEST_EMAIL\",
    \"password\": \"$TEST_PASSWORD\"
  }")

echo "🔑 Check that the token is valid..."
curl -H "Authorization: Bearer $TOKEN_RESPONSE" \
  "$PB_URL/api/health" | jq .

curl -H "Authorization: Bearer $TOKEN_RESPONSE" \
  "http://localhost:3900/api/v1/library-prompts/tree" | jq .

RESPONSE=$(curl -s -H "Authorization: Bearer $TOKEN_RESPONSE" \
  "http://localhost:3900/api/v1/library-prompts/tree")

echo $RESPONSE
SSG
Lets use this cool astro theme: https://github.com/ctrimm/astro-payroll-solution-theme
git clone https://github.com/ctrimm/astro-payroll-solution-theme #MIT Licensed
#https://payflo.corytrimm.com/ #demo

npm run dev -- --host 0.0.0.0 --port 4321 #http://192.168.1.11:4321/
Why is so cool?
- Amazing Blog Post section with filter tags + Cool ToC
- Login/Book a call buttons
SSG x PB
I was also reading, chatting with Gemini, that we could keep the good old stack
I mean: Cloudflare Pages + CF Workers + Fetch/Posts users/pwds from a pocketbase hosted somewhere…
Even pb can provide very nice authentication signin/up while the theme is on cloudflare pages.
CF Workers would be the one in charge to allow access to certain static paths like /private checking if the user is logged in or not
sudo apt install gh
gh auth login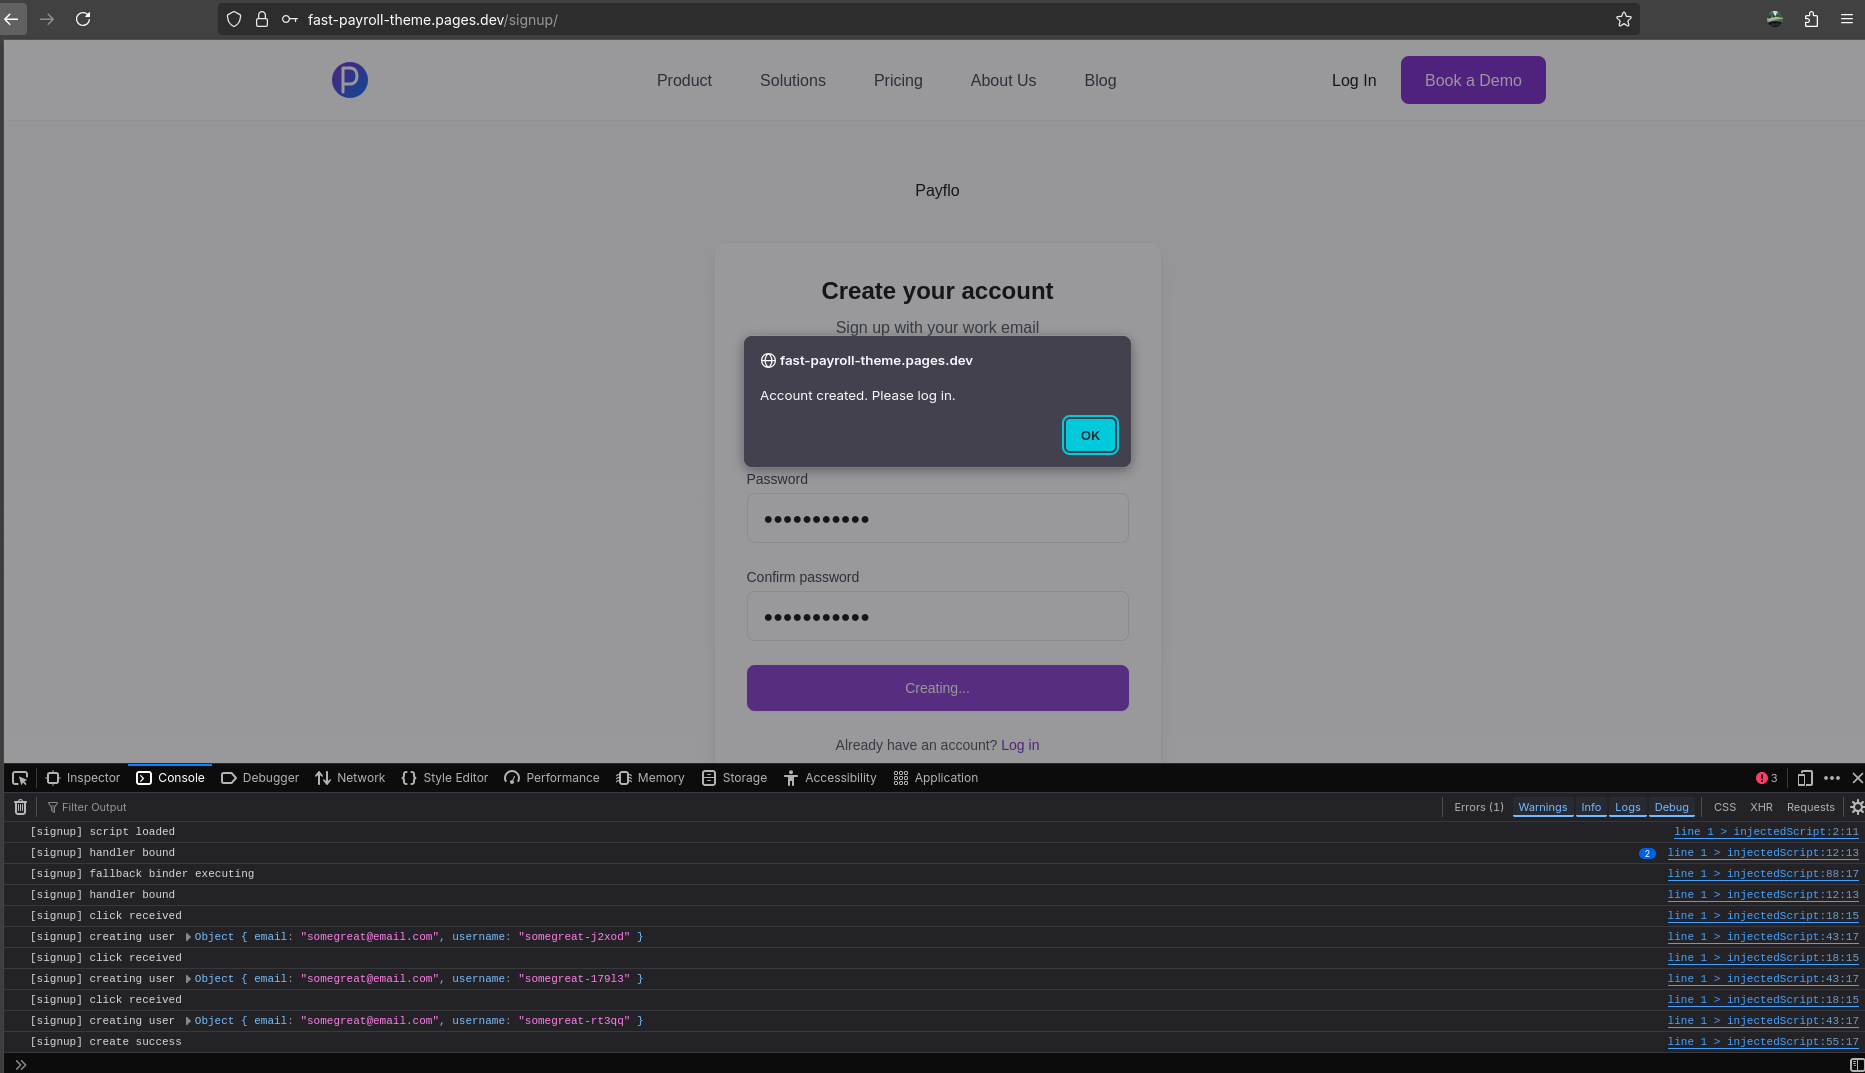
gh repo create payroll-workers-pb --public --source=. --remote=origin --pushAnd I got auth via PB SDK working!
We should have a look to /api/collections/users/auth-with-password
Remember you have: https://pocketbase.io/demo/ But this wont give you API access.
The astro site will need to have the PB library so that the SDK is available:
npm i pocketbaseFor this, we will need to have pocketbase up and running and then to provision a proper collection: http://192.168.1.11:8080/api/health
#npm i pocketbase
PB_URL=http://192.168.1.11:8080 \
PB_ADMIN_EMAIL="yourpbemail" \
PB_ADMIN_PASSWORD="yourpbadminpass" \
npm run provision:pb
You could pass those via
.envand then try to signup/in:http://192.168.1.8:4321/signup
So first i tried it via MKCert and then i just I went quickly with my known Cloudflare Tunnels
With CF tunnels and the https it worked fine!
Cloudflare Workers Auth
You wont be able to use the demo PB API, so you will need to bring your PB publically + Cloudflare pages: CF Pages configured, like recently
#npm run build
wrangler pages deploy dist --project-name=fast-payroll-theme --branch=main
Remember to config the url for your CF worker:
And to add your PB container into the cloudflare tunnels network:
docker network connect cloudflared_tunnel pocketbaseAnd now these will work:
This user has been created as per the SSG and CF Workers interaction:
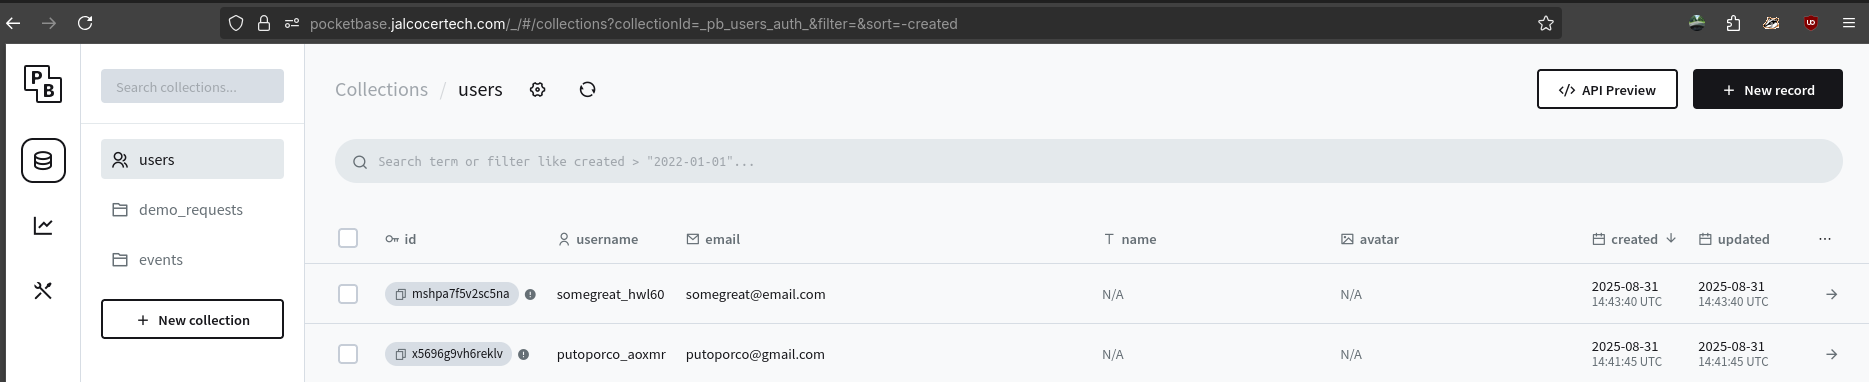
Once the /signup is actually sending the data to your PB instance (users collection), we can proceed.
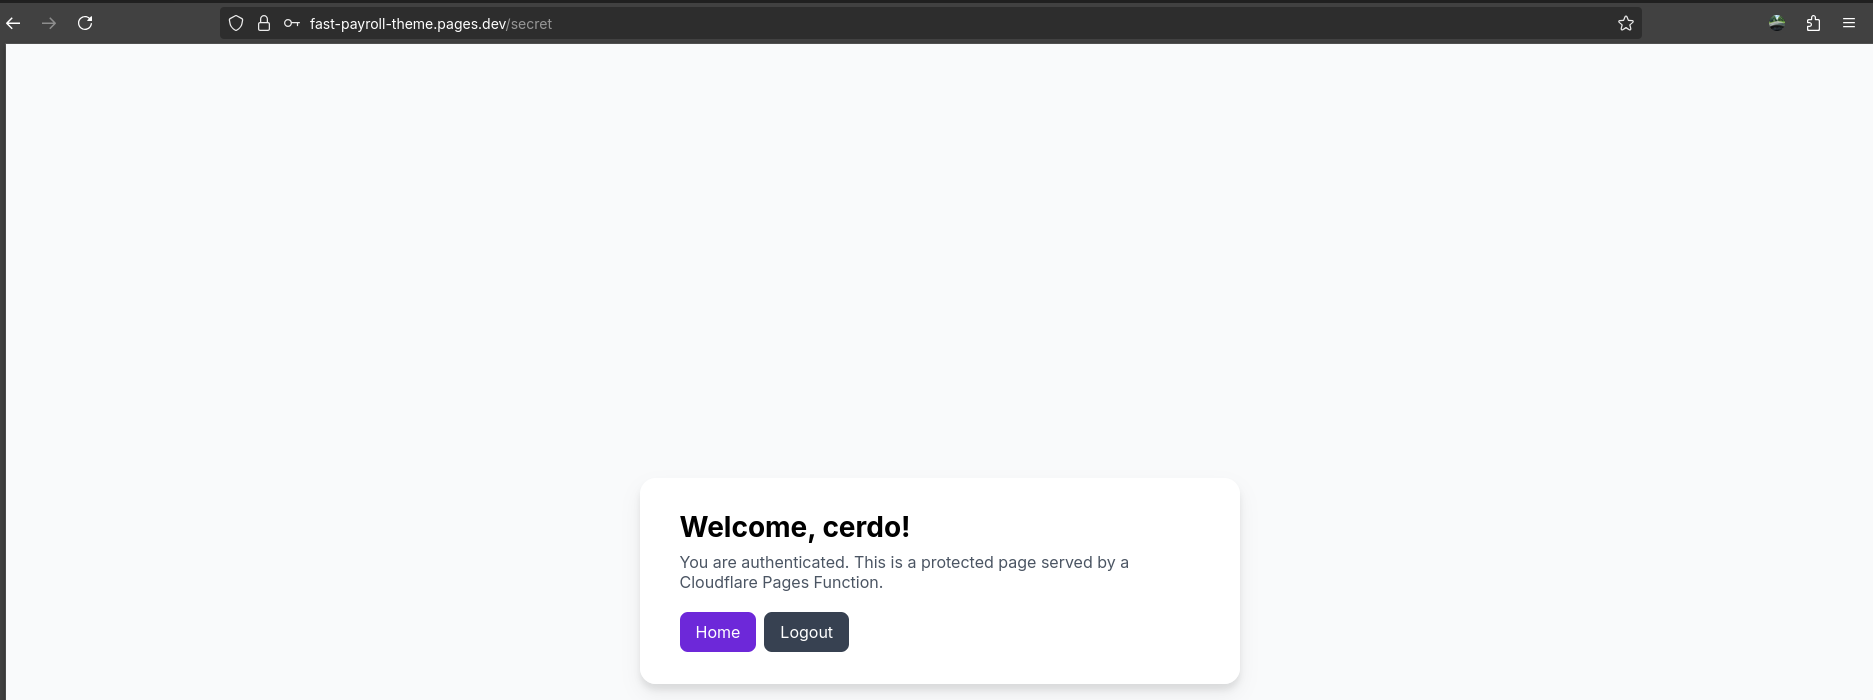
How about using the login page of the theme, and allow you to see a new /secret page only if you are logged in with a mail and pass that is inside the PB collection?
If you are not logged in, you will be redirected towards /login.
Simple, static and it literally flies:

100,000 requests/day, 1000 requests/min and 10ms CPU time - We are golden :)
See how well it works: https://fast-payroll-theme.pages.dev/login/
Conclusions
We could use any other combination of authentications, like: LogTo, TinyAuth, just hardcoded… I recapped recently on this post.
This is how it looks the result: https://fast-payroll-theme.pages.dev/
Im now thinking that a future webifyer/awebsiteforall project could have such workflow:
SSG -> PB signup/signin -> See the /themes page if logged in and then choose:
- Free Tier: Select theme -> Gitea replicate user/pwd -> markdown editor
- Paid Tier: Pay and get your own domain (check against stripe)
- Custom solutions
As this has worked, so should a SSG + CF Worker + Logto via JS (instead of python):
Im still impressed by new CLI tools, like
- In case you need to bill someone, there is a new player in town: https://github.com/cemalidev/invocli
A Node.js CLI for generating PDF invoices
Remember also about serverless-invoices.
- Cursor CLI
Some concepts recap
- A callback is a function passed as an argument to another function, which is then executed at a later time.
- A hook is a specific type of callback that allows you to “tap into” or execute code at a predefined point in a system’s execution flow.
- A webhook is a specific application of a hook for REST APIs, acting as an event-driven HTTP callback that sends real-time data to a client’s URL when a specific event occurs.
- An endpoint is a specific URL in a REST API that represents a resource or a collection of resources, serving as the destination for client requests.
See also https://docs.warp.dev/developers/cli
Proper Tags
That’s a great question, and there are several ways to tag your project, with the v.breakingchange.feature.fix format being a common approach.
This is an example of semantic versioning and is widely used for version control.
Semantic Versioning
Semantic versioning, often shortened to SemVer, is a system that uses three numbers to represent the version of a software project: MAJOR.MINOR.PATCH.
It provides a clear way to communicate the type of changes that have been made in a new release.
- MAJOR: The first number is incremented when you make breaking changes that are incompatible with previous versions.
- MINOR: The second number is for new features that are backward-compatible.
- PATCH: The third number is for backward-compatible bug fixes.
For example, if you’re on version 1.2.3:
- A bug fix would change it to
1.2.4. - A new feature would change it to
1.3.0. - A breaking change would change it to
2.0.0.
This system is very effective because it gives users and developers a clear understanding of the scope and potential impact of a new release without needing to read detailed release notes.
Additional Tags
You can add additional tags to provide more context. These are often used for pre-release versions.
alpha: This indicates a very early, unstable version.beta: This is a more stable pre-release, often used for testing.rc(release candidate): This is a final test version before the official release.dev(development): This indicates a version that is actively being worked on.
For example, a pre-release version could be tagged as 1.4.0-beta.1.
Using Your Proposed Format
Your proposed format, v.breakingchange.feature.fix, is a conceptual breakdown of the types of changes that would lead to a new version number in the SemVer system.
It’s not a standard tagging format itself but rather a good way to think about the reasons behind your versioning.
The actual tag you’d use for a new version with a breaking change, a new feature, and some fixes would be something like v1.2.3 or v2.0.0 depending on the changes.
Ultimately, the best tagging strategy depends on your project’s needs and how you want to communicate with your users and collaborators.
However, adopting SemVer is a widely accepted and highly recommended practice.
FAQ
A hook is a type of callback, but the two terms aren’t interchangeable.
A callback is a general programming concept where you pass a function (or “callable”) as an argument to another function, which then calls it at a later time.
A hook is a specific type of callback used in certain software architectures, especially those that are event-driven or extensible.
Understanding Callbacks
A callback is a fundamental programming pattern.
It’s essentially a function that’s given to another function to be executed later.
The function receiving the callback is often a higher-order function.
This pattern is commonly used in asynchronous operations, like fetching data from a server, where you want to perform an action only after the data has been received.
Consider this simple example:
function fetchData(url, callback) {
  // Simulate an asynchronous network request
  setTimeout(() => {
    const data = "Hello, world!";
    callback(data); // The callback function is called here
  }, 1000);
}

function processData(data) {
  console.log("Processing the data:", data);
}

// Pass processData as a callback to fetchData
fetchData("https://example.com/api/data", processData);
In this case, processData is the callback.
It’s passed to fetchData and is only executed after the simulated data has been “fetched.”
Understanding Hooks
A hook, on the other hand, is a specific implementation of the callback pattern.
Hooks are typically used in frameworks or applications that allow developers to “hook into” or “tap into” specific points in the system’s execution flow.
They are essentially pre-defined callbacks that a system will invoke when a particular event occurs.
For example, in a content management system (CMS) like WordPress, there are many action hooks and filter hooks.
- Action hooks allow you to execute your own custom code at a specific point, such as when a new post is saved. You “hook” your function to that event.
- Filter hooks allow you to modify data before it’s displayed or saved, such as filtering the content of a post before it’s shown to a user.
A common example of hooks is in React. React Hooks like useState and useEffect are special functions that let you “hook into” React features from your functional components.
For instance, useEffect allows you to hook into the component’s lifecycle to perform side effects like data fetching or DOM manipulation.
The Analogy
Think of it this way: a callback is like giving a friend your phone number and asking them to call you back when they’re ready to leave.
You’ve provided the mechanism for a future action.
A hook is more like a specific, pre-determined “Do Not Disturb” sign on a hotel room door.
The cleaning staff has a pre-defined process for checking doors, and when they encounter your sign, it “hooks” into their normal routine, causing them to skip your room.
The system (the cleaning staff’s routine) has a designated point where it checks for and responds to your input (the hook).
In the context of REST APIs, the concepts of callbacks and hooks are used to enable asynchronous communication and event-driven architecture.
While a traditional REST API operates on a simple request-response model (the client requests data and the server immediately responds), callbacks and hooks allow the API to notify the client about events that happen later, without the client needing to repeatedly ask for updates.
Callbacks in REST APIs
A callback in a REST API is typically used for long-running, asynchronous operations.
Instead of the API server holding a connection open while it performs a task, the client sends a request that includes a special callback URL.
The server then immediately responds with a status like 202 Accepted, acknowledging the request. When the long-running task is finally complete, the server makes a new HTTP request to the client’s provided callback URL, sending the final result.
This is much more efficient than polling, where the client would have to repeatedly send requests to the server to check if the task is finished.
- Example: An e-commerce API might accept a request to generate a complex sales report.
- The client sends a
POSTrequest to/reportswith acallbackUrlin the payload. The server immediately returns a202status. - When the report is ready hours later, the server sends a
POSTrequest to the client’scallbackUrlwith the report data.
Hooks in REST APIs (Webhooks)
A hook in the context of REST APIs is almost always referred to as a webhook.
A webhook is a mechanism that allows a service to send real-time data to a client as soon as a specific event occurs, without any prior request from the client.
The client, or “subscriber,” provides a URL (the webhook URL) to which the “publisher” sends data.
Webhooks are a key component of an event-driven architecture.
They are essentially user-defined HTTP callbacks that are triggered by system-wide events.
Example: A GitHub API user can configure a webhook on their repository.
- When a new commit is pushed, GitHub sends a
POSTrequest to the user’s webhook URL with a JSON payload containing information about the commit. - The user’s application can then process this data in real-time, perhaps by triggering an automated build process.
Gitea 101
Gitea x GHA
With Github you can get GHA for free on public repos.
But how about setting Github to Gitea webhooks and then build your site on your homelab automatically?
What? What are the Directions?
Webhooks are
Gitea -> Your service.
To make things happen inside Gitea, you call its API
Your service -> Gitea.
- Run Gitea into your HomeLab via: https://github.com/JAlcocerT/Home-Lab/tree/main/gitea
sudo docker compose up -dAnd go to localhost:3033 to see Gitea Web UI.
depends_on container feature works between containers and the compose overrides. See these .mdYou know whats commin right?
- Deploy Gitea, create the admin and get its PAT - Get Familiar with gitea API capabilities
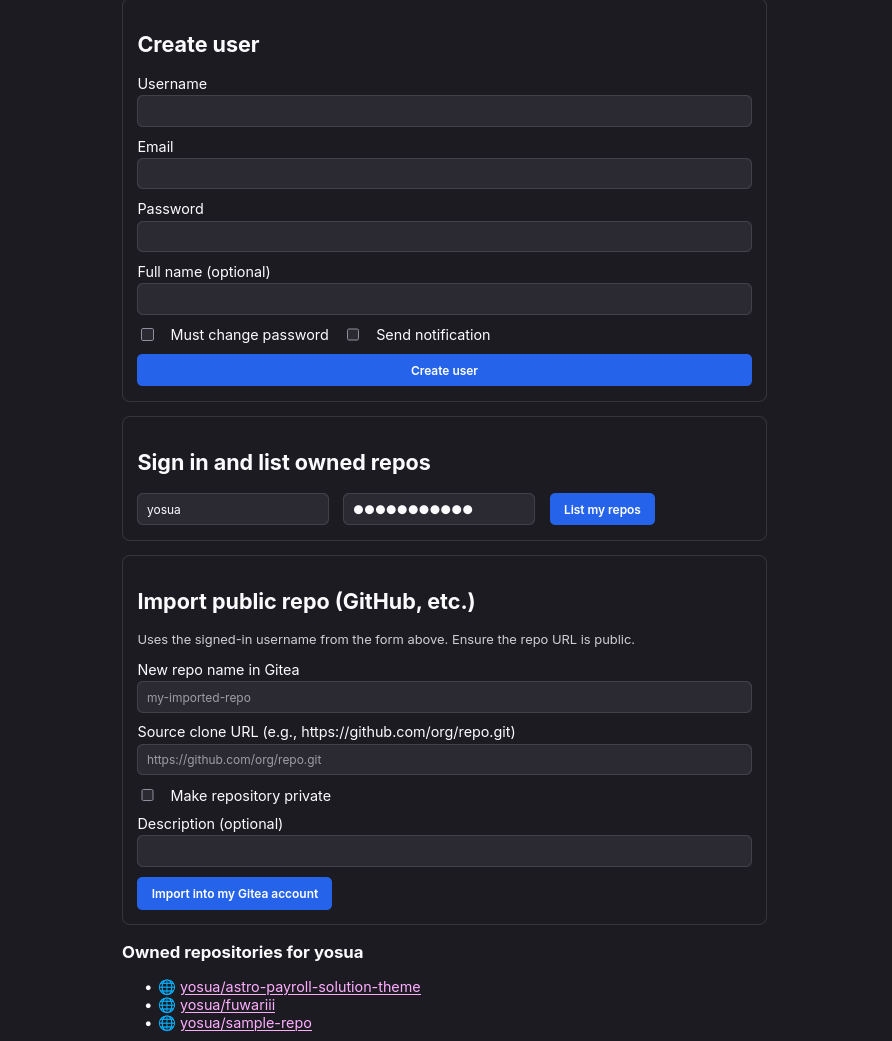
- As users can be created via API and they can fork repos…how about using some html + FastAPI to wrap that?
- Imagine…using gitea and cloning a public Github Repo, like the one we talked above
curl -sS -X POST \
  -H "Authorization: token $GITEA_TOKEN" \
  -H "Content-Type: application/json" \
  -d '{
    "clone_addr": "https://github.com/ctrimm/astro-payroll-solution-theme.git",
    "repo_name": "astro-payroll-solution-theme",
    "mirror": false,
    "private": false,
    "description": "Imported from GitHub"
  }' \
  "$GITEA_BASE/repos/migrate?sudo=yosua" | jq '.full_name,.private,.mirror'
Then, continue developing a WebApp that would allow for logged in users to simply edit the content of that SSG (markdown editor)
When commit happens, a static build would be triggered via Webhook
See this sample FastAPI + html that bundles of this:
Wouldnt that architectural workflow be cooool? See the diagram and ets understand how
Gitea via CLI
How about doing cool stuff with Gitea, but programatically?
Gitea has a cool API
I mean a REST API, a type of API (Application Programming Interface): interface to interact with a system’s capabilities.
- Examples: REST over HTTP/JSON, GraphQL, gRPC, SOAP, WebSocket APIs, language SDKs, even CLIs.
- In your Gitea context:
- “API” in https://docs.gitea.com/api/1.24/ specifically means the HTTP REST API (JSON over HTTP).
- Your curl examples are REST calls to
http://.../api/v1/.... - Webhooks are not you calling the API; they’re HTTP callbacks from Gitea to you.
- And for these to work, someone or something should be listening
Gitea Webhooks
If you want to dive deeper…I have not yet
Gitea provides a built-in command-line tool for administration tasks, including user management.
The command to create a new user is gitea admin user create.
You’ll need to provide some required information like the username, password, and email.
You can also specify other options, such as making the new user an administrator.
Here’s a general example of the command:
gitea admin user create --username myname --password asecurepassword --email me@example.comIf you want to create an admin user, you can add the --admin flag:
gitea admin user create --admin --username myadmin --password anothersafe_password --email admin@example.comNote: The specific way you run this command may vary depending on your Gitea installation.
For example, if you’re running Gitea in a Docker container, you’ll need to execute the command inside the container using docker exec.
Cloning Repositories
Gitea is a Git server, so you use standard Git commands to interact with it.
To clone a repository, you’ll use the git clone command, just like you would with any other Git service (like GitHub or GitLab).
You’ll need the repository’s URL, which can be either an HTTPS or an SSH URL.
You can find this URL on the Gitea web interface for the repository.
Here are examples for both methods:
Using HTTPS:
git clone https://gitea.example.com/username/repository.gitUsing SSH:
git clone git@gitea.example.com:username/repository.gitBefore you can clone via SSH, you’ll need to have an SSH key added to your Gitea user account.