FrontEnd 101. SPAs and ways to do Auth
TL;DR
About Front-End 101 and how to do better auth.
With Selfhosted OAUTH alternatives recap.
+++ What’s Forward Auth vs http Cookie
Intro
This has been the year of getting better at authentication.
I got to setup properly: Logto and TinyAuth as two different auth alternatives.
Via Flask, we can also have hardcoded users to be logged in, which you can improve by being part of the .env
I also got to know the PB way of authenticating users.
graph TD
    subgraph "Frontend (Browser)"
        Component[Component] -->|"triggers user action"| Hook[Hooks]
        Hook -->|"calls business logic"| Service[Service]
    end

    subgraph "Backend (Server)"
        subgraph "API (API Endpoints)"
            Service -->|"sends HTTP request (with JWT)"| Backend_API[Backend API]
            Backend_API -->|"validates JWT"| Authorization[Authorization Logic]
            Authorization -->|"grants access"| Backend_Logic[Business Logic]
            Backend_Logic <-->|"reads/writes data"| Database[Database]
        end
    end

    Backend_Logic -->|"sends response"| Backend_API
    Backend_API -->|"sends HTTP response"| Service
    Service -->|"updates state"| Hook
    Hook -->|"updates UI"| Component
A FE guy recommended me to look:
- https://tanstack.com/query/latest - Powerful asynchronous state management, server-state utilities and data fetching
- https://redux-toolkit.js.org/rtk-query/overview - RTK Query is an optional addon included in the Redux Toolkit package, and its functionality is built on top of the other APIs in Redux Toolkit.
FE Can do a lot
Front End and its html, css and JS/TS can do a lot of things.
Not only great looking static blogs or content driven sites.
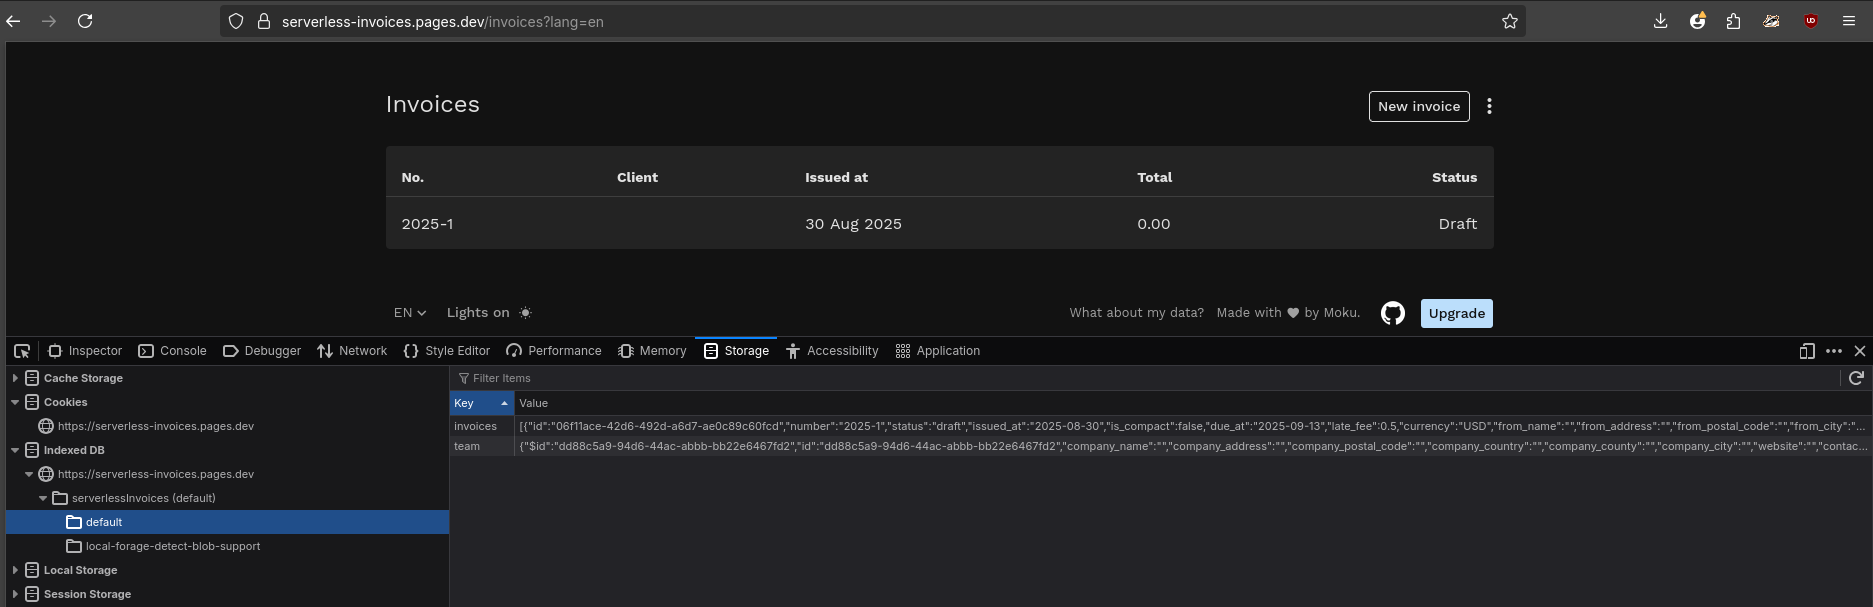
But also apps, like these for invoice generation, that actually perform some task:
We can generate PDFs while being statically deployed.
The client’s CPU (and browser engine) does the layout and PDF generation 😧
It seem all that is just the beauty of SPAs.
Because I got it deployed statically for free at cloudflare pages like so, with all its features working: https://serverless-invoices.pages.dev/
Its also interesting to see how it works the invoice editor, purely static.
Idea for a markdown editor?
Ill have to see also react-invoice deployed at vercel or wikiJS to get more ideas
If you are confussed…I have been too.
Get a broader view: I have added this SSG / SPA / SPA+Webhooks / Full Stack 101
| Model | What it is | Pros | Cons | Good for | Typical hosting/runtime |
|---|---|---|---|---|---|
| SPA | Client‑side rendered app; one index.html, routes in browser | Simple hosting, rich UX, offline possible, minimal infra | Larger initial JS, SEO needs care, auth done client‑side | Tools, dashboards, single‑user/private apps | Static host (CF Pages/Netlify/Vercel) + SPA fallback |
| PWA | SPA/SSG with Service Worker + manifest for offline/install | Offline/cache, installable, better UX | SW complexity, cache invalidation, browser quirks | Field apps, recurring tools, low‑connectivity use | Same as SPA/SSG + Service Worker |
| SPA + Webhooks | SPA UI + serverless functions reacting to provider webhooks; small state in KV/DB; client reads via /api/me | Keep static hosting; entitlements/auth/events without full backend; low cost | Extra moving parts (functions, secrets, KV); client gating (not true server auth) | Feature unlocks, subscription gates, light auth/roles, Stripe/MailerLite/Logto/PocketBase events | Static host + Functions (CF Workers/Pages Functions, Netlify/Vercel) + KV/D1 |
| SSG | Pages pre‑rendered at build time | Great SEO/TTFB, CDN‑only, predictable costs | Rebuilds for content changes (unless ISR); dynamic per‑user needs client fetch | Marketing/docs, blogs, mostly static content | Static host; optional ISR/edge revalidation |
| JAMstack | Architecture: static frontends + APIs + serverless; can be SPA or SSG | Scales via CDN, decoupled services, strong DX | Requires integration glue (webhooks/functions), service sprawl | Sites/apps that mix static + APIs; headless CMS | Static host + Functions + external APIs (headless CMS, auth, payments) |
| SSR (full‑stack) | HTML rendered per request (server/edge) with API/backend | Fast first render, great SEO for dynamic routes, secure server auth, streaming | Needs runtime/server, higher ops complexity/cost | Multi‑user SaaS, personalized content, complex auth | App platform (Node SSR: Nuxt/Next/Nest/Express) on server/edge |

FE Separation of Concerns
An excellent representation of a modern, well-structured front-end application architecture is the model follows the separation of concerns principle.
This is a cornerstone of building scalable and maintainable software.
But why this layered approach is so effective?
Component: The Presentation Layer 🎭
The Component is a pure presentation layer. Its sole responsibility is to render the UI and respond to user events. It shouldn’t contain any complex business logic.
Its job is to be “dumb”—it displays data it receives and passes user interactions up to the next layer.
This makes components highly reusable and easy to reason about.
For example, a <UserProfile> component simply takes user data as a prop and displays the name, photo, and bio.
It doesn’t know how that data was fetched.
Hooks: The Business Logic Layer 🧠
Hooks act as the bridge between the UI and the data layer. They contain the application’s business logic.
A hook’s job is to manage state, handle side effects (like data fetching), and expose a clean, reusable interface for components.
For example, a useUserProfile() hook would be responsible for fetching the user’s data from an API and managing the loading and error states.
It encapsulates all that complexity so the component doesn’t have to.
It’s the “smart” part of the application that knows what to do with data.
Services: The Data Layer 🔌
Services are the low-level data access layer.
They are responsible for communicating with external resources like a backend API (e.g., FastAPI) or a database (e.g., PocketBase, or PB as you mentioned).
A service contains the raw functions for making HTTP requests, handling authentication tokens, and formatting data.
They don’t know anything about the UI or how the data will be used.
They simply provide a clean, promise-based API for other parts of the application to use.
By separating your application this way, you gain several key advantages:
- Reusability: Your services can be used by any hook, and your hooks can be used by any component, without code duplication.
- Testability: As discussed earlier, you can test each layer in isolation. The service tests ensure your API calls work correctly, the hook tests verify your business logic, and the component tests check that the UI renders properly.
- Maintainability: If your backend API changes, you only need to update your services. If you want to change a UI design, you only need to modify a component. This prevents a domino effect of changes across the entire codebase.
About Business Logic
You’ve hit on a common point of confusion.
Business logic is a broad term, and in modern development, it exists on both the front end (FE) and the back end (BE).
Your hooks can and should contain business logic, but it’s a specific type of logic.
Business Logic on the Front End (Hooks)
The business logic in your hooks is primarily about application state and user interface orchestration.
It dictates how the front end should behave and react to user input and back-end responses. This is often called client-side business logic.
Examples include:
- Form Validation: Checking if a user’s input is valid before sending it to the back end.
- UI State Management: Logic for showing a loading spinner, handling a “Remember Me” checkbox, or toggling UI elements.
- Data Transformation: Formatting data from the back end for a better user experience (e.g., converting a raw date string into a “3 days ago” format).
This logic should be focused on improving the user experience and making the application feel responsive and intelligent without requiring a round-trip to the server.
Business Logic on the Back End
The business logic on the back end is the core, authoritative logic that governs your application’s data and security. This is where the most critical rules and operations reside. It’s the server-side business logic.
Examples include:
- Security & Authorization: The ultimate decision on whether a user can access or modify a resource. This is non-negotiable and must be handled on the server.
- Data Validation & Integrity: Ensuring that data written to the database is always valid and adheres to all constraints (e.g., a user’s email is unique, a product’s price is positive).
- Complex Calculations: Processing a user’s shopping cart, calculating taxes and shipping, or running any resource-intensive operations.
Why the Distinction Matters
You need both. The logic in your front-end hooks and the logic on your back end work together to create a seamless experience.
- Defense in Depth: The front-end validation in your hooks provides a great user experience by giving instant feedback, but the back-end validation is the last line of defense. You should never trust a front-end request, as it can be bypassed.
- Scalability & Maintainability: By separating the logic, you can scale each part independently. A bug in your UI logic won’t compromise your data, and changes to your back end can be made without completely refactoring the front end.
So, to summarize: hooks are a part of the front end, and they contain client-side business logic to improve the user experience. The back end contains the authoritative server-side business logic that secures your application and manages your data.
Authentication vs Authorization
That’s a crucial question in web security, and the distinction is often a source of confusion.
In simple terms:
- Authentication is about WHO you are.
- Authorization is about what you can DO.
Getting philosophical here
Think of a real-world analogy, like a secured building:
Authentication (Your ID Card): When you arrive at the front door, the security guard asks for your ID. You present it, and the guard verifies that you are indeed the person named on the card. This process confirms your identity. You have been authenticated.
Authorization (Your Key Card Permissions): Once inside, you use your key card to open a specific door. The key card is programmed to only give you access to the floors and rooms you are allowed to enter. You can go into the office kitchen, but not the executive conference room. This process determines your level of access and what you are permitted to do. You have been authorized for specific areas.
| Aspect | Authentication | Authorization |
|---|---|---|
| Question it Answers | Who are you? | What are you allowed to do? |
| Process | Verifying identity. | Granting or denying access to resources based on permissions. |
| Credentials Used | Username/password, biometrics (fingerprint), tokens (JWT), smart cards, etc. | Roles, permissions, access policies, scopes (in OAuth). |
| Order of Operations | Always comes first. You must be authenticated before you can be authorized. | Always follows authentication. The system needs to know who you are before it can decide what you can access. |
| Example in Web Security | You enter your email and password to log in to an application. The application verifies your credentials. | The application sees that you are an “admin” and shows you a dashboard with options to manage users, which a regular user wouldn’t see. Or, an API request with your token only grants you access to your own user profile data. |
In the context of the previous discussion:
OAuth is an authorization protocol. Its main job is to define the secure process for an application to get a token that grants it specific permissions to access a user’s resources.
A JWT can be used for both authentication and authorization. The act of a server validating the JWT’s signature to confirm it came from a trusted source is part of authentication. The “claims” inside the JWT’s payload (e.g.,
role: "admin") provide the authorization information that the resource server uses to decide what the user can do.
Authentication Tools
I have been very happy with LogTo so far.
Logto
🧑🚀 Authentication and authorization infrastructure for SaaS and AI apps, built on OIDC and OAuth 2.1 with multi-tenancy, SSO, and RBAC.
The documentation is pretty detailed, and they keep adding new features: https://docs.logto.io/end-user-flows/collect-user-profile
Their blog normally brings quite interesting ideas:
- MCP is cool, but their auth is hard: https://blog.logto.io/mcp-auth?ref=newsletter.
But most importantly, Logto works: they send the email for people to validate that they are interested etc
This is the LOGTO TS SDK for interacting with Logto’s Management API: https://github.com/logto-io/logto/blob/master/packages/api/README.md
But I feel most confortable with the Python one, as tested on few pet projects:


TinyAuth
If you have done your Traefik v3.3 setup at your server, you can try this one.
We can say that its part of the SelfHosted group.
- I have been testing this on my homelab at: https://tinyauth.jalcocertech.com/login
Flask User/PWD Challenge
Just a simply: user and password.
Because why not:
Thats similar to what I was doing with Streamlit Auth hardcoded users/pwds
PocketBase
Lately I got to try PocketBase.
We can interact with a PB instance via Curls and Bearer tokens:
#source .env #to get PB admin email and the pwd!

TOKEN=$(curl -s -X POST "$PB/api/admins/auth-with-password" \
  -H 'content-type: application/json' \
  -d "{\"identity\":\"$ADMIN_EMAIL\",\"password\":\"$ADMIN_PASS\"}" | jq -r .token)
echo "$TOKEN"
curl -s -X POST "$PB/api/collections/users/records" \
-H "Authorization: Bearer $TOKEN" \
-H "Content-Type: application/json" \
-d '{
"username": "jalcocert",
"email": "jalcocert@whatever.com",
"emailVisibility": true,
"password": "somepass",
"passwordConfirm": "somepass",
"name": "jalcocert"
}'PB Auth via SDK: We can authenticate programatically to PB via scripts.
Conclusions
There are many excellent open-source and self-hosted OAuth providers, often falling under the broader category of Identity and Access Management (IAM) solutions.
These tools give you full control over your user data and authentication flows, a significant advantage for security and customization.
Here are some of the most popular and well-regarded options:
- Keycloak
Keycloak is arguably the most well-known and feature-rich open-source IAM solution.
It’s sponsored by Red Hat and is a mature, enterprise-ready platform.
And im aware that there are companies using it as an auth to be passed on top of their internal web apps that are publically accesible.
- Key Features: Single Sign-On (SSO), Multi-Factor Authentication (MFA), identity brokering (social login with GitHub, Google, etc.), user federation with LDAP/Active Directory, and fine-grained authorization policies.
- Protocols: It’s a powerhouse, supporting OAuth 2.0, OpenID Connect (OIDC), and SAML 2.0.
- Deployment: Easy to deploy with Docker and Kubernetes, and it can be backed by standard databases like PostgreSQL or MySQL.
- Pros: Huge community, extensive documentation, and a robust feature set out of the box.
- Cons: Can have a steep learning curve and may require more resources than a lighter-weight solution.
- Authelia
Authelia is an open-source authentication and authorization server designed to be a companion for reverse proxies.
Key Features: Provides a web portal with SSO and MFA. It works by protecting web applications behind a reverse proxy (like Nginx, Traefik, or Caddy).
Protocols: OpenID Connect 1.0 provider.
Deployment: Very lightweight and efficient, often deployed in a Docker container.
Pros: Simple to set up for protecting multiple services, very resource-efficient, and great for home labs or small-to-medium deployments.
Cons: Primarily focused on a specific use case (reverse proxy protection), and not a full-featured IAM for general application use.
- Authentik
Authentik is a newer, full-featured open-source identity provider.
- Key Features: Combines a wide range of features from user management and authentication to API protection and more. It has a modern, user-friendly interface.
- Protocols: Supports OAuth 2.0/OIDC, SAML, LDAP, and RADIUS.
- Deployment: Designed to be easily deployed on Docker Compose or Kubernetes.
- Pros: Highly flexible and integrates with a variety of services, transparent security with open-source code, and provides a lot of functionality in one package.
- Cons: Being a newer project, the community is smaller than Keycloak, and it might not have the same level of battle-tested enterprise deployments yet.
The choice among these depends on your specific needs: a full-featured platform (Keycloak, Authentik), a lightweight solution for protecting existing services (Authelia), or a modular API-first approach (Ory).
The Identity Provider (IdP) is the component that primarily regulates authentication. 🔐
The IdP is the system that manages user identities and is responsible for verifying a user’s credentials.
It’s the central authority that holds the user’s information and confirms that they are who they claim to be.
How different authentication models interact?
Ysing a tool like Authelia on top of your web app login is fundamentally different from the PocketBase HTTP cookie approach.
The key difference is the layer at which authentication is handled.
Authelia vs PB
Authelia’s Role (Forward Auth)
Authelia is a centralized authentication and authorization server designed to work with a reverse proxy (like Cloudflare, NGINX, or Traefik) via the forward auth pattern.
It intercepts every request to your web app before the request ever reaches the app itself.
The login screen you see is Authelia’s, not your web app’s.
- A user tries to access
your-app.com. - The reverse proxy intercepts the request and sends a sub-request to Authelia asking, “Is this user allowed to see this page?”
- Authelia checks for a valid session cookie that it controls.
- If the user is not authenticated, Authelia sends a redirect to its own login page.
- If the user is authenticated, Authelia responds with a “success” signal, and the reverse proxy then forwards the original request to your web app.
Your web app itself doesn’t need to know anything about user sessions, cookies, or authentication.
It simply trusts that any request it receives has already been authenticated by the reverse proxy.
This is why it’s a very powerful pattern for securing applications that don’t have their own built-in authentication, such as dashboards or static sites.
PocketBase’s HTTP Cookie Approach
With PocketBase, authentication is decentralized and handled by the web application itself.
- A user accesses
your-app.com. - Your app’s front-end (CSR) presents the login form.
- The user submits credentials to the PocketBase backend.
- PocketBase validates the credentials and responds by setting a secure,
HttpOnlycookie in the browser. - On every subsequent request from your web app to the PocketBase API, the browser automatically attaches this cookie.
- PocketBase’s backend validates the cookie on its own end to verify the user’s identity.
Key Differences & Why It’s Not the Same
The core difference is who’s in charge of authentication.
| Feature | Authelia (Forward Auth) | PocketBase (HTTP Cookie) |
|---|---|---|
| Authentication Layer | Handled by a separate, centralized service (Authelia) at the reverse proxy level. | Handled by the application’s backend (PocketBase) itself. |
| Login Page | Authelia’s login page; it’s a single sign-on (SSO) experience. | Your web app’s login page, which talks to PocketBase. |
| Application Awareness | The web app is completely unaware of the authentication process; it simply receives requests from an authenticated source. | The web app’s front-end and back-end are tightly coupled for authentication. The app code must be aware of cookies and session state. |
| Use Case | Ideal for wrapping any web service with a login page, even those with no built-in auth, and for providing SSO across multiple subdomains. | Ideal for building an application from the ground up with an integrated authentication system. |
In short, Authelia is like a single, universal front-door security guard for all your applications.
PocketBase is like each of your applications having its own separate lock and key.
How the IdP Fits In
In the context of the authentication and authorization concepts we’ve discussed, the Identity Provider plays a key role:
- Verifying Credentials: When a user enters a username and password (or uses a biometric scan, etc.), the IdP is the service that checks these credentials against its own database. It performs the act of authentication.
- Issuing a Token: Once the user is authenticated, the IdP issues a security token, often a JWT, to represent that verified identity. This token is what the user’s application will use in subsequent requests.
- Centralized Authority: The IdP allows for a centralized approach to authentication. Instead of every application or service having to build its own login system, they can delegate this responsibility to a trusted IdP. This is a core principle behind Single Sign-On (SSO).
In the OAuth flow, the Authorization Server often doubles as the Identity Provider.
For example, when you “Sign in with Google,” Google’s servers act as the IdP, authenticating you and then issuing a token that the third-party application can use for authorization.
Similarly, the open-source and self-hosted solutions like Keycloak or Okta are designed to be both the Identity Provider and the Authorization Server for your applications.
FAQ
Web Security Concepts
For web security, OAuth, JWT, and bearer tokens are related concepts, but they serve different purposes.
OAuth is a protocol, JWT is a token format, and a bearer token is a token type.
A good analogy is: OAuth is the lockbox that holds the key, a JWT is a specific type of key (a self-contained one), and a bearer token is a kind of key that grants access to anyone who holds it.
And there has been a recent LogTo blog post about these: https://blog.logto.io/jwt-vs-oauth/
OAuth: The Authorization Protocol 🤝
OAuth (Open Authorization) is an authorization framework that defines a process for a user to grant a third-party application access to their resources on a different service, without having to share their credentials.
For example, when you “Sign in with Google” to a new website, you’re using OAuth.
Google manages your authentication and, after you give your consent, issues a token to the new website that grants it limited access to your data.
JWT: The Token Format 📄
A JSON Web Token (JWT) is a specific, compact, and self-contained token format that is often used within the OAuth framework.
A JWT isn’t a protocol itself, but a standardized way of securely transmitting information between parties as a JSON object.
A JWT has three parts: https://www.devtoolbox.co/tools/jwt-viewer
- Header: Specifies the type of token (JWT) and the signing algorithm.
- Payload: Contains “claims,” which are statements about the user or resource. These can include user ID, roles, and expiration time.
- Signature: A cryptographic signature that verifies the token’s integrity and authenticity. This signature ensures the token hasn’t been tampered with.
Because a JWT is self-contained, a resource server can validate the token’s signature without needing to communicate with the authorization server, which is why it’s a popular choice for building stateless APIs.
Bearer Token: The Token Type 🔑
A bearer token is a type of access token that grants access to anyone who “bears” or possesses it.
It’s the most common type of access token used in OAuth 2.0. When an application receives a bearer token, it includes it in the Authorization header of subsequent requests to access protected resources.
The key characteristic of a bearer token is that it’s a “possession-based” key.
If an attacker steals a bearer token, they can use it to access resources as if they were the legitimate user, until the token expires.
This is why it’s critical to transmit bearer tokens only over a secure channel like HTTPS and to store them securely.
How They All Fit Together
The typical flow is:
- A user initiates an action on a client application (e.g., clicking “Log in with Google”).
- The client application directs the user to an authorization server (e.g., Google’s login page), which is part of the OAuth framework.
- The user authenticates with the authorization server and grants the client application consent to access their data.
- The authorization server issues a JWT, which is formatted to be a bearer token, and sends it back to the client application.
- The client application uses this JWT bearer token in the
Authorizationheader of its requests to the resource server (e.g., a photo album API). - The resource server validates the JWT’s signature and, if it’s valid, grants the client application access to the requested resources.
FE Concepts
In modern web development frameworks like React, hooks, services, and components are architectural concepts that help you build organized, reusable, and maintainable applications.
They relate to the security concepts we’ve discussed by defining where and how authentication and authorization logic should be handled within your application’s front end.
1. Components
A component is the fundamental building block of a front-end application.
It’s a self-contained, reusable piece of code (often a JavaScript function or class) that renders a part of the user interface (UI).
Think of a component as a LEGO brick: it can be a button, a form, a user profile card, or an entire page. Components handle the visual representation of your data and respond to user actions.
- Example: A
<LoginButton>component that renders a button to initiate the login process. - Security Relation: Components are where you might display a UI based on a user’s authorization. For example, a
<Dashboard>component might check if a user is an admin before rendering a “Manage Users” button.
2. Services
A service (or a “utility” or “helper”) is a piece of code that encapsulates a specific function or responsibility, usually for interacting with a back-end API.
Services don’t handle UI; their job is to abstract away complex logic like making HTTP requests, managing data, or in our case, handling security flows.
- Example: A
AuthServicethat contains methods likelogin(),logout(),getToken(), andisLoggedIn(). This service would be responsible for sending the username and password to your back-end API or handling the OAuth redirect and token storage. - Security Relation: This is where the core authentication and authorization logic should reside. Instead of every component making its own API calls, they all rely on the
AuthService. This promotes the separation of concerns and makes your code more secure and easier to manage.
3. Hooks
A hook (specific to React, but a similar concept exists in other frameworks) is a function that lets you “hook into” a component’s lifecycle and state.
Hooks allow you to reuse stateful logic without changing your component hierarchy. They are a powerful way to make your components “smarter” without cluttering them.
- Example: A
useAuth()hook that provides components with the current user’s login status (isLoggedIn), their profile data, and methods for login/logout. This hook might internally use theAuthServicewe mentioned. - Security Relation: Hooks are the most modern way to connect your components to your services. A component might call
const { isLoggedIn, userRole } = useAuth();to get the user’s status. It then uses this information to determine what to display. This keeps the component’s code clean and focused on rendering, while the hook handles the complex security logic by interacting with theAuthService.
How They All Fit Together in a Security Context
Imagine you’re building a dashboard that only “admin” users can see. The process would look like this:
- A Component (
<AdminDashboard>) needs to know if the user is an admin. - It uses a Hook (
useAuth()) to get theuserRolefrom a centralized state. The hook is responsible for fetching and managing this state. - The hook gets the user’s role by calling a method on an Service (
AuthService.getUserRole()). - The
AuthServiceretrieves the role from the user’s stored JWT token (which was obtained during the OAuth flow), and returns it to the hook. - The hook returns the
userRoleto the component. - The component then uses a conditional statement like
if (userRole === 'admin')to decide what UI to render.
This architecture ensures that your authentication logic is centralized in services, exposed to components in a clean way via hooks, and used by your components to render the correct UI for the user.
Testing on Hooks vs Testing on Components
A front-end developer would tell you that because it’s a core principle of modern front-end development. The idea is to separate the logic from the UI, which makes code easier to test, reuse, and maintain.
Why Testing Hooks is Simpler than Testing Components
The core reason is that hooks contain the business logic, while components contain the UI rendering logic. Testing these two things separately is more efficient and robust.
1. Isolation of Logic:
- Hooks: Hooks are pure JavaScript functions. They don’t have any UI to render or user events to simulate. You can test them like any other function: you provide specific inputs (props or state) and assert that they return the expected output (a state or value). For example, a
useAuth()hook can be tested by calling it and checking if theisLoggedInvalue is correct after a simulated login action. This is called unit testing. - Components: Components involve a lot more complexity. They render UI elements, respond to user clicks, and handle state changes. To test a component, you need a full rendering environment (like the DOM), which is more complex and slower to set up. You would have to “mount” the component, find the right button, simulate a click, and then assert that the UI changed as expected.
2. Speed and Efficiency:
- Hooks: Since hooks are just functions, their tests run incredibly fast. This allows you to have a large number of tests that can be run quickly and frequently, which is essential for a continuous integration workflow.
- Components: Testing components often involves more overhead, leading to slower test suites.
3. Test Portability:
- Hooks: The logic within a hook is not tied to any single component. You can create a test once for your
useAuth()hook, and that test will cover the authentication logic for every component that uses it. - Components: A test for a single component is specific to that component. If you have 10 different components that all use the
useAuth()hook, you don’t need to write 10 separate tests for the authentication logic—you just need one for the hook itself.
By focusing on testing the logic in the hooks, you ensure that the core functionality is bug-free and that the components are simply a clean, thin layer that uses that proven logic to display the correct UI. This practice leads to a more robust, maintainable, and scalable codebase.
Whats Forward Auth?
Forward auth is an authentication pattern where a reverse proxy or API gateway intercepts all incoming requests and forwards them to a dedicated, separate authentication service.
The reverse proxy only allows the original request to proceed to its final destination (the backend application) if the authentication service responds with a “success” status code (e.g., a 2xx HTTP status).
If the authentication service denies the request, the proxy returns an error or a redirect to the login page directly to the client, without ever reaching the backend application.
This pattern is especially popular in microservices architectures because it centralizes authentication logic.
Instead of each microservice having to implement its own authentication, they can trust the reverse proxy to handle it for them.
How It Differs From an HTTP Cookie
It’s a common misconception that forward auth is an alternative to an HTTP cookie.
In reality, they’re not mutually exclusive; they work together.
Forward auth is a system design pattern, while an HTTP cookie is a mechanism for passing data.
The HTTP cookie is the tool that enables the forward auth process.
Here’s how they differ:
HTTP Cookie: An HTTP cookie is a small piece of data that a server sends to a web browser. The browser stores it and automatically sends it back with every subsequent request to the same domain. Cookies are the most common way to maintain a user’s session state.
- Function: Stores authentication information (like a session ID or a token) on the client side.
- Where it lives: In the user’s browser, tied to a specific domain.
Forward Auth: Forward auth is the architectural pattern that leverages the cookie. It describes what happens to that cookie and the request it’s attached to.
The key distinction is in responsibility.
A browser handles the HTTP cookie automatically, but a reverse proxy or gateway handles the forward auth logic.
Think of it like this:
A cookie is a boarding pass that proves you’re a legitimate passenger. 🎫
Forward auth is the airport security checkpoint that inspects your boarding pass before you’re allowed to board the plane. 🛂
The forward auth gateway checks the cookie and, if it’s valid, lets the request through.
Without the forward auth pattern, the cookie would just go directly to the backend application, which would then have to do its own validation.
Forward auth externalizes this validation process, making the entire system more scalable and secure.
Why Forward Auth Is More Secure
Forward auth is generally considered more secure because it centralizes and abstracts the authentication logic away from your application’s core services.
This prevents each individual service from needing to handle its own authentication, reducing the attack surface.
Centralized Security Logic: Instead of every microservice being responsible for validating authentication cookies or tokens, a single, dedicated gateway (like a Cloudflare Worker or a reverse proxy) handles this critical task. This reduces the risk of security vulnerabilities caused by inconsistent or incorrect implementations across different services.
Stateless Microservices: The backend services don’t need to know anything about the user’s session or authentication. They receive a request from the gateway that has already been validated. This means the services are simpler, more scalable, and less prone to security flaws.
Protection Against Direct Access: The forward auth proxy can be configured to be the only entry point to your microservices. It prevents unauthorized requests from bypassing the security layer and hitting a service directly, which is a common vector for attack.
Enforced Security Policies: The gateway can enforce security policies like rate limiting, bot detection, and WAF (Web Application Firewall) rules before a request even reaches your backend. This adds another layer of defense against malicious traffic.
PocketBase Alternatives to HTTP Cookies
PocketBase’s primary authentication mechanism is a JWT (JSON Web Token).
While PocketBase itself sets this token in an HttpOnly cookie by default for CSR, you have the option to handle the token manually. This is what’s considered the “less secure” method you heard about and is often a reason for not needing a Cloudflare Worker.
- JWT in Local Storage: The user logs in, and the PocketBase client-side SDK receives the JWT. Instead of letting the browser store it in a cookie, you can manually save this token in the browser’s
localStorageorsessionStorage. On subsequent requests, your JavaScript code must then retrieve this token and add it to theAuthorization: Bearer <token>header.
Why this is less secure: Storing the JWT in localStorage makes it vulnerable to Cross-Site Scripting (XSS) attacks. If an attacker can inject malicious JavaScript into your site, they can easily access the token from localStorage and steal it. They can then impersonate the user and perform actions on their behalf. An HttpOnly cookie, on the other hand, is inaccessible to client-side JavaScript, making it immune to this type of attack.
The reason you wouldn’t necessarily need a Cloudflare Worker in this scenario is that your JavaScript is now fully responsible for managing the token and sending it with requests, bypassing the need for a proxy to handle cookie management. However, this convenience comes at a significant security cost.