[JAlcocerTech] Services Recap
Tl;DR
Pure throughput be like.
Intro
- WHY Im writting this post: Bc I was supposed to launch a mbsd fwk here, but I just released an ebook so far
- What Ive learnt with it: Ive ended up following the roadmap for my mbsd oss fwk and with a good foundation for outbound marketing
HomeLab x Agentic Workflows
As always i go to termix and see whats going on:
#ssh http://192.168.1.18:3034
htop #btop
See if you are missing disk space:
ncdu /
#sudo journalctl --vacuum-time=7d- lynx browser and helium
- btop > htop
- herdr > ghostty
- gram > vscode
If you are using FreeCad, be prepare to have 15GB, and for Arduino CLI ~8GB, for Kicad ~4gb
Ive tried t3 code with my Pi.
#https://github.com/pingdotgg/t3code/releases/tag/v0.0.33 #and appimagelauncher
curl -L \
    -o /home/jalcocert/Applications/T3-Code-0.0.33-x86_64.AppImage \
    https://github.com/pingdotgg/t3code/releases/download/v0.0.33/T3-Code-0.0.33-x86_64.AppImage && \
  chmod +x /home/jalcocert/Applications/T3-Code-0.0.33-x86_64.AppImage
Want an agent that learns with you? Try Hermes
- https://github.com/fathah/hermes-desktop/releases/download/v0.7.3/hermes-desktop-0.7.3.AppImage
- https://github.com/nousresearch/hermes-agent
#https://github.com/nousresearch/hermes-agent/releases/download/v0.5.15/hermes-agent
curl -L \
    -o /home/jalcocert/Applications/hermes-agent-0.5.15-linux-x64.AppImage \
    https://github.com/nousresearch/hermes-agent/releases/download/v0.5.15/hermes-agent-0.5.15-linux-x64.AppImage && \
  chmod +x /home/jalcocert/Applications/T3-Code-0.0.33-x86_64.AppImage
I had an that pushed to this repo after I reviewed the quality at my local Forgejo.
#  ssh -T git@gitlab.com

ssh -T -o BatchMode=yes forgejo-home
# gh auth status #I disabled mine to avoid conflicts while tinkering- Get a repo
- Then made it available at forgejo for the agent
http://192.168.1.2:3034/hermesagent/electronics-101 - Then put it back to gh here
- And test with https://webaudit.jalcocertech.com/
How to make sure your agent can write to the local Forgejo 🚀
Forgejo Write Access Validation
Date: 2026-0…
Local machine user: jalcocert
Forgejo SSH account validated: hermesagent
Forgejo host alias: forgejo-home
Forgejo SSH endpoint: git@192.168.1.2:2235
Summary
Write access to the local Forgejo instance was validated successfully for the configured SSH user hermesagent.
The validation checked:
- Local Git identity and repository remotes.
- SSH authentication to Forgejo.
- Actual repository write permission by pushing a temporary branch.
- Cleanup by deleting the temporary branch.
- Confirmation that no temporary test refs remained afterward.
HTTP/password-based remotes were not validated.
The successful validation applies to the configured SSH access through forgejo-home.
SSH Configuration Found
The local SSH config contains:
sshconfig
Host forgejo-home
    HostName 192.168.1.2
    Port 2235
    User git
    IdentityFile ~/.ssh/id_ed25519_forgejo
    IdentitiesOnly yes
The Forgejo SSH key files found locally were:
~/.ssh/id_ed25519_forgejo~/.ssh/id_ed25519_forgejo.pub
Global Git Identity
The global Git config includes:
user.name=hermesagent
user.email=alice@example.com
Authentication Check
Command run:
ssh -T -o BatchMode=yes forgejo-homeResult:
Hi there, hermesagent! You've successfully authenticated with the key named hermesagent@pi-home, but Forgejo does not provide shell access.
If this is unexpected, please log in with password and setup Forgejo under another user.
Conclusion: SSH authentication to Forgejo succeeded as hermesagent.
Write Permission Check
A temporary branch was pushed and then deleted from each Forgejo SSH remote.
Temporary branch used:
codex-write-test-20260819150805-3599Test method:
git push <remote> HEAD:refs/heads/codex-write-test-20260819150805-3599
git push <remote> :refs/heads/codex-write-test-20260819150805-3599
This validates actual write access because Forgejo accepted creation of a new remote branch.
The following deletion validates cleanup permission and confirms the test branch did not remain.
Repositories Validated
| Local repository | Forgejo remote | Result |
|---|---|---|
/home/jalcocert/electronics-101 | forgejo-home:hermesagent/electronics-101.git | Write OK, cleaned up |
/home/jalcocert/email-outbound-checks | forgejo-home:hermesagent/email-outbound-check.git | Write OK, cleaned up |
/home/jalcocert/gosolar-spain | forgejo-home:hermesagent/gosolar-spain.git | Write OK, cleaned up |
/home/jalcocert/mbsd | forgejo-home:hermesagent/mbsd.git | Write OK, cleaned up |
/home/jalcocert/pi-connectivity | forgejo-home:hermesagent/pi-connectivity.git | Write OK, cleaned up |
/home/jalcocert/selfhosted-connectivity | forgejo-home:hermesagent/selfhosted-connectivity.git | Write OK, cleaned up |
/home/jalcocert/optimum-path | forgejo-home:hermesagent/optimum-path.git | Write OK, cleaned up |
Cleanup Verification
After deletion, each repository was checked with:
git ls-remote --heads <remote> codex-write-test-20260819150805-3599Results:
forgejo-home:hermesagent/electronics-101.git remaining_test_refs=0
forgejo-home:hermesagent/email-outbound-check.git remaining_test_refs=0
forgejo-home:hermesagent/gosolar-spain.git remaining_test_refs=0
forgejo-home:hermesagent/mbsd.git remaining_test_refs=0
forgejo-home:hermesagent/pi-connectivity.git remaining_test_refs=0
forgejo-home:hermesagent/selfhosted-connectivity.git remaining_test_refs=0
forgejo-home:hermesagent/optimum-path.git remaining_test_refs=0
Conclusion: the temporary validation branch was removed from all checked Forgejo repositories.
Additional Remotes Observed
The following local repositories use GitHub remotes and were not part of the Forgejo write validation:
/home/jalcocert/Home-Lab/home/jalcocert/RPi/home/jalcocert/poc/home/jalcocert/RPi/Z_SelfHosting/rpi-mjpg-streamer/home/jalcocert/.hermes/hermes-agent
The following local repositories use HTTP remotes to the local Forgejo web endpoint and were not validated for HTTP/password write access:
/home/jalcocert/leads-slubnechwile:http://192.168.1.2:3034/JAlcocerT/leads-slubnechwile/home/jalcocert/optimum-path:http://192.168.1.2:3034/jalcocert/optimum-path
Final Result: SSH-based Forgejo write access is confirmed for hermesagent on the validated repositories.
Herdr was interesting on top of tmux
coming from the experiment on heat pump viability
and the data driven insulation
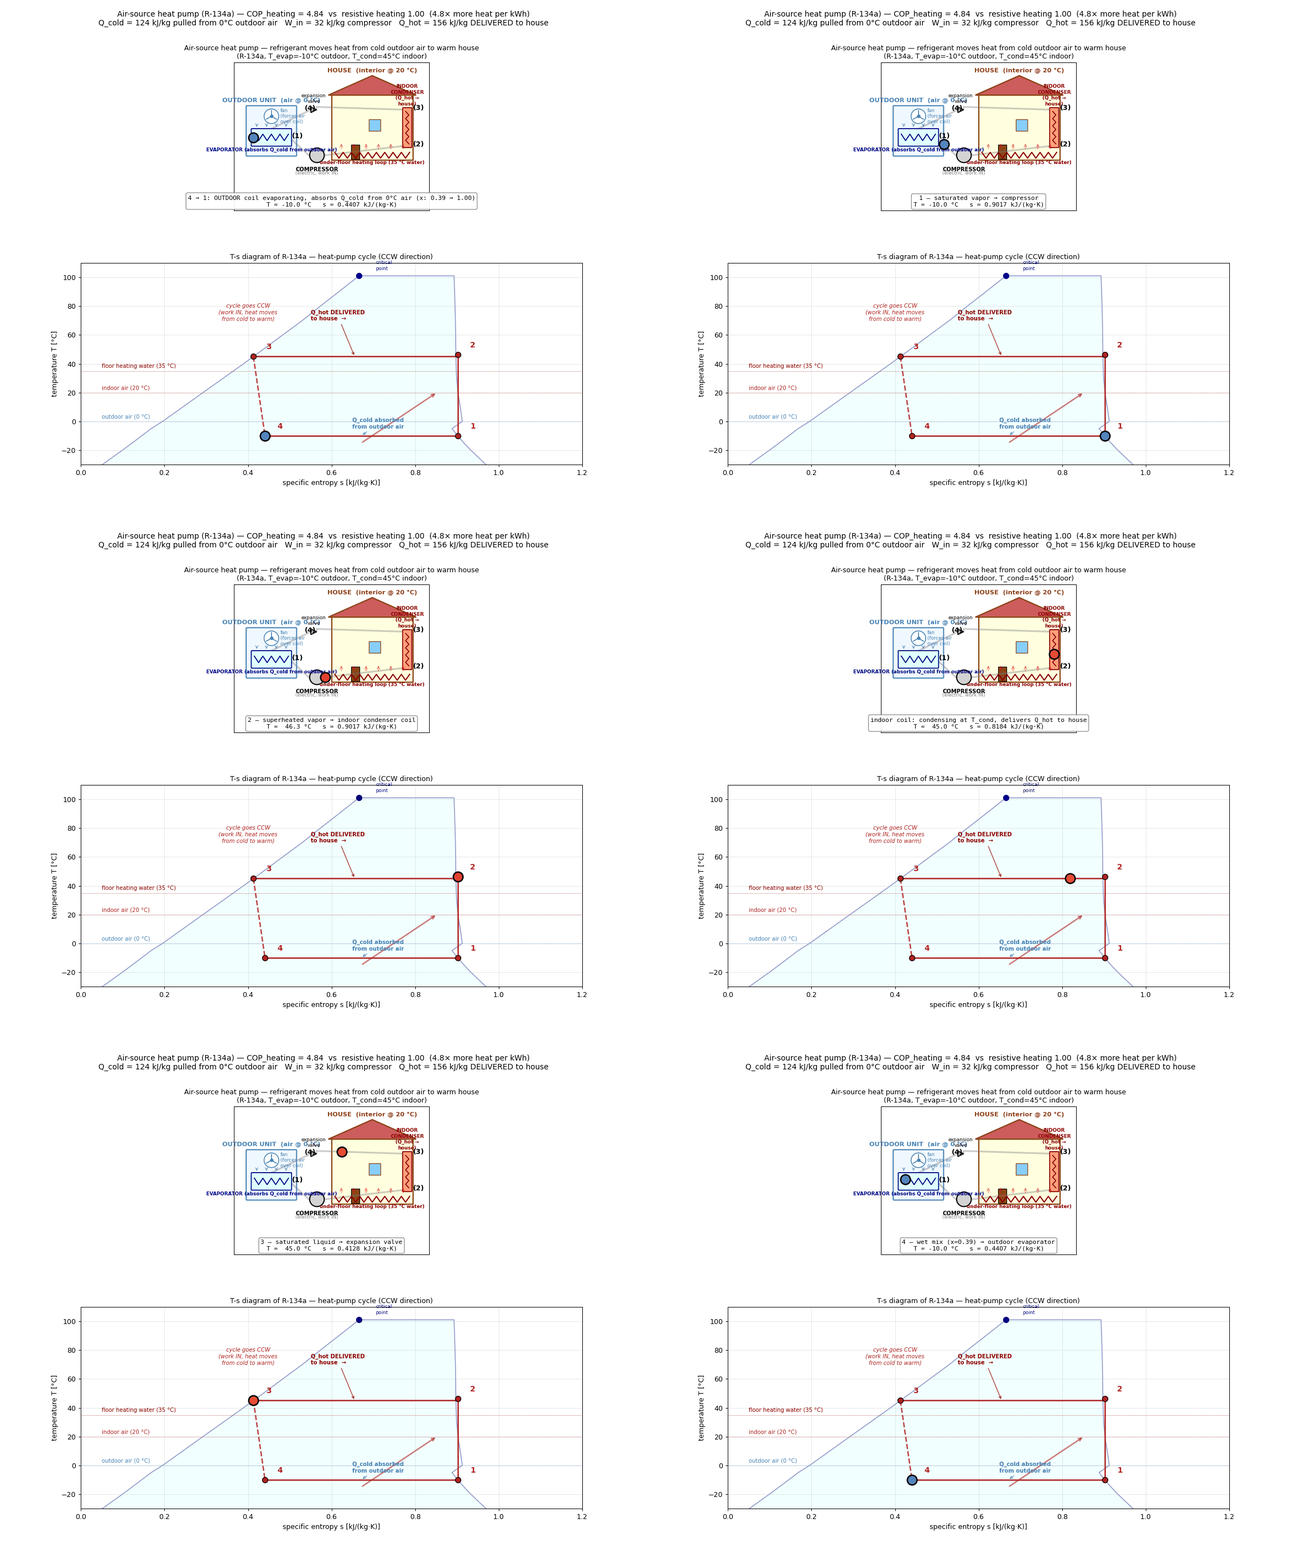
Coming from this post.
https://github.com/JAlcocerT/jalcocertech/tree/main-site-cloudflare-hub
Real Engineering
Lets use open physics to do cool stuff
Energy Solutions
Because this matters
Other buildings, mountains will affect the ROI of your PV setup.
Luckily, we can simulate that in advance:
- PV optimum orientation
- PV+Heat
- PV+Batteries
- PV +
- Building x Sun rays
- AC for my house: https://jalcocert.github.io/JAlcocerT/data-driven-insulation-evaluation/#which-ac-is-enough-for-my-house
I wrote about data driven insulation evaluation sometime back
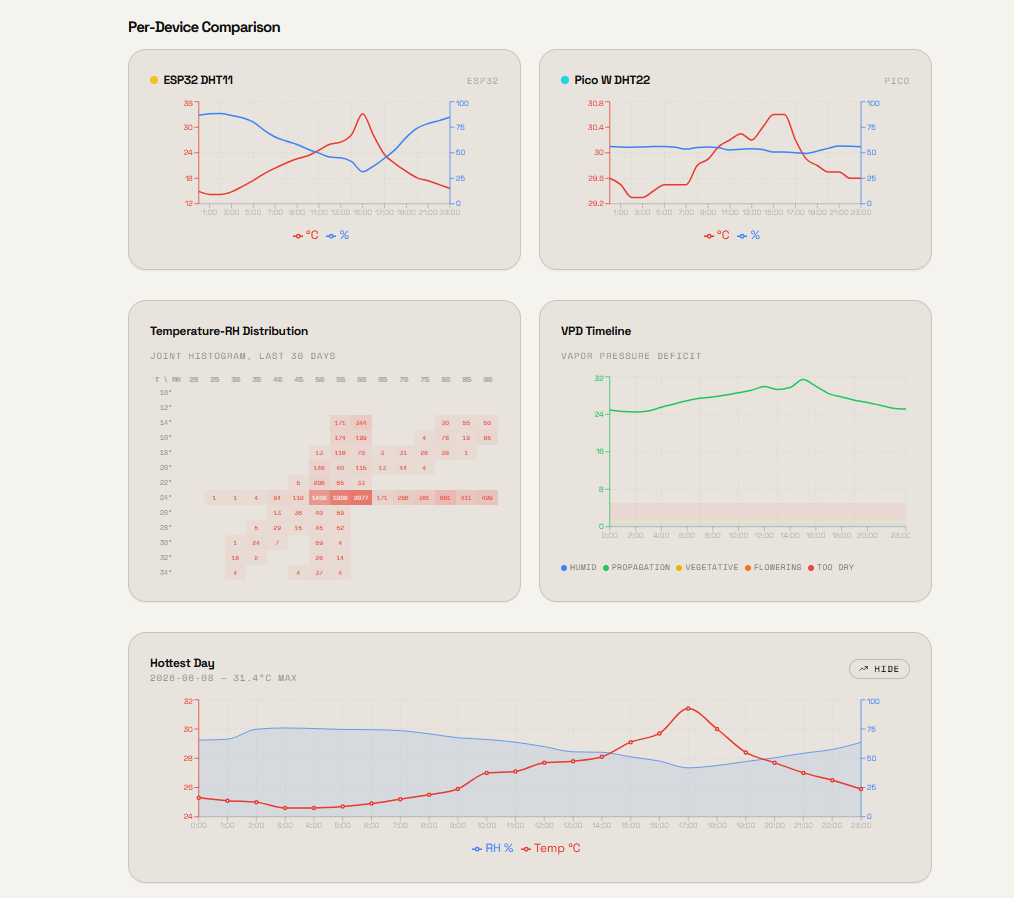
Heat Pumps are so cool
If you have played with one of these BLDC pumps
Thats exactly the knowledge that you needed.
In modern residential heat pump systems, variable flow is managed by High-Efficiency Variable Speed ECM (Electronically Commutated Motor) Circulator Pumps controlled dynamically by the heat pump’s central brain.
Instead of a basic 2-wire DC setup or wasteful valve throttling, these systems use smart circulator pumps (such as Wilo-Yonos/Para or Grundfos UPM3/Alpha) utilizing two primary control layers:
- The Electrical / Communication Interface
Modern heating circulators receive independent power and dedicated external control signals via a multi-wire interface (typically 4–5 wires):
- Dedicated PWM Signal (Bi-directional / Mini-PWM): The heat pump controller outputs a low-voltage (5V/12V or 24V) high-frequency PWM signal strictly for data communication (separate from AC power). The pump reports back status and actual flow via feedback pulses.
- 0–10V Analog DC Voltage: The heat pump outputs a variable DC voltage where 0V = Standby/Off, 1–2V = Minimum modulation (~15%), and 10V = 100% full capacity.
- Digital Bus (LIN / CAN / Modbus): Common in high-end inverter heat pumps for precise telemetry (RPM, flow rate in L/min, fluid temperature, error codes).
- Control Strategies & Logic
The heat pump’s micro-controller modulates the pump speed in real-time according to one of several algorithms:
Constant Temperature Differential ($\Delta T$ Control):
How it works: The controller monitors both the supply (flow) and return line temperature sensors. It modulates pump speed dynamically to maintain a steady temperature drop (usually $5\text{ K}$ for radiant underfloor heating or $7\text{–}10\text{ K}$ for low-temp radiators).
Why it matters: As the compressor modulates up or down to match outdoor weather, the pump speeds up or slows down to keep heat transfer at peak thermodynamic efficiency ($COP$).
Proportional Pressure Control ($\Delta p\text{-v}$):
How it works: Used when individual room thermostatic valves (TRVs) or underfloor zone actuators open and close.
Why it matters: As zones shut off, the pump senses the rising hydraulic resistance and automatically dials down its speed, eliminating pipe whistling, cavitation noise, and saving electricity.
Constant Pressure Control ($\Delta p\text{-c}$):
Maintains a constant differential pressure across the manifold regardless of how many individual loops are calling for heat.
Summary Comparison: Heat Pump vs. Basic DC Control
| Feature | Residential Heat Pump Circulator | Small 2-Wire DC Pump |
|---|---|---|
| Speed Control Method | Dedicated low-voltage signal (PWM / 0–10V / LIN bus) | Variable DC input voltage bucking |
| Logic Location | Onboard heat pump firmware balancing $\Delta T$ & refrigerant cycle | External user dial or fixed resistance |
| Power Consumption | 3W to 45W (Self-adjusting ECM / Permanent Magnet) | Fixed 19W unless manually stepped down |
| Hydraulic Protection | Integrated differential pressure sensing & anti-seize cycle | None (requires external relief/bypass valve) |
A residential air-to-water heat pump operates using two separate, sealed fluid circuits that interface through a specialized heat exchanger called a condenser (often a brazed plate heat exchanger).
Circuit 1: The Refrigerant Loop (Thermodynamic Core)
- Medium: High-pressure chemical refrigerant (e.g., R32, R290 propane, or R410A).
- Mover: The high-power compressor (1,000W–5,000W+).
- Role:
- Evaporator (Outdoor Unit): Liquid refrigerant boils at very low temperatures (e.g., $-20^\circ\text{C}$ to $-5^\circ\text{C}$), absorbing latent heat from outdoor air drawn across fins by a large fan.
- Compressor: Squeezes the gaseous refrigerant into a high-pressure, superheated gas ($60^\circ\text{C}\text{–}85^\circ\text{C}$).
- Expansion Valve: Drops the refrigerant pressure back down to restart the cycle.
The Bridge: Brazed Plate Heat Exchanger (BPHE)
A compact block composed of dozens of corrugated, razor-thin stainless steel plates brazed together in alternating layers.
- Hot refrigerant gas flows down every odd channel.
- Cold return water flows up every even channel in the opposite direction (counter-flow).
- Heat passes instantly through the thin steel plates without the refrigerant and water ever physically mixing. As heat leaves the refrigerant, it condenses back into liquid.
Circuit 2: The Hydronic Water Loop (Home Distribution)
- Medium: Pressurized water (often mixed with anti-corrosion inhibitors and glycol).
- Mover: The small ECM circulator pump (10W–50W).
- Role:
- Receives the heat transferred across the plates, warming up from ~$\text{30}^\circ\text{C}$ to ~$\text{35}^\circ\text{C}$ (for underfloor heating).
- Circulates through underfloor heating loops, radiators, or the domestic hot water (DHW) cylinder coil.
- Returns to the heat exchanger after radiating thermal energy into the living space.
Monobloc vs. Split Architecture
Where these two circuits meet depends on the heat pump’s design:
| Design | Where Circuit 1 Ends & Circuit 2 Begins | Piping Entering the House |
|---|---|---|
| Monobloc | The heat exchanger is inside the outdoor unit | Water pipes run through the wall into the home |
| Split System | The heat exchanger is inside the indoor unit (hydrobox) | Refrigerant copper lines run through the wall |
Modern residential heat pump compressors use a 3-phase Brushless DC (BLDC) motor—specifically referred to in HVAC terminology as a PMSM (Permanent Magnet Synchronous Motor) or simply an Inverter Compressor.
The electrical setup brings the concept full circle back to your FPV drone:
How the Compressor Motor is Driven
Unlike your 19W pump (which hides its tiny DC driver internally) and older legacy heat pumps (which used single-speed AC induction motors), a modern heat pump compressor is driven by an external, high-power Inverter Drive (essentially a giant industrial ESC).
Mains AC Power (230V/400V)
          │
          ▼
   [ Rectifier / PFC ]      ──> Converts AC into High-Voltage DC (~320V–600V DC)
          │
          ▼
 [ Inverter Board (ESC) ]   ──> Fast IGBT / SiC MOSFET power switches
          │
          ▼  (3 Phase Wires: U, V, W)
 [ BLDC / PMSM Compressor ] ──> Sealed twin-rotary or scroll motor inside refrigerant dome
Connecting the Concepts: FPV Drone vs. Pump vs. Compressor 📌
| Feature | Your FPV Drone Motor | Your 19W Watering Pump | Heat Pump Inverter Compressor |
|---|---|---|---|
| Motor Type | 3-Phase Sensorless BLDC | 3-Phase BLDC | 3-Phase Permanent Magnet BLDC / PMSM |
| ESC / Inverter | External (4-in-1 ESC board) | Internal (Epoxy-potted micro-IC) | External (Large aluminum heatsink Inverter Board) |
| Operating Voltage | Low Voltage DC (e.g., 4S–6S / 16V–25V) | Low Voltage DC (e.g., 12V / 24V) | High Voltage DC (rectified ~350V to 600V DC) |
| Wiring | 3 Phase Wires (U, V, W) | 2 DC Wires (+ / -) | 3 Heavy Terminals (U, V, W) sealed through glass-to-metal pins |
| Control Logic | Back-EMF / Zero-crossing (or FOC) | Hall-sensor / Basic commutation IC | Field-Oriented Control (FOC) with Space Vector PWM |
They are called “inverters” because the electrical circuit literally inverts direct current (DC) back into alternating current (AC) at an adjustable frequency to control motor speed.
In electrical engineering terms:
- Rectifier: Converts AC $\rightarrow$ DC
- Inverter: Converts DC $\rightarrow$ AC
In fact, I was simulating rectifiers and inverters :)
The Problem with Direct Grid AC
Grid power from your wall outlet is locked at a fixed frequency and voltage (e.g., $230\text{V}$ at $50\text{Hz}$ or $120\text{V}$ at $60\text{Hz}$).
An AC motor plugged straight into the wall is forced to spin at a fixed speed governed by that frequency:
$$\text{Speed (RPM)} = \frac{120 \times \text{Frequency}}{\text{Number of Motor Poles}}$$
At a fixed $50\text{Hz}$, a standard 2-pole motor will always spin at roughly $3000\text{ RPM}$. It has only two states: 100% full speed or 0% completely off.
How the “Inverter” Solves This in 3 Stages
To make the motor run at any custom speed (e.g., 20%, 45%, or 90%), the system must create its own custom frequency on demand.
It does this in three steps:
Step 1: Rectification        Step 2: DC Bus          Step 3: INVERSION
  Mains AC (50Hz fixed)   ──>   Raw DC Power   ──>   Synthesized AC/Pulsed Drive
[ AC to DC ] [ Clean ] [ DC to AC (Variable Hz) ]- Rectification (AC $\rightarrow$ DC): Diodes convert the fixed $50\text{Hz}$ grid AC power into raw DC voltage ($\sim 325\text{V} \text{ DC}$).
- Filtering (DC Link): Heavy capacitors smooth the voltage into a stable DC reservoir.
- Inversion (DC $\rightarrow$ AC) — Where the name comes from: High-power electronic switches (IGBTs or MOSFETs) switch on and off thousands of times per second.
By chopping the DC voltage, the circuit inverts that steady DC back into a simulated 3-phase AC waveform with an infinitely adjustable frequency (e.g., anywhere from $10\text{Hz}$ up to $120\text{Hz}$).
Why Marketing Kept the Name
The stage that creates the variable speed is the DC-to-AC Inverter stage.
Manufacturers began labeling entire appliances (air conditioners, heat pumps, refrigerators, washing machines) as “Inverter” models to distinguish these modern, variable-speed, energy-saving units from old-fashioned, noisy “On/Off” appliances.
Why Use a BLDC Inverter Instead of Basic AC?
Stepless Modulation (10%–100% capacity): Instead of noisily banging on and off at full blast like older single-speed fridges/ACs, the inverter varies the driving frequency smoothly. On a mild day, it throttles down to run slowly and whisper-quiet on just 300W–500W.
Extreme Efficiency: Permanent magnet BLDC rotors eliminate the rotor electrical losses ($I^2R$ copper losses) inherent in traditional AC induction motors.
No Massive Inrush Current: Soft-starting the BLDC motor eliminates the huge 50A–80A starting surge (locked-rotor amps) typical of legacy compressors, preventing home lights from flickering.
Conversion Losses in the Inverter Drive
The conversion from grid AC $\rightarrow$ DC $\rightarrow$ synthesized 3-phase AC has an overall electrical efficiency of 95% to 98%, meaning the conversion loss is only 2% to 5%.
AC Grid In (100%) ──> [Rectifier / PFC] ──> [DC Bus] ──> [Inverter / IGBTs] ──> Motor (95–98%)
(~1–2% loss) (~1–3% loss)- Where the loss goes: Mainly switching losses and internal resistance in the power transistors (IGBTs / MOSFETs), dissipating as low-grade heat on the drive’s aluminum heatsink.
- Why it is worth it: Sacrificing 3% of power in electronic conversion allows the compressor to modulate to lower speeds, saving 30% to 50% in thermodynamic energy compared to cycling an on/off motor at full blast.
Are Solar-Assisted Heat Pumps Using AC or DC Compressors?
Solar-assisted heat pumps divide into two architectures depending on their system design:
- Standard Grid-Tied PV Systems (AC Coupled)
Most residential rooftop solar installations use standard inverter heat pumps powered via the home’s main AC electrical panel.
- Flow: Solar Panels (DC) $\rightarrow$ Solar Inverter (AC) $\rightarrow$ Heat Pump Inverter (DC $\rightarrow$ 3-Phase AC).
- Why it’s common: Allows the heat pump to draw from the electrical grid at night and feed excess solar power back to the grid during sunny peaks without dedicated proprietary wiring.
- Direct-DC / Hybrid Solar Heat Pumps (DC Coupled)
Specialized off-grid or solar-hybrid systems (e.g., Solimpeks, Masterflux, Boyard) feed solar energy directly into the DC link:
- Flow: Solar PV (DC) $\rightarrow$ MPPT DC-DC Regulator $\rightarrow$ Internal Compressor Inverter $\rightarrow$ 3-Phase BLDC motor.
- No Solar AC Inverter Needed: Because the compressor’s inverter runs internally on a high-voltage DC bus, DC solar power feeds straight into that DC stage. This eliminates the round-trip conversion penalty ($10%\text{–}15%$ saved).
- Grid Backup: If a cloud passes, the onboard rectifier seamlessly draws supplemental power from the AC grid to keep the DC bus charged.
MPPT and HEMS are two key technologies that optimize energy flow in modern solar and smart-home setups: MPPT handles hardware-level electrical efficiency, while HEMS handles system-level software automation.
- MPPT (Maximum Power Point Tracking)
MPPT is an electronic algorithm and DC-DC converter circuit built inside solar inverters and charge controllers.
Its job is to extract the maximum possible electrical power from your solar panels under varying sunlight and temperature conditions.
- The Problem: Solar panels have a non-linear relationship between voltage and current. If you draw too much current, the panel voltage collapses; if you don’t draw enough, current drops. Power output ($\text{Watts} = \text{Volts} \times \text{Amps}$) peaks at only one exact combination of voltage and current, called the Maximum Power Point ($V_{\text{mp}}, I_{\text{mp}}$).
- How It Works: As clouds pass or the panels heat up, this sweet spot constantly shifts. The MPPT controller continuously sweeps and adjusts its internal electrical resistance thousands of times a second to keep the panels operating at peak power.
- Impact: An MPPT controller harvests 20% to 30% more energy than an older, direct-connection PWM controller.
- HEMS (Home Energy Management System)
HEMS is the “central brain” (software and smart controller hardware) that orchestrates energy generation, storage, and consumption across the entire house.
Instead of having isolated devices operating blindly, a HEMS coordinates:
- Solar PV Generation (rooftop panels)
- Home Battery Storage (charging/discharging)
- EV Chargers (dynamic car charging)
- Heat Pumps & Water Heaters (SG-Ready / thermal storage)
- Dynamic Grid Tariffs (hourly electricity pricing)
How They Compare & Work Together
| Feature | MPPT | HEMS |
|---|---|---|
| Primary Role | Hardware-level power extraction | Whole-home energy scheduling & optimization |
| Where It Lives | Inside the solar inverter / charge controller | Dedicated gateway box or cloud/local software hub |
| Decides… | “What is the best voltage to pull maximum watts from the panels right now?” | “Should excess solar go into the EV, the home battery, or heat the hot water tank?” |
| Timescale | Milliseconds (electrical tracking) | Minutes to hours (pricing, weather, and load forecasts) |
In practice: The MPPT ensures your panels generate the absolute maximum wattage possible; the HEMS decides in real-time where those watts can be used to save the most money.
IoT
Ive put together a DIY/Custom HA version that summarizes all my home sensor, including the Zigbee ones:
cd ./poc/iot-dashboardThe idea comes from here
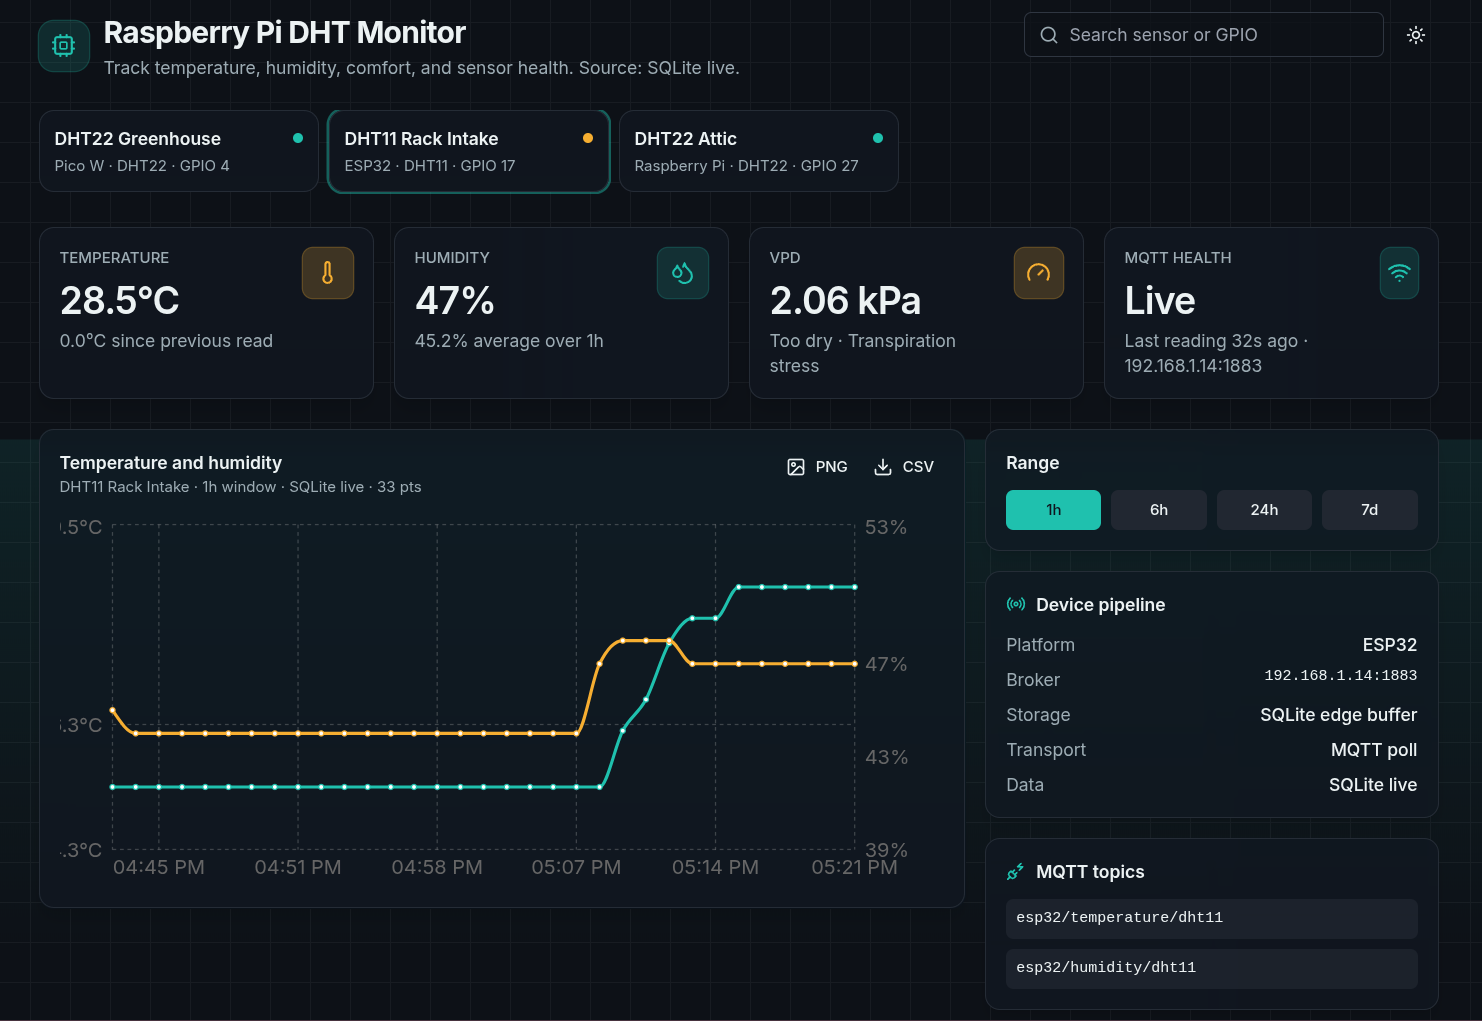
Crops
AgriTech? AgroTech? Crops intelligence?
RecoBart?
#cd ./poc/iot-rpi-dht-insulation
sqlite3 /home/jalcocert/poc/iot-rpi-dht-insulation/ingester/data/readings.sqlite "
SELECT
  date(received_at) AS day,
  ROUND(AVG(CASE WHEN device = 'esp32' AND metric = 'humidity' THEN value END), 2) AS esp_humidity,
  ROUND(AVG(CASE WHEN device = 'esp32' AND metric = 'temperature' THEN value END), 2) AS esp_temp,
  ROUND(AVG(CASE WHEN device = 'pico' AND metric = 'humidity' THEN value END), 2) AS pico_humidity,
  ROUND(AVG(CASE WHEN device = 'pico' AND metric = 'temperature' THEN value END), 2) AS pico_temp,
  COUNT(*) AS total_readings
FROM readings
WHERE device IN ('esp32', 'pico')
  AND metric IN ('humidity', 'temperature')
GROUP BY day
ORDER BY day;"
Things that can happen after planting tomatoes and tinkering IRL.
FPV
The calibration rule new scale = current scale x Betaflight displayed mAh / charger top-up mAh
In Betaflight 4.5, the Blackbox field amperageLatest is already calibrated current, stored in centi-amps:
It is not raw ADC data and must not be converted through the analog current-sensor formula a second time.
You need these to know you are not exceeding your battery C rating :)
I went from this python CLI to control a tello, to get a meteor and tinker with betaflight telemetry and then ofc, got custom Eachine and custom Zidora 5inch dron.
3d printing/design/manufacturing coming up: https://aetherfpv.com/pages/gravity-drone-stand
Get to know your batteries: how much they weight, the way their resistance (ohms) will change across their lifespan
- Average: ~8.21 A
- p95: ~25.10 A
- p99: ~57.29 A
And the average airborne power estimate, Charger-based: ~134 W
ffmpeg -display_rotation 0 -i "DJI_20260910191149_0027_D.MP4" `
    -map 0:v:0 -map 0:a? -c copy -movflags +faststart `
    "DJI_20260910191149_0027_D_landscape.MP4"
You can prepare to ULM/PPL: https://ulm-ppl-test.pages.dev/
Or just get ready to DYOR and make a DIY dron.
Configure your controls:
- Pos 1 (Up): ANGLE box highlights yellow (Maximum guardrails / full auto-level).
- Pos 2 (Mid): HORIZON box highlights yellow (Auto-level with flip capability).
- Pos 3 (Down): Neither highlights (Full manual Acro mode).
Id also add the beeper and Flip over crash modes
And fixed props couple of times here and here
If you are going without VTX, lower the Power to 25mW. 100mW is too much.
The Hex Drivers Won’t Fit It: The 4-piece RC hex set (1.5, 2.0, 2.5, 3.0 mm) only fits recessed screw heads (screws with a hole in the top).
The Nut Needs an Outer Socket: The M5 nut is a standard hexagon on the outside measuring 8 mm across the flats. The driver must wrap around it, not go inside it.
To tighten or remove those nuts, you need an 8 mm socket:
- An 8 mm one-way ratcheting FPV prop tool (the fastest option for prop swaps).
- A standard 8 mm socket / nut driver from a hardware store.
- A basic 8 mm box wrench or small adjustable spanner.
Once you have an 8 mm socket paired with that 4-piece RC hex driver set, you have all the wrench sizes needed to tear down and rebuild a standard 5-inch drone.
Hex keys and Allen keys are the exact same shape—both are standard 6-sided hexagons (“Allen” is just a brand name for a hex wrench).
Oh, And before flying, make sure you are aware about licenses, permissions, insurances, limitations and comply with them
I even made my own build for ELRS https://github.com/JAlcocerT/meteor-dron/tree/main/ExpressLRS-build
6 Ways to RUIN Your FPV Drone!
- Nylon Standoffs: Using nylon standoffs in your drone frame or flight control stack can lead to breakage and instability during crashes.
- Unnecessary 3D Printed Parts: Adding non-essential parts like spoilers increases weight and can negatively affect flight performance.
- Stacking Pin Headers: These can cause intermittent connections and are prone to vibration issues, leading to erratic flight behavior.
- Ribbon Cables: They are not durable under shock and vibration, making them a poor choice for connecting ESCs and flight controllers.
- Slammed Builds: Keeping the top and bottom plates too close can lead to short circuits and complicate maintenance. Titanium Motor Screws: They can be brittle and may break under stress, causing motors to detach during flight.
FPV assembly
https://www.youtube.com/watch?v=ulAdXUTfees
https://www.youtube.com/watch?v=vqQHIRdJOec
https://www.youtube.com/watch?v=1ys1R9ZNMKA
https://www.youtube.com/watch?v=9Jhi3VOZ9w8
FPV Telemetry
cd ./dron/desktop-version
uv sync
uv run main.py
Your Python app ↓ UDP # how app data is packaged/sent ↓ IP / network # addresses, e.g. 192.168.10.1 ↓ Wi‑Fi (802.11) # local wireless networking protocol ↓ Radio modulation # turns bits into radio waves ↓ Tello antenna
For your Tello:
- UDP: carries messages such as takeoff, RC movement values, telemetry, and H.264 video packets.
- Wi‑Fi: is the local network connection between your laptop and the drone’s access point.
- Modulation: is the radio-level technique Wi‑Fi uses to put digital bits onto the 2.4 GHz radio signal—typically variants of OFDM with QAM-style symbols.
So UDP does not “send radio waves” itself.
It hands packets down through the network stack; Wi‑Fi transports those packets over the air.
One subtle but useful detail: UDP itself does not retry lost packets, but Wi‑Fi often retries a failed radio transmission at its own lower layer.
If it still cannot deliver it quickly enough, the UDP packet is lost.
That is why live video may show a skipped frame rather than freezing to wait for recovery.
The tello with 1100 mah li-ion, uses 70% battery for 7 min flight
- 1,100 mAh = 1.1 Ah
- 10% use = 0.11 Ah per minute
- That is 0.11 × 60 = 6.6 A average current
- At a typical ~3.7–3.8 V battery voltage:
6.6 A × 3.7 V = 24.4 W | 6.6 A × 3.8 V = 25.1 W
So call it ~25 W during that style of flight.
https://fpv-logs.pages.dev/
If you are interested to make overlays, get the .BTL and claibrate the power consumption to what your charger tells you after the session.
Then the A flowing will be accurate.
As i knew it was 8 and 9 and my charger told me 175mah, instead of 347mah
+Firmware revision: Betaflight 4.2.4 (fbcaf8c50) STM32F405
    14 +Firmware date:     Oct 20 2020 08:18:45
    15 +Craft name:        NOVICE-IV
For the bigger drone i got, i also made some power calibration: working initially for gentle flights like so
Remember that this is important for batteries and other componentes like ESC/FC:
Ovonic 1300 mAh 100C: 130 A theoretical Corrected 99th percentile: 52.3 A = 40% of rating
Tattu 850 mAh 75C: 63.75 A theoretical Corrected 99th percentile: 52.3 A = 82% of rating
Motors: XING 2450KV Props: 5x5x3 V1S tri-blades Pack: 4S
- Make sure to understand the limit of your batteries: 18650 (), LiPo 1S (3.5-4.2)
| Parameter | Standard 18650 Li-ion | Standard 1S LiPo |
|---|---|---|
| Fully Charged | 4.2V | 4.2V |
| Nominal (Average) | 3.6V – 3.7V | 3.7V |
| Cut-off / Empty | 2.8V – 3.0V | 3.0V |
You can configure EdgeTX to inform you about battery level in real time! Thats (its Rx, not RX+)
- Get ready to perform RCA from telemetry when you’ll have a fpv crash
Then perform damage diagnosis
FPV Apps
I Mean sth better that my tello flutter desktop test and more user friendly that my python cli based control
Some people put together freemium apps: https://vueladrones.app
So far, i was tinkering with the python CLI for the dji tello and attempted one of my first desktop apps to control the tello via laptop keyboard here.
git clone git@gitlab.com:fossengineer1/dron.gitBut so far the best result was with the CLI only one, which included face recognition of the video feed.
Until I made this with PyQT
Others also do real world services, like cleaning with drones
https://www.droneguru.es/servicios/#limpieza
Mechanism Design
With the release of the whitepaper and OSS framework for mbsd: https://github.com/JAlcocerT/mbsd-core
kinematics.py  ──►  OpenSCAD  ──►  CadQuery  ──►  FreeCAD  ──►  Blender
(math) (quick check) (BREP/STEP) (FEM/draw) (render)- https://jalcocert.github.io/JAlcocerT/fem/
- https://fossengineer.com/beso-topology-optimization-calculix/
#herdr #lazydocker #lazygit
git clone https://github.com/JAlcocerT/mbsd-core
git clone https://github.com/JAlcocerT/mbsd-examples
#codex --yolo- https://github.com/JAlcocerT/mbsd-examples/releases
- https://github.com/JAlcocerT/mbsd-core/releases/tag/v0.2.0
You can also do FEM with 3dcad https://github.com/JAlcocerT/3Design/tree/main/z-freecad
And added the bike W calculator from this old practice :)
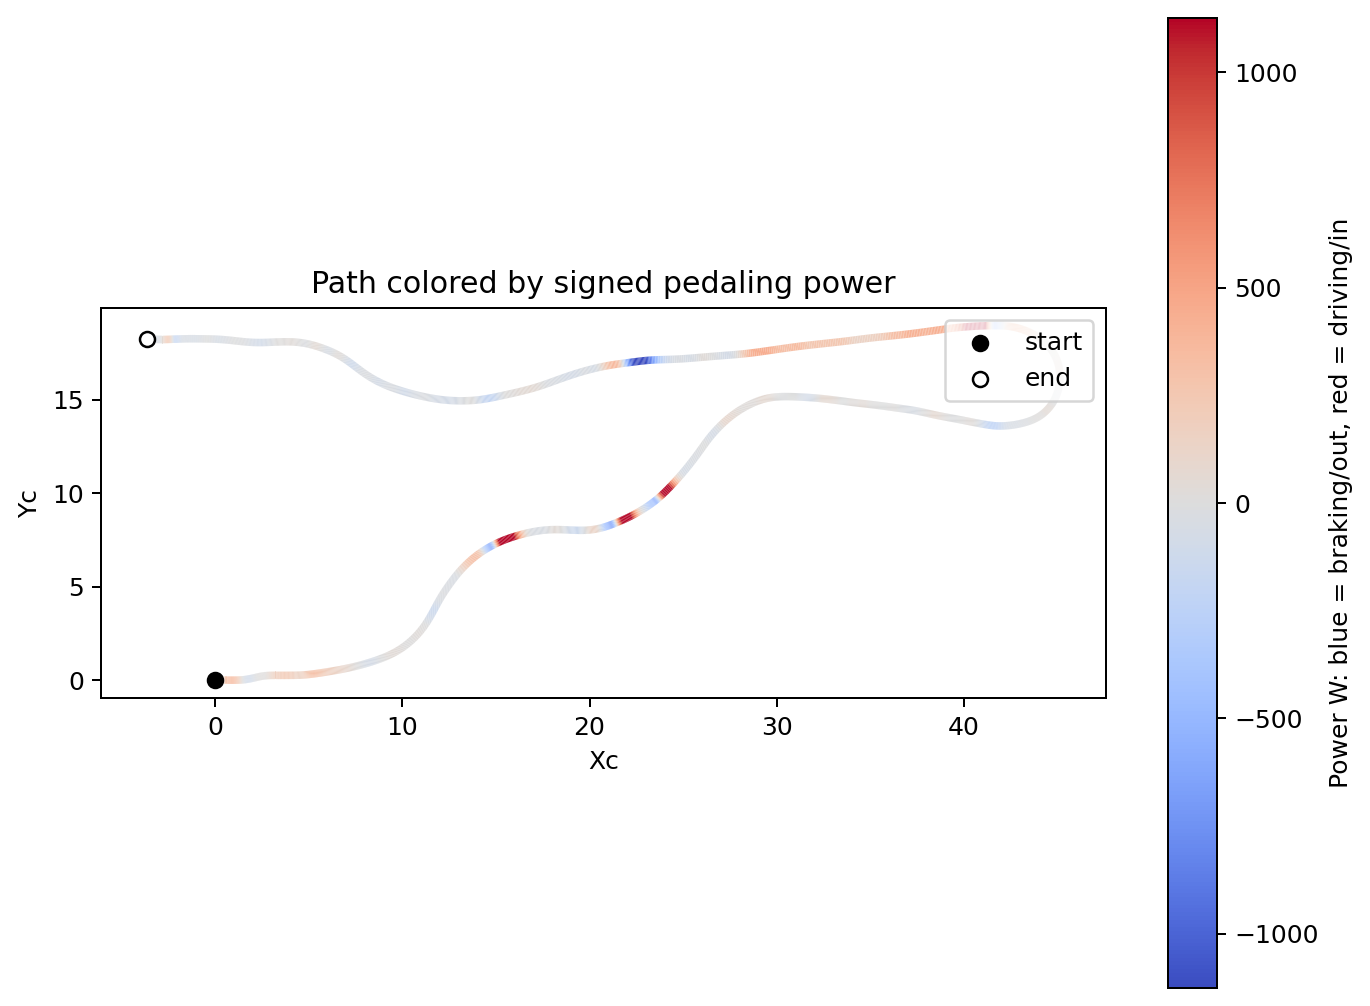
You can learn mbsd theory here: https://github.com/moorepants/learn-multibody-dynamics/
or here: ebooks.jalcocertech
Multi Body Systems Dynamics dot com
- http://192.168.1.2:3034/hermesagent/mbsd/src/branch/master
- http://192.168.1.2:3034/hermesagent/mbsd/commit/5751bd7702319119ffc3cac7165ef59f194d1b1c#diff-c3c9e15a6c85805e37f84b9ce1c44b1db55a0d95
I took all the goodies from the github and forgejo repos: 2D/3D
The idea is to finally launch the overdue oss mbsd framework
not https://multibodysystemdynamics.pages.dev/ this but https://multibodysystemsdynamics.com/
So you can continue where you left it http://192.168.1.18:5173/
- app.multibodysystemsdynamics.com
- multibodysystemsdynamics.com
- multibodysystemsdynamics.com/roadmap
- multibodysystemsdynamics.com/whitepaper
#herdr
scp jalcocert@192.168.1.2:/home/jalcocert/multibody-tests/*.md . #v-0-2-0-concerns.md
cd /home/jalcocert/multibody-tests #x300
#cd /home/jalcocert/mbsd
Im just publishing in this order:
cd /home/jalcocert/Desktop/mbsd-framework/mbsd-core
git push origin main
git push origin v0.2.0
Then:
cd /home/jalcocert/Desktop/mbsd-framework/mbsd-examples
git push origin main
git push origin v0.2.0
Create the GitHub releases after pushing tags, core first, examples second.
The v0.4.0: make 2D results portable
cd /home/jalcocert/Desktop/mbsd-framework/mbsd-core
git switch main
#git merge --ff-only v0.4.0-dev
#  git tag -a v0.4.0 -m "MBSD Core v0.4.0"
git push origin main
git push origin v0.4.0 #post CI pass

# gh release create v0.4.0 \
#   --repo JAlcocerT/mbsd-core \
#   --title "MBSD Core v0.4.0 - Week 4 Export" \
#   --notes-file CHANGELOG.md

awk '
  /^## v0\.4\.0 / { found=1; next }
  /^## / && found { exit }
  found { print }
' CHANGELOG.md | gh release create v0.4.0 \
  --repo JAlcocerT/mbsd-core \
  --verify-tag \
  --title "MBSD Core v0.4.0 - Week 4 Export" \
  --notes-file - \
  --latest
Then release examples:
cd /home/jalcocert/Desktop/mbsd-framework/mbsd-examples
git switch main
git push origin main
git push origin v0.4.0
git switch main
git merge --ff-only v0.4.0-dev
git tag -a v0.4.0 -m "MBSD Examples v0.4.0"
git push origin mainWait for examples CI to pass, then:
git push origin v0.4.0

awk '
  /^## v0\.4\.0 / { found=1; next }
  /^## / && found { exit }
  found { print }
' CHANGELOG.md | gh release create v0.4.0 \
  --repo JAlcocerT/mbsd-examples \
  --verify-tag \
  --title "MBSD Examples v0.4.0 - Week 4 Export Handoff" \
  --notes-file - \
  --latest
The progression is coherent:
- 0.4: portable 2D data
- 0.5: experimental 3D vocabulary
- 0.6: reinforce 2D foundations
- 0.7: 3D kinematics
- 0.8: limited 3D dynamics
- Pre-1.0: stabilize, document and validate both APIs
Then, the v0.5.0: establishes conventions and data contracts before solver equations depend on them.
That reduces future API churn and avoids overstating 3D capability.
For the 0-5-0 was like 🚀
Compared with 0.4.0, users of 0.5.0 can now describe and export experimental 3D models.
They can:
- Represent 3D positions and orientations with Pose3D and quaternions.
- Define spatial bodies with mass, center of mass, principal inertia and pose.
- Define world or body-local coordinate frames.
- Describe fixed and spherical joint connections.
- Export the spatial model to versioned JSON.
- Use documented SI units, right-handed XYZ coordinates and body-to-world rotations.
- Run a pendulum-like 3D vocabulary/export example.
0.4.0 already provided working 2D kinematics, constrained dynamics and JSON/CSV handoffs. Those remain available unchanged.
The important limitation: 0.5.0 describes 3D mechanisms, but does not solve their 3D kinematics or dynamics yet.
cd /home/jalcocert/Desktop/mbsd-framework/mbsd-core

git switch main
git merge --ff-only v0.5.0-dev
git tag -a v0.5.0 -m "MBSD Core v0.5.0"
git push origin main
git push origin v0.5.0

awk '
  /^## v0\.5\.0 / { found=1; next }
  /^## / && found { exit }
  found { print }
' CHANGELOG.md | gh release create v0.5.0 \
  --repo JAlcocerT/mbsd-core \
  --verify-tag \
  --title "MBSD Core v0.5.0 - Experimental 3D Vocabulary" \
  --notes-file - \
  --latest
Then examples:
cd /home/jalcocert/Desktop/mbsd-framework/mbsd-examples

git switch main
git merge --ff-only v0.5.0-dev
git tag -a v0.5.0 -m "MBSD Examples v0.5.0"
git push origin main
git push origin v0.5.0

awk '
  /^## v0\.5\.0 / { found=1; next }
  /^## / && found { exit }
  found { print }
' CHANGELOG.md | gh release create v0.5.0 \
  --repo JAlcocerT/mbsd-examples \
  --verify-tag \
  --title "MBSD Examples v0.5.0 - Experimental 3D Vocabulary" \
  --notes-file - \
--latest- https://github.com/JAlcocerT/mbsd-core/releases/tag/v0.5.0
- https://github.com/JAlcocerT/mbsd-examples/releases/tag/v0.5.0
Others
Attract and Convert
waiting list for energy, or for whatever, like this foss email capture
Every business has its own delivery
But every business owner will resonate when you ask how they are getting customers.
- With a proper website: webaudits here
But hey, dont just attract and convert, make them want to stay (LTV goes up!)
Web Audits x Custom Web review 📌
git clone https://github.com/JAlcocerT/morita-web

cd /home/jalcocert/poc_webs_magnet
make audit-full-fast URL=https://psikolognevinkeskin.info/
That is probably the one you want: full audit suite with link checks enabled, using the faster Lychee Docker checker.
Other variants:
make audit URL=https://psikolognevinkeskin.info/Runs the suite but skips link checks by default.
make audit-full URL=https://psikolognevinkeskin.info/Runs full suite with the default Docker link checker.
cd /home/jalcocert/poc_webs_magnet
docker compose -f docker-compose.prod.yml down
docker compose -f docker-compose.prod.yml up -d --build- With outbound marketing: get leads, enrich leads, reachout via email
cd ./fossengineerpapermod/custom-mail #for organic/custom newsletter
#make prod-up

cd custom-mail
cp .env.production.sample .env.production
# edit .env.production
make prod-up
docker compose -f docker-compose.prod.yml config
Then in your existing Cloudflare Tunnel config, point the public hostname to:

http://custom-mail:8088

cd ./poc/genbi-energy-solutions/waitlist/ #it can be re-used nicely for lead-gen for other projects
Its just an couple of API calls, captchas / CF turnstile and a couple of templates so you can do branded DRIP, nurturing and convert those leads.
You just need email x DNS done right for outbound
- Dont forget about the attribution
Made the DNS setup also for getslubnechwile 📌
- You can now go from website to promo video like:
Conclusions
You get what you deserve negotiate
Lately I was asked: how can we work together?
 Consulting Services
 DIY via ebooks
Very interesting converging questions, but zooming out the real one is: do we really want to work together?
have we validated our ideas and we can create a win-win situation?
can we create a win-win where each of us leverages in the other’s output?
I created a formbricks flow to validate precisely that with this form
Formbricks x JSON form 📌
Flow I made them go through:
- Who they are
- One-sentence idea
- Actual stage: raw, researched, talked to buyers, pre-sold, shipped, revenue
- Buyer clarity
- Evidence: paid, pilot, calls, waitlist, competitors, none
- Pain intensity
- Concrete paid outcome
- First 10-buyer distribution path
- What exists today
- 14-day commitment
- Biggest blocker
- Contact info
The intent is to classify people into: raw idea, needs validation, ready to test, ready to build, or already commercial.
It deliberately exposes weak ideas by asking for buyer clarity, evidence, distribution, and commitment
python .agents\skills\formbricks-as-code\scripts\validate_survey.py forms\idea-state-intake.json --funnel

#Result: OK.
cd forms
uv run python main.py status cmtljp6ee1j5d01xdkqdqpdyp inProgress
What do I do?
I bridge the gap between messy raw data and executive strategy.
By standardizing data models, governance, and architecture, I make sure analytics systems deliver accurate metrics consistently
So what?
You get to ship, what you want, in time:
Concerned about time to value?
Do not let the MVP date become the product.
cd ./poc/libg/telecom-executive #https://executive-check.pages.dev/ #https://pm-pdm-checks.pages.dev/
npx wrangler pages deploy telecom-executive --project-name executive-check --branch main
What can I recommend you if you are starting out?
- Do stuff. And avoid bs:
https://aegis-freedom.pages.dev/ - Maximize active income and save
- Value based or nothing
This value-based is getting traction:
Domain mechanincs come first:
I was clearing the initial real estate and genbi independent PoCs done with gemini earlier this year and brought them/improved at the PoC repo, here and here:
http://realestate-landing-prod:4321
http://shopify-landing-prod:4321
For webaudits, ive done some improvements http://auditmagnet-prod:3001
flowchart LR
    %% --- Styles ---
    classDef free fill:#E8F5E9,stroke:#2E7D32,stroke-width:2px,color:#1B5E20;
    classDef low fill:#FFF9C4,stroke:#FBC02D,stroke-width:2px,color:#FBC02D;
    classDef mid fill:#FFE0B2,stroke:#F57C00,stroke-width:2px,color:#F57C00;
    classDef high fill:#FFCDD2,stroke:#C62828,stroke-width:2px,color:#C62828;
    classDef bridge fill:#E3F2FD,stroke:#1565C0,stroke-width:3px,color:#0D47A1;

    %% --- Nodes ---
    L0("Free Content
( DIY = $0)"):::free
    L1("Web Audits 🛡️
(Reveals Problem )"):::free
    L11("Tech Blog/Youtube"):::free
    L12("ebooks"):::free
    L13("mbsd framework OSS"):::free
    L14("OSS guides"):::free

    L3("Done With You
(Trade $$ for knowledge)"):::mid
    L4("Done For You
(Trade $$$ for outcomes)"):::high
    L44("GenBI
Shopify PoC"):::bridge
    L45("Real Estate
Funnel Bot"):::bridge
    L46("Energy Solutions
HVAC insulation"):::bridge
    L47("IoT Solutions
Crops"):::bridge
    L48("Weddings
Photo QR"):::bridge

    %% --- Connections ---
    L0 --> L1
    L1 --> L3
    L12 -->|JAlcocerTech| L3
    L13 -->|MultiBodySystemsDynamicscom| L3
    L14 -->|FOSS Engineer| L3
    L0 --> L11
    L0 --> L12
    L0 --> L13
    L0 --> L14
    L3 --> L4
    L4 -->|Productized Service| L44
    L4 -->|Productized Service| L45
    L4 -->|Productized Service| L46
    L4 -->|Productized Service| L47
    L4 -->|Productized Service| L48
Also, the daily notes have stopped to flow here and the cv-laitex similarly, just to be part of a personal / career folders inside my services.
FAQ
Interesting Articles
https://www.seangoedecke.com/llms-reward-expertise/
OSS Journaling
I started a repo to use logseq and do .md notes.
I ended up just writing .md via vscode
the downside?
I can just do so in laptops that i own to get the sync via github
In case that you will work outside hardware you control, you can always go with other alternatives like silverbullet, or: https://fossengineer.com/files-md-local-first-markdown-notes/
Its an awsome PWA that can write local files and .weba audios: https://app.files.md/
You can also do this with the forgejo setup if you are not afraid of .md: https://speedtest.fossengineer.com/jalcocert/my-logseq-notes
Skills im using
Created a Codex skill for this workflow: C:/Users/j--e-/.codex/skills/weekly-work-summarizer/SKILL.md
It includes:
- EOW summary workflow
- director TL;DR email workflow
- daily ticket/hour bullet allocation workflow
- CV/career evidence note workflow
- style rules for Jira/Teams/email-safe output
- reusable templates in C:/Users/j–e-/.codex/skills/weekly-work-summarizer/references/templates.md
- UI metadata in agents/openai.yaml
Validation passed: Skill is valid!
Future trigger examples:
- “Use weekly-work-summarizer to create this week’s EOW”
- “Make the director TLDR from this week’s notes”
- “Create CV bullets from this week”
- “Generate hours reporting bullets from Monday to Friday”
Inbound marketing x Branded Videos
In theory, artifacts like ebooks, this blog, fossengineer… should give you inbound traffic.
But
The openAI image gpt 2 is so great that there is really no excuse not to get this right.
Doing 3 min videos (with xyz words aka xyz tokens) and 30 second shorts…
Its just one logo and skill away: ./poc/zzz-
And this can serve to do QR x Guerrilla Marketing or send personalized video demos to high quality leads.