More video Tricks [with FFMPEG]
So far, ive been doing couple of things with the action cam.
Even apply data analytics for action cams and for karting!
Now its time for a recap on my latest video tricks.
High vs Low Bit Rate
Bit rate for video simply refers to the amount of data used per second to store the video.
It’s usually measured in bits per second (bps), often expressed as kilobits per second (kbps) or megabits per second (Mbps).
Higher bit rate = More data = Better video quality (more detail, less compression artifacts) = Larger file size.
Lower bit rate = Less data = Lower video quality (more compression, potential for blurriness or blockiness) = Smaller file size.
Think of it like the “flow” of information for the video.
A higher bit rate means a richer, faster flow of visual data, resulting in a better picture.
FHD - 1080/30
- With the updated firmware and high bit rate,
1080p30 UW RSI got these files withH.265codec:
- 38.9GB total MP4 files (every 17.2gb or 1h 12min there is a file reset)
- Bitrate 31168 kbps, with an average size of ~4.03MB/s
- Using 80% of the total battery for those ~2h 45min of video
This happened while recording at ~0C
- With the updated firmware and low bit rate,
1080p30 UW RSI got:
- 41.6GB total MP4 files (every 17.2gb or 1h 13min there is a file reset)
- Bitrate 30739 kbps, with an average size of ~3.98MB/s
- Using 93% of the total battery for those ~2h 45min of video
This happened while recording at room temperature ~20C
- How about 1080/60?
4K
- At 60fps
Three files with a total size of 35.5GB and draining battery to 67% (-33%) for 42min and 50s video.
Recording at 4K/60fps RS+ and standard (no UW, h.265) and high bitrate.
To fill the internal memory, you get around ~57 min of video.
All of this at -2C. For YT these are
2160p60.
- With 4K/120 RS+
Recording with high bitrate, I got 4 different files with total size of 48GB (full internal memory) and battery drained from 100 to 37% (-63%)
In youtube will be as
2160p60(4k), but 60 fps as well
2.7K
- 2.7k/30 RS+ and high bit rate
In youtube you will see those as
1440p
- 2.7/60/RS+/high BR
1440p60
Data Overlay with Python
I was already analyzing GoPro Metadata:
 Go Pro Telemetry Post
 Go Pro Telemetry EDA
But how about adding telemetry overlays to MP4’s?
GoPro Python Metadata Overlay
Python MoviePy…
…actually uses FFMPEG, but makes it more scriptable, in theory.
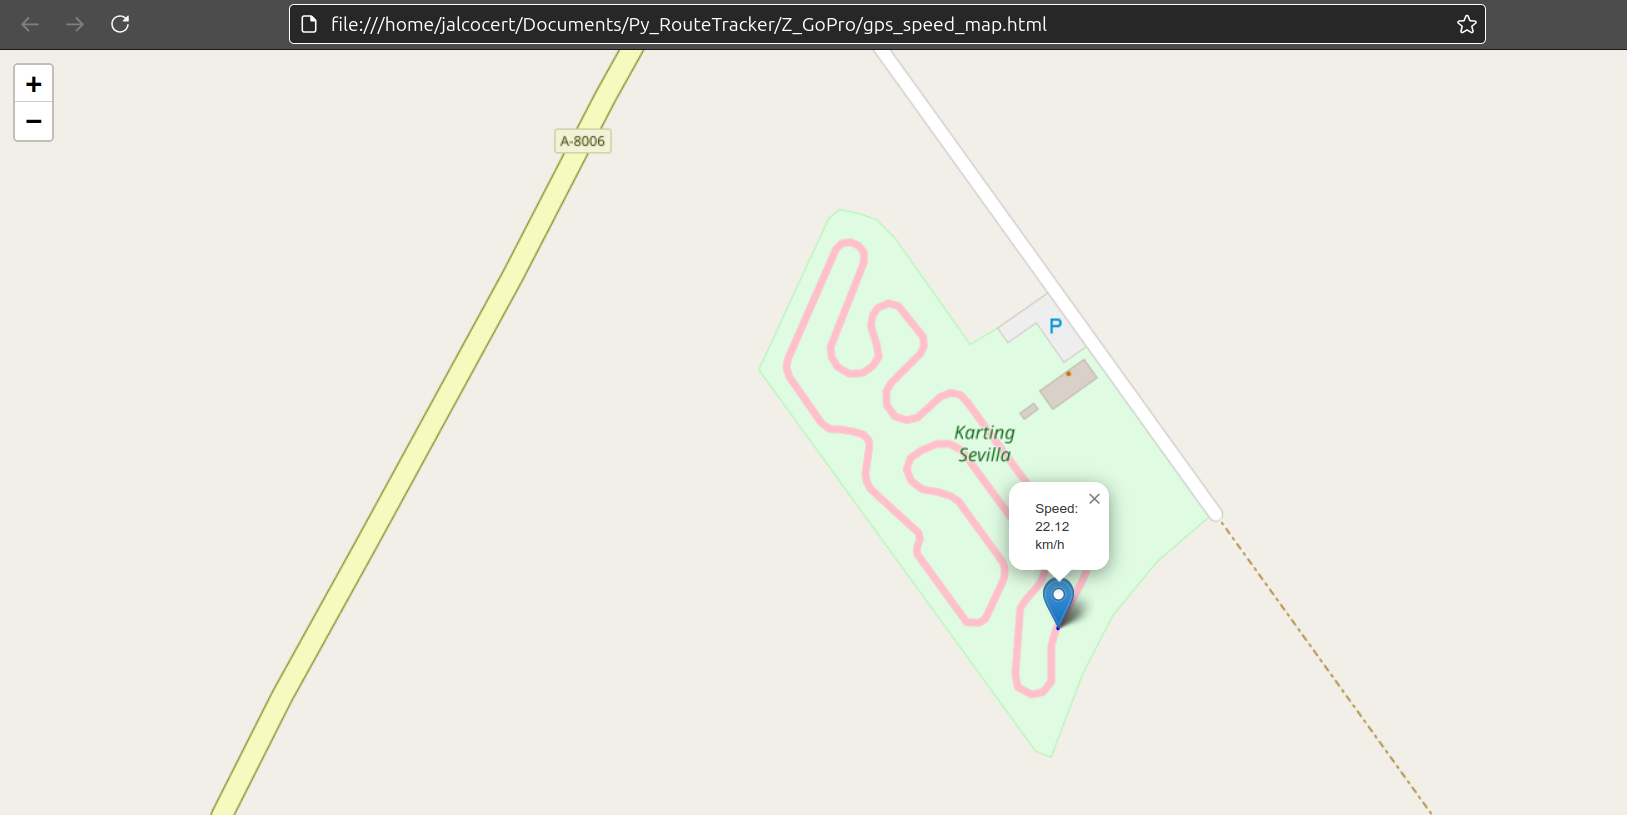
DJI and GPX Overlay
And for action cams without GPS… like my DJI OA5Pro.
How about recording the route on another app and just syncing it?
Gemini x Overlay explanation 📌
Building a Python tool to overlay GPX data onto MP4 videos is a challenging but rewarding project.
Steps and libraries you’ll need:
1. Libraries:
gpxpy: For parsing and working with GPX files.pip install gpxpymoviepy: For video editing and overlaying.pip install moviepyopencv-python(cv2): For image and video processing.pip install opencv-pythonmatplotlib(optional): For creating graphs or custom visualizations.pip install matplotlib- Potentially others: Depending on your specific visualization needs (e.g., for map tiles if you want a map background).
2. Core Logic:
- GPX Parsing: Use
gpxpyto load and parse the GPX file. Extract the latitude, longitude, time, and optionally speed data points. - Video Handling: Use
moviepyto load the MP4 video. - Synchronization: This is the trickiest part. You’ll need to establish a correspondence between the timestamps in your GPX data and the frames in your video. Here are a couple of approaches:
- Manual Synchronization: Allow the user to specify a start time offset or identify a specific event in both the video and the GPX data to align them. This is often the most practical.
- Automated Synchronization (Advanced): This could involve analyzing audio or video features to find matching points, but it’s significantly more complex.
- Visualization:
- Position Overlay: Use
opencv-pythonto draw the GPS track on each frame of the video. You can convert latitude/longitude to pixel coordinates. Consider using a map image as a background for better visualization. - Speed Graph: Use
matplotlibto create a graph of speed over time. Then, usemoviepyto add this graph as an overlay on the video. - Other Data: You can overlay any data from your GPX file (heart rate, altitude, etc.) using similar techniques.
- Position Overlay: Use
- Video Composition: Use
moviepyto combine the original video with the overlays you’ve created.
3. Code Structure (Conceptual):
import gpxpy
import gpxpy.gpx
from moviepy.editor import VideoFileClip, ImageClip, CompositeVideoClip
import cv2
import matplotlib.pyplot as plt
import numpy as np

def overlay_gpx_on_video(video_path, gpx_path, output_path):
    # 1. Load video and GPX data
    video = VideoFileClip(video_path)
    with open(gpx_path, 'r') as gpx_file:
        gpx = gpxpy.parse(gpx_file)

    # 2. Synchronization (Manual example)
    time_offset = float(input("Enter time offset (seconds) between video and GPX: "))  # User input

    # 3. Visualization (Position Overlay Example)
    frames = []
    for i, track in enumerate(gpx.tracks):
        for j, segment in enumerate(track.segments):
            for k, point in enumerate(segment.points):
                timestamp = point.time + timedelta(seconds=time_offset)
                frame_time = timestamp.timestamp() - video.start # Time relative to video start
                if frame_time >= 0 and frame_time <= video.duration:
                    frame = video.get_frame(frame_time)
                    # Convert lat/lon to pixel coordinates (You'll need a mapping function)
                    x, y = lat_lon_to_pixels(point.latitude, point.longitude)  # Implement this
                    cv2.circle(frame, (x, y), 5, (0, 0, 255), -1)  # Draw a circle
                    frames.append(ImageClip(frame).set_duration(1/video.fps)) #add frame to the list of frames

    final_clip = concatenate_videoclips(frames)
    final_clip.write_videofile(output_path, fps=video.fps)


def lat_lon_to_pixels(lat, lon):  # Example (You'll need a proper projection)
    # This is a VERY simplified example and won't be accurate for real-world use.
    # You'll need to use a proper map projection library (e.g., pyproj) for accurate conversion.
    # Assume a simple linear mapping for demonstration:
    map_width = 1000  # Example
    map_height = 500  # Example
    min_lat = 0       # Example (Get from your map data)
    max_lat = 90      # Example
    min_lon = 0       # Example
    max_lon = 180     # Example

    x = int((lon - min_lon) / (max_lon - min_lon) * map_width)
    y = int((lat - min_lat) / (max_lat - min_lat) * map_height)
    return x, y

# Example usage:
video_path = "your_video.mp4"
gpx_path = "your_gpx.gpx"
output_path = "output_video.mp4"
overlay_gpx_on_video(video_path, gpx_path, output_path)
4. Key Challenges and Improvements:
- Accurate Synchronization: This is the most crucial and often the most difficult part.
- Map Projection: For accurate position overlays, you’ll need to use a proper map projection library (like
pyproj) to convert latitude/longitude to pixel coordinates on a map image. You’ll likely want to use a tile server or download map tiles. - Performance: Processing video frame by frame can be slow. Consider optimizing your code for performance.
- User Interface: For a more user-friendly tool, you could create a graphical user interface (GUI) using libraries like
Tkint,PyQt, orKivy. - Error Handling: Add robust error handling to your code.
This detailed breakdown should give you a solid starting point for building your Python GPX overlay tool.
Remember that this is a complex project, so break it down into smaller, manageable steps.
Start with the basics (loading video and GPX, basic visualization) and then gradually add more features (synchronization, map integration, speed graphs, etc.).
Conclusions
Its great to look back and see how far ive gone regarding videos.
At least compared from where I started!
sudo apt install vlc
sudo apt install ubuntu-restricted-extras
FAQ
Transfering Files
Moving just MP4’s will save you ~23% of the transfer load.
I prefer to do it with rsync:
#cp *.MP4 /home/jalcocert/Desktop/oa5pro/
#rsync -avP *.MP4 /home/jalcocert/Desktop/oa5pro/ #it creates the folder if its not there | no overwrite
#rsync -avP *.MP4 /media/jalcocert/Backup2TB/DJI-OA5Pro #copy it to an external SSD

rsync -avP --include='*.MP4' --exclude='*' /media/jalcocert/OsmoAction/DCIM/DJI_001/ ~/Desktop/CAM/
rsync -avP --include='*.MP4' --exclude='*' . ~/Desktop/CAM3/
mkdir -p "$HOME/Desktop/CAM1-$(date +%m-%d)" && rsync -avP --include='*.MP4' --exclude='*' . "$HOME/Desktop/CAM1-$(date +%m-%d)"


#rm *.LRF #clean if needed LRF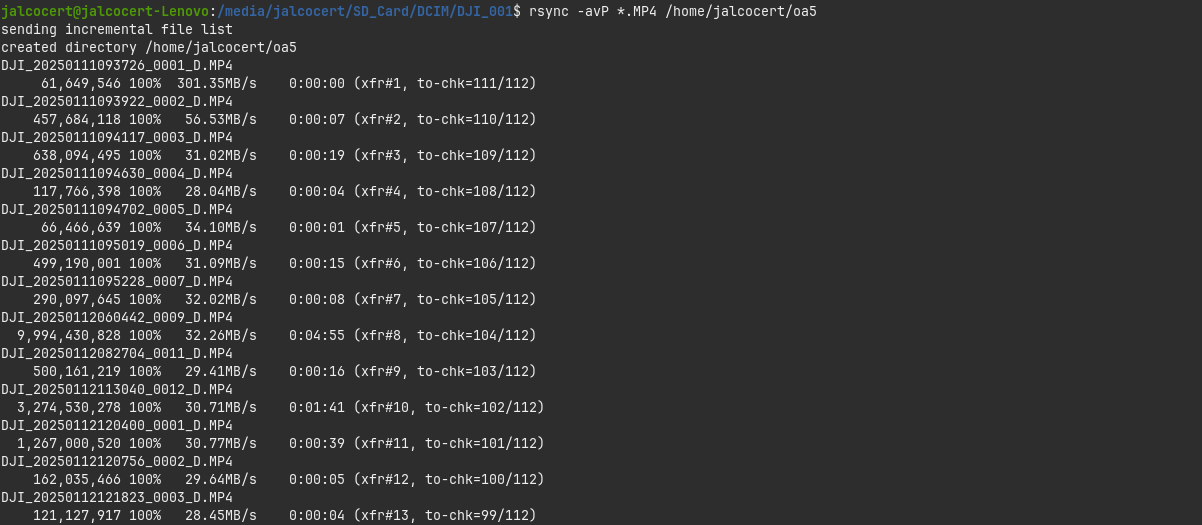
When moving the full 48GB, it will take ~20min
If later on you want to group them per record date:
for file in *; do
  if [[ -f "$file" ]]; then
    date_str=$(stat -c %y "$file" | cut -d ' ' -f 1 | tr -d '-')
    mkdir -p "$date_str"
    mv "$file" "$date_str/"
  fi
done
This will create directories like 20250318, 20250319, and 20250320 and move the respective files into them.
Quick Videos - FFMPEG CLI
Making things simpler with CLI.
FFMPEG CLI Tricks within Linux 📌
- Simply Join: Keeping original audio and no reencoding.
###ffmpeg -i "concat:$(ls *.mp4 | tr '\n' '|')" -c copy output_video.mp4 #all from a folder
ls *.MP4 | sed "s/^/file '/; s/$/'/" > file_list.txt #add .MP4 of current folder to a list
#du -sh ./* #check their size

#Generate a video with the mentioned files (IT PRESERVES THE ORIGINAL FORMATS, BITRATE...)
ffmpeg -f concat -safe 0 -i file_list.txt -c copy output_video.mp4
##different output folder (if you do it from OA5 to desktop you will be limited by transfer speed)
ffmpeg -f concat -safe 0 -i file_list.txt -c copy /home/jalcocert/Desktop/output_video.mp4

#ffmpeg -f concat -safe 0 -i file_list.txt -c:v copy -an output_video.mp4 #silenced video
#ffmpeg -i output_video.mp4 -filter:v "setpts=PTS/4" -an fast_output_video.mp4 #fast output- Join (Silenced) + Song
ls *.MP4 | sed "s/^/file '/; s/$/'/" > file_list.txt #add .mp4 of current folder to a list

#du -sh ./* #check their size

#generate a video from few parts
#ffmpeg -f concat -safe 0 -i file_list.txt -c copy output_video.mp4
ffmpeg -f concat -safe 0 -i file_list.txt -c:v copy -an silenced_output_video.mp4 #silenced video
#ffmpeg -i output_video.mp4 -filter:v "setpts=PTS/4" -an fast_output_video.mp4 #

#ffmpeg -stream_loop -1 -i "AETHER - Density & Time.mp3" -i silenced_output_video.mp4 -c:v copy -c:a aac -shortest output_with_song.mp4
ffmpeg -stream_loop -1 -i "TRAVELATOR - Density & Time.mp3" -i silenced_output_video.mp4 -c:v copy -c:a aac -shortest output_with_song.mp4

### 🎵 Music by: - Extract images from a video:
4ffmpeg -i input_video.mp4 -vf "select='gte(t\,120)',fps=1" -vsync vfr frame_%03d.png
ffmpeg -i DJI_20250116072852_0036_D.MP4 -vf "select='gte(t\,90)',fps=1" -vsync vfr frame_%03d.png
#ffmpeg -i DJI_20250116072852_0036_D.MP4 -vf "select='gte(t\,90)',fps=1" -vsync vfr frame_%03d.jpg


#between 2 seconds, 1fps extracts and creates a folder
#ffmpeg -i DJI_20250116072528_0035_D.MP4 -vf "select='between(t,90,105)',fps=1" -vsync vfr frame_%03d.png
mkdir -p "./$(basename DJI_20250215215547_0006_D.MP4 .MP4)" && ffmpeg -i DJI_20250215215547_0006_D.MP4 -vf "select='between(t,260,262)',fps=1" -vsync vfr "./$(basename DJI_20250215215547_0006_D.MP4 .MP4)/frame_%03d.png"- How to reduce image quality in Linux - To upload as youtube thumbnail:
#ffmpeg -i thumbnail.png -c:v libwebp -quality 80 compressed_thumbnail.webp
#ffmpeg -i PXL_20241030_115355466.jpg -q:v 3 compressed_PXL_20241030_115355466.jpg
ffmpeg -i thumbnail.png -qscale:v 2 compressed_thumbnail.jpg
Extracting images from a video…and making a gif 📌
- From a timeframe until the end, 1 frame:
#from second 90 of the video, give me 1fps
ffmpeg -i DJI_20250116072852_0036_D.MP4 -vf "select='gte(t\,90)',fps=1" -vsync vfr frame_%03d.png
ffmpeg -i DJI_20250116072852_0036_D.MP4 -vf "select='gte(t\,90)',fps=1" -vsync vfr frame_%03d.jpg- And just between 90s and 105s timeframe, 1fps:
ffmpeg -i DJI_20250116072528_0035_D.MP4 -vf "select='between(t,90,105)',fps=1" -vsync vfr frame_%03d.png- Make a gif with the pulled images
Telemetry Data
Extracting data from action camera .MP4 files.
It all started with PhyPhox and PyRouteTracker
sudo apt-get install libimage-exiftool-perl
exiftool -ee ./GX030390.MP4
#exiftool -ee ./GX030390.MP4 > output.txt
If you do similarly with a OA5Pro video and see the metadata, the output is much more reduced
exiftool -ee ./DJI_20241008163958_0031_D.MP4 #no GPS - no party, but it can have acelerometer data!- Not everything is lost, see the oa5pro acelerometer as telemetry
- Idea to Make the magic happen with moviepy: https://zulko.github.io/moviepy/getting_started/updating_to_v2.html
FFMPEG
Some tricks with ffmpeg package.
No reencoding = Quick
- Simply Join: Keeping original audio and no reencoding
###ffmpeg -i "concat:$(ls *.mp4 | tr '\n' '|')" -c copy output_video.mp4 #all from a folder
ls *.MP4 | sed "s/^/file '/; s/$/'/" > file_list.txt #add .MP4 of current folder to a list
#du -sh ./* #check their size

#Generate a video with the mentioned files (IT PRESERVES THE ORIGINAL FORMATS, BITRATE...)
ffmpeg -f concat -safe 0 -i file_list.txt -c copy output_video.mp4
ffmpeg -f concat -safe 0 -i file_list.txt -c copy /home/jalcocert/Desktop/output_video.mp4 #different folder (if you do it from OA5 to desktop you will be limited by transfer speed)

#ffmpeg -f concat -safe 0 -i file_list.txt -c:v copy -an output_video.mp4 #silenced video
#ffmpeg -i output_video.mp4 -filter:v "setpts=PTS/4" -an fast_output_video.mp4 #

#shorts (limited to 3min)
ffmpeg -i DJI_2025abc.MP4 -t 175 -c copy output.mp4- Join (Silenced) + Song
ls *.MP4 | sed "s/^/file '/; s/$/'/" > file_list.txt #add .mp4 of current folder to a list

#du -sh ./* #check their size

#generate a video from few parts
#ffmpeg -f concat -safe 0 -i file_list.txt -c copy output_video.mp4
ffmpeg -f concat -safe 0 -i file_list.txt -c:v copy -an silenced_output_video.mp4 #silenced video
#ffmpeg -i output_video.mp4 -filter:v "setpts=PTS/4" -an fast_output_video.mp4 #

#ffmpeg -stream_loop -1 -i "AETHER - Density & Time.mp3" -i silenced_output_video.mp4 -c:v copy -c:a aac -shortest output_with_song.mp4
ffmpeg -stream_loop -1 -i "TRAVELATOR - Density & Time.mp3" -i silenced_output_video.mp4 -c:v copy -c:a aac -shortest output_with_song.mp4

### 🎵 Music by: - Extract images from video:
4ffmpeg -i input_video.mp4 -vf "select='gte(t\,120)',fps=1" -vsync vfr frame_%03d.png
ffmpeg -i DJI_20250116072852_0036_D.MP4 -vf "select='gte(t\,90)',fps=1" -vsync vfr frame_%03d.png
#ffmpeg -i DJI_20250116072852_0036_D.MP4 -vf "select='gte(t\,90)',fps=1" -vsync vfr frame_%03d.jpg


#between 2 seconds, 1fps extracts and creates a folder
#ffmpeg -i DJI_20250116072528_0035_D.MP4 -vf "select='between(t,90,105)',fps=1" -vsync vfr frame_%03d.png
mkdir -p "./$(basename DJI_20250215215547_0006_D.MP4 .MP4)" && ffmpeg -i DJI_20250215215547_0006_D.MP4 -vf "select='between(t,260,262)',fps=1" -vsync vfr "./$(basename DJI_20250215215547_0006_D.MP4 .MP4)/frame_%03d.png"- How to reduce image quality in Linux to upload as youtube thumbnail:
#ffmpeg -i thumbnail.png -c:v libwebp -quality 80 compressed_thumbnail.webp
#ffmpeg -i PXL_20241030_115355466.jpg -q:v 3 compressed_PXL_20241030_115355466.jpg
ffmpeg -i thumbnail.png -qscale:v 2 compressed_thumbnail.jpg- If you record on a chest mount and sometimes take the cam in the regular position, you will have to use the rotation variable for the joins and you wont escape the reencoding this time.
#sudo apt install mediainfo

for video in *.MP4; do
    echo "File: $video"
    mediainfo "$video" | grep -E 'Rotation|Width|Height|Format|Duration'
    ffprobe -v error -select_streams v:0 -show_entries stream=width,height,duration,codec_name,r_frame_rate -show_entries stream_tags=rotate "$video" | grep -E "TAG:rotate|width|height|duration|codec_name|r_frame_rate"
    echo "-----------------------"
done
Just record consistently in one orientation the videos you want to join later (maybe?)
Space what?
You might need some space after playing around with action cams.
df -h | awk '$2 ~ /G/'
#df -h | awk '$2 ~ /G/' | sort -rh -k 2 #sorted
df -h | awk '$5 > "5G" {print $0}' #list the partitions greater than 5GB- Have a look to the trash
#gio trash --empty
du -sh ~/.local/share/Trash/files- Maybe unused container images?
docker builder prune
#docker system prune -a
#docker volume prune
docker image prune -a
Summary Table:
| Command | Focus | Cleans | Data Loss Risk |
|---|---|---|---|
docker builder prune | Build Cache | Unused build layers | Low |
docker system prune | All Unused Resources | Containers, Networks, Dangling Images, Build Cache | Medium |
docker volume prune | Unused Volumes | Volumes not attached to any container | HIGH |
docker image prune | Dangling/Untagged Images | Dangling images, optionally all untagged images | Medium |
Which one to use?
- Start with
docker system pruneif you want a general cleanup. - Use
docker builder pruneif you’re only concerned about build cache. - Be extremely careful with
docker volume pruneas it can delete data. - Use
docker image prunewith the-aoption if you want to remove all untagged images (including older versions that might be taking up space). Be sure you don’t need those older versions!
Night Video
People keeps doing cool things and giving cool recommendations: https://www.youtube.com/watch?v=_mHT8RGDHos
Example with OA4:
2.7K and 4K in 4:3 aspect ratio at 24-60fps. 2.7K and 4K in 16:9 aspect ratio at 100/120fps. Wide-angle mode.
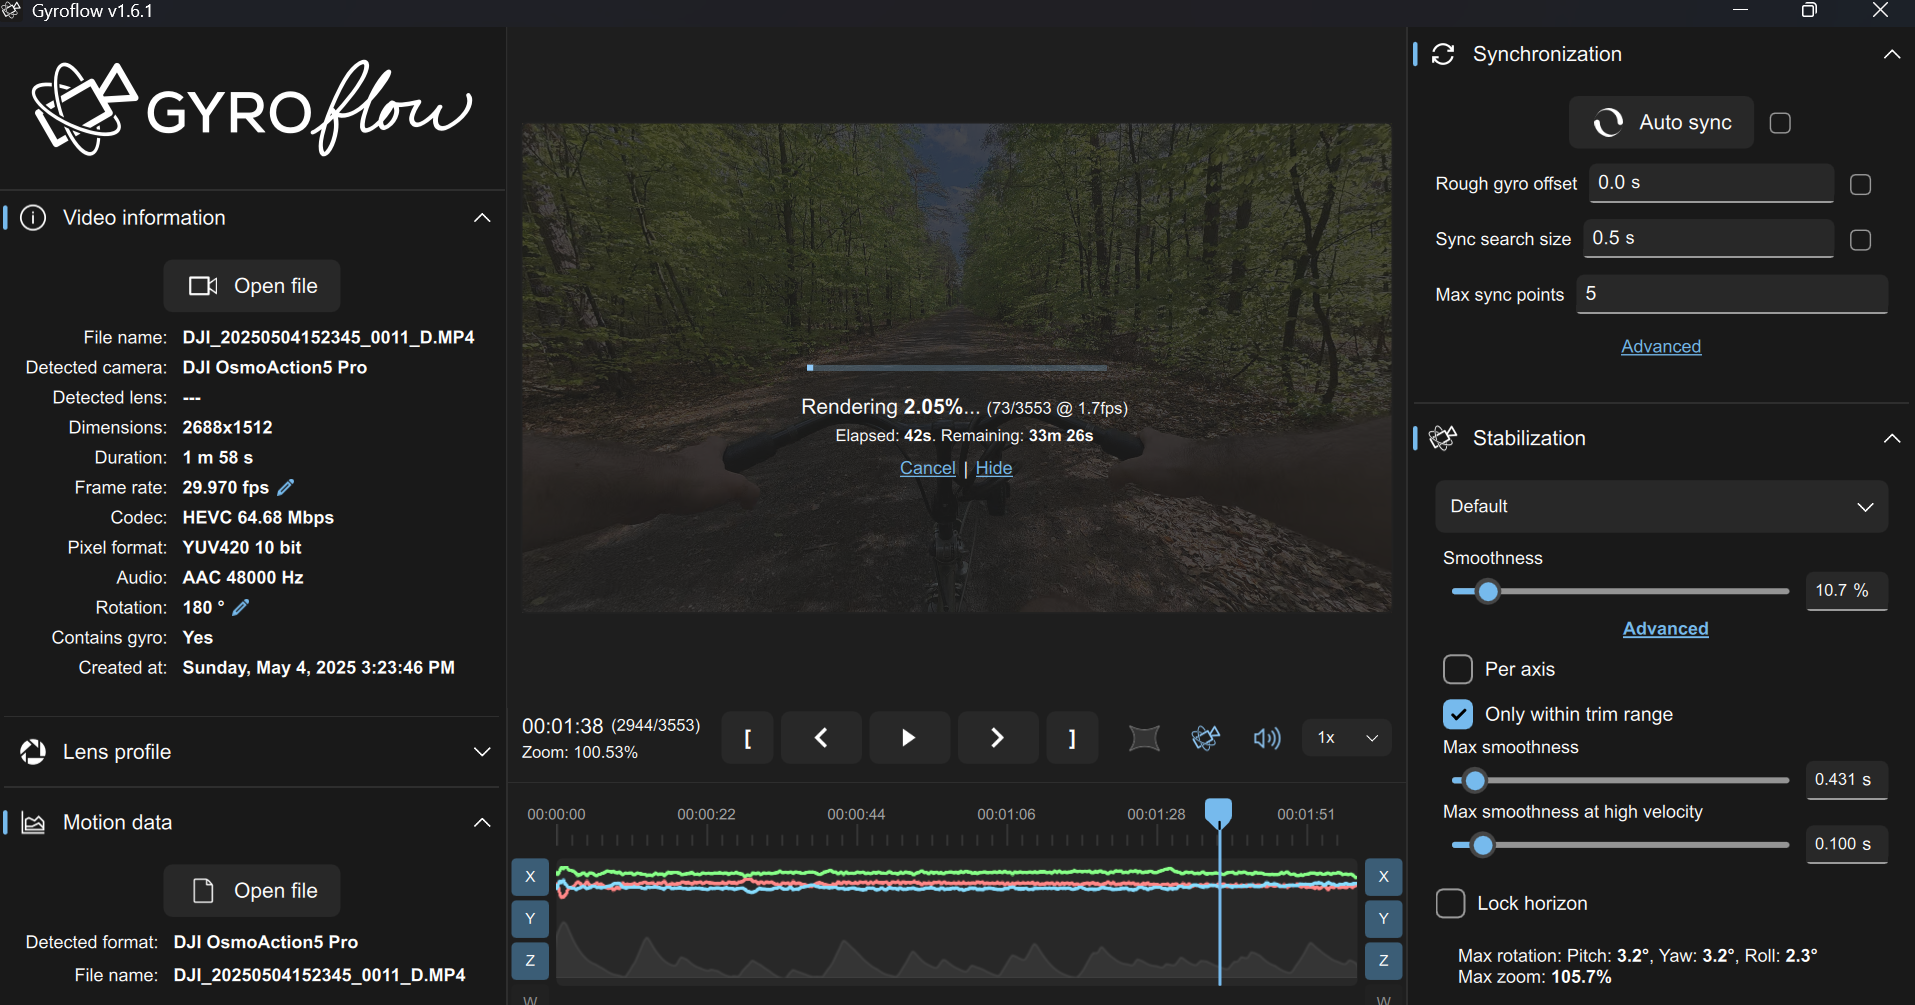
They also add the important detail that the in camera stabilization must be turned off to record the gyro data.
Gyroflow
Gyroflow is an application that can stabilize your video by using motion data from a gyroscope and optionally an accelerometer.
Modern cameras record that data internally (GoPro, Sony, Insta360 etc), and this application stabilizes the captured footage precisely by using them.
#choco install exiftool
#exiftool -ver
exiftool -ee .\DJI_20250504152345_0011_D.MP4 #working when recorded W and no RS!
I got a sample acelerometer data every 0.3s when recording at 30FPS
It can also use gyro data from an external sources (eg. from Betaflight blackbox).
GPL v3.0 | Video stabilization using gyroscope data
For Windows you have it on the microsoft store, for linux:
sudo apt update
sudo apt install fuse
sudo apt install libc++1

#https://github.com/gyroflow/gyroflow/releases

wget https://github.com/gyroflow/gyroflow/releases/download/v1.6.0/Gyroflow-linux64.AppImage
chmod +x Gyroflow-linux64.AppImage
./Gyroflow-linux64.AppImage


#alternatively
wget https://github.com/gyroflow/gyroflow/releases/download/v1.6.0/Gyroflow-linux64.tar.gz
tar -xzvf Gyroflow-linux64.tar.gz
cd Gyroflow
chmod +x gyroflow
./gyroflowKDEnLive
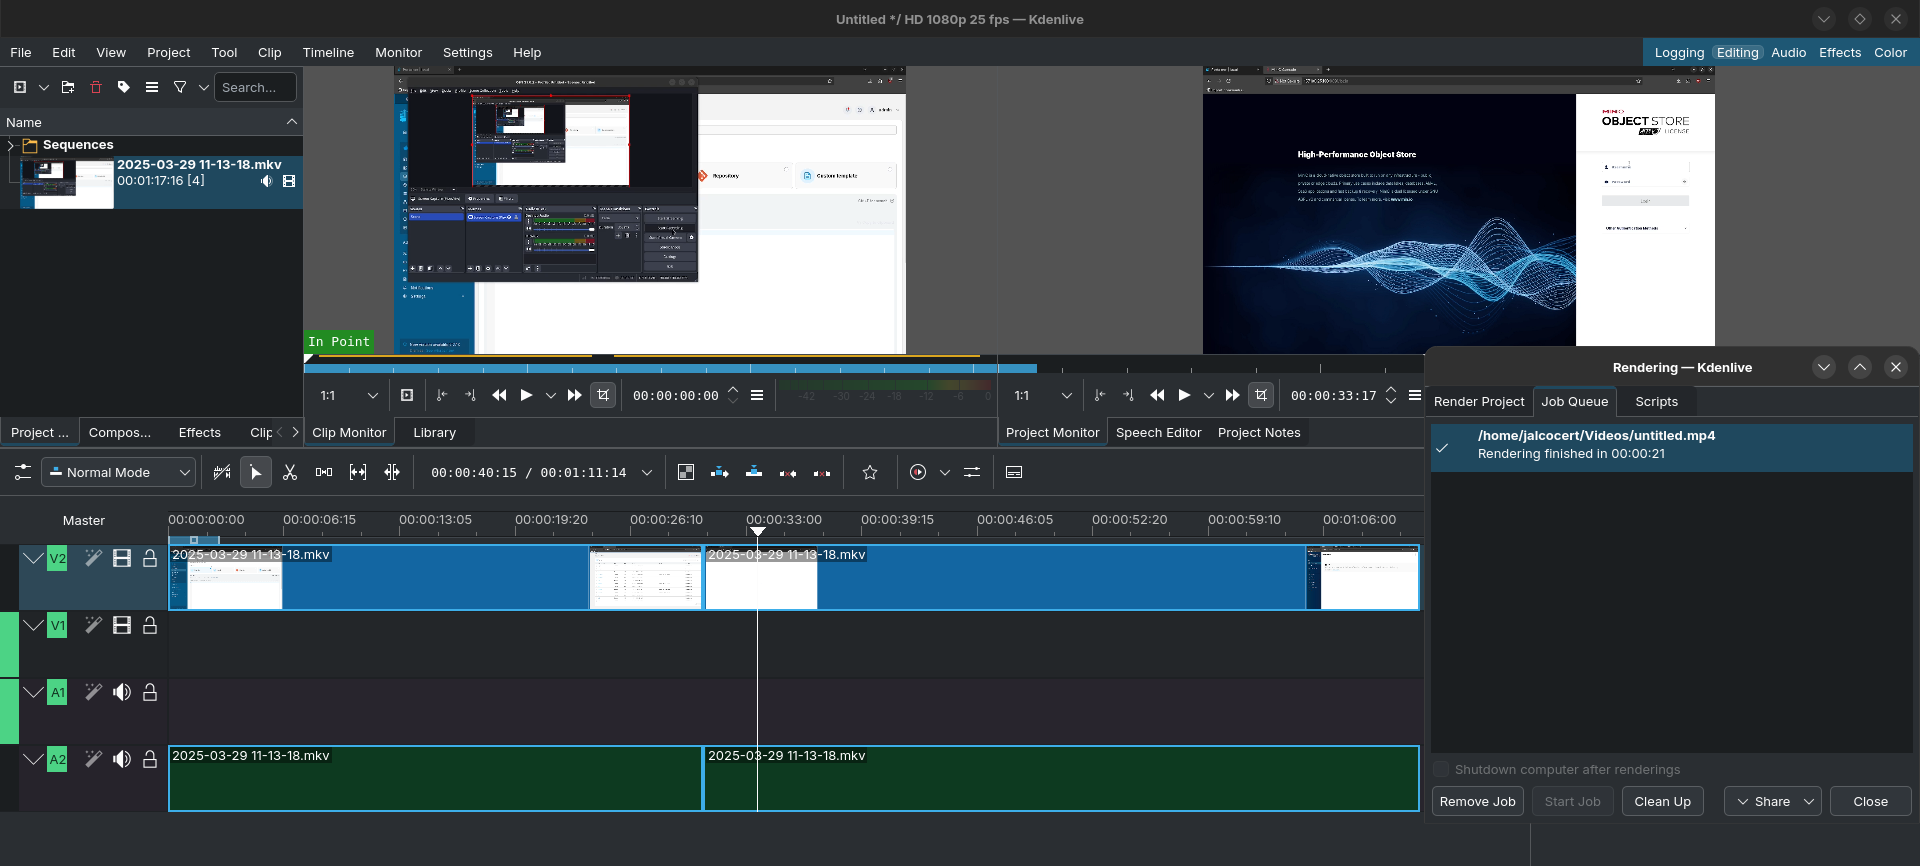
I was also using kdenlive as seen here
flatpak install flathub org.kde.kdenlive
Youtube video Descriptions
How about something like:
Kampinos, 8 xyz 2025
DJI OA5Pro 4k/30/RS/UW

0:00 Introduction
1:46 Section Two
4:57 Final Section

[Any other relevant description text can go here]
And the timestamps can be automatic, I mean…when you join your parts, get already a .txt telling which parts you joined, in which second…