Raspberry Pi Pico W
TL;DR
We will get few IoT scripts working via PicoW + MQTT + HA
Intro
Two years ago I was tinkering with microcontrollers.
But still, I have not put together all my learnings in a proper way.
Actually… in any readable way.
So lets get the PicoW part sorted out.
 RPi Related Blog
 RPi (PicoW Scripts) Repository
We will see:
- How to connect the PicoW
- Using the IDE
Raspberry Pi Pico W
Ideas for Readme’s - https://github.com/STJRush/handycode/tree/master/Raspi%20Pico
- The chip: RP2040 and you can get the pinout and schematics as per https://www.raspberrypi.com/documentation/microcontrollers/pico-series.html#pico-1-family
- The schema: https://docs.micropython.org/en/latest/rp2/quickref.html
The W version (brings wifi), see the official docs
PiW 101
You can get familiar via this post with the picoW: https://picockpit.com/raspberry-pi/everything-about-the-raspberry-pi-pico/
We are going to see few working examples:
- Playing with the Led
- Connect the PicoW to Wifi
- Reading the internal temp sensor
- Reading an external temp sensor - MLX90614
- MQTT and the PicoW
But basically, you will want to connect it to your laptop:
ls /dev/tty*

sudo apt-get update
sudo apt-get install screen

screen /dev/ttyACM0
Confirm that the device is plugged:
ls -l /dev/ttyACM0Connect to the PicoW:
ls -l /dev/serial/by-id; ls -l /dev/ttyACM* 2>/dev/null

newgrp dialout
mpremote connect /dev/ttyACM0 repl
You can connect to your PiW console logs:
sudo apt install picocom
picocom -b 115200 /dev/ttyACM0
# picocom v3.1

# port is        : /dev/ttyACM0
# flowcontrol    : none
# baudrate is    : 115200
# parity is      : none
# databits are   : 8
# stopbits are   : 1
# escape is      : C-a
# local echo is  : no
# noinit is      : no
# noreset is     : no
# hangup is      : no
# nolock is      : no
# send_cmd is    : sz -vv
# receive_cmd is : rz -vv -E
# imap is        :
# omap is        :
# emap is        : crcrlf,delbs,
# logfile is     : none
# initstring     : none
# exit_after is  : not set
# exit is        : no
Then just:
picocom -b 115200 /dev/ttyACM0If you press ctrl+c twice, you will access te python terminl inside the picow
MicroPython v1.20.0 on 2023-04-26; Raspberry Pi Pico W with RP2040
Type "help()" for more information.
>>>  #the program will stop executing in loop while u are here
IDE for PicoW
This repository: https://github.com/ajgquional/rpi-picow-micropython
Is great to get your started!
You can try with Thony or ArduinoIDE (I prefer the latter)
#sudo apt-get install -y thonny
flatpak install flathub cc.arduino.IDE2
When installing arduinoIDE:
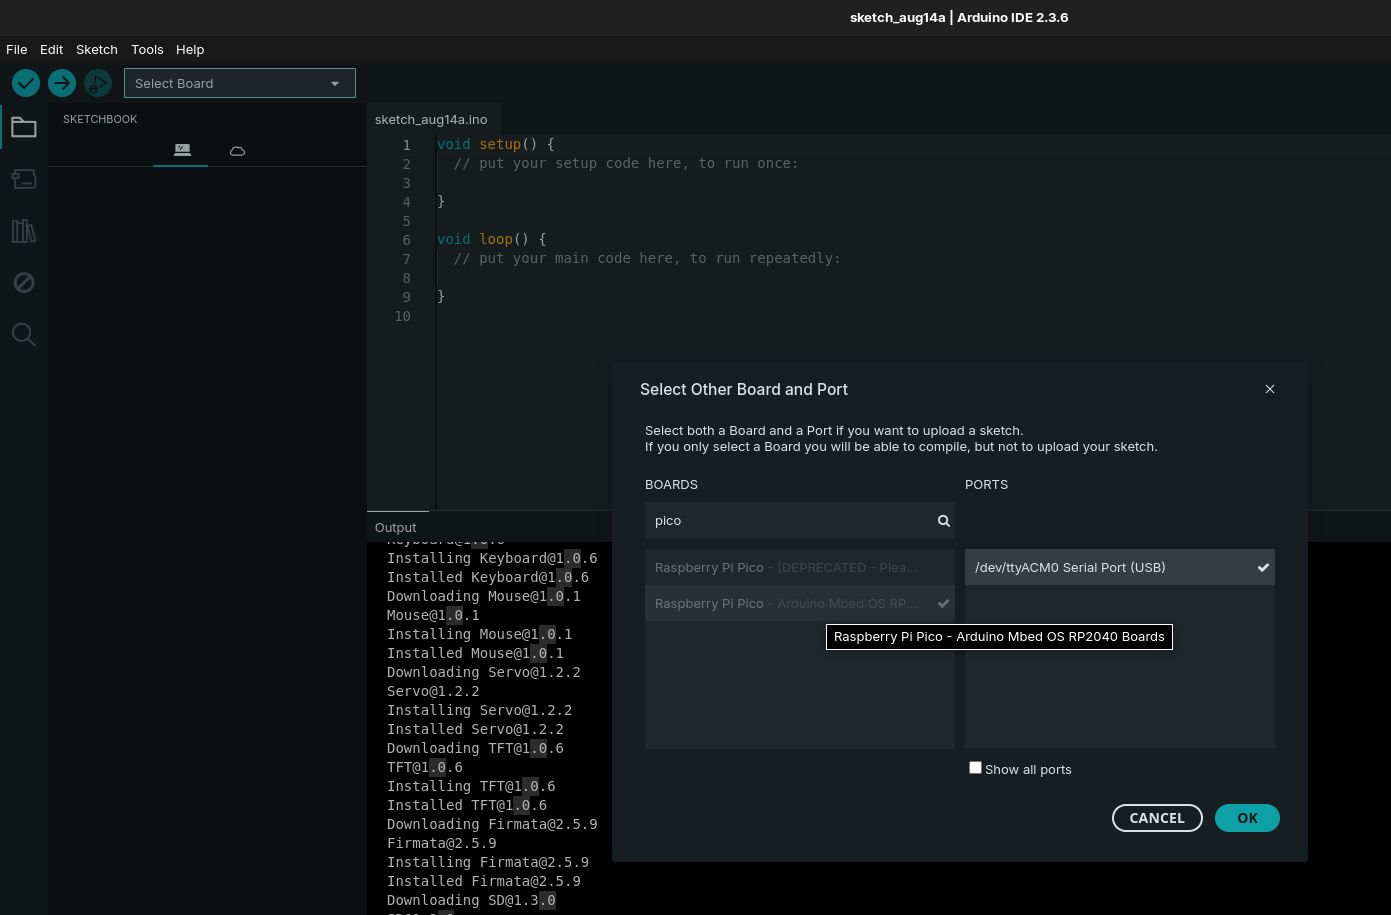
You will see a message like: The “Arduino Mbed OS RP2040 Boards [v 4.4.1]” core has to be installed for the currently selected “Raspberry Pi Pico” board.
Do you want to install it now?
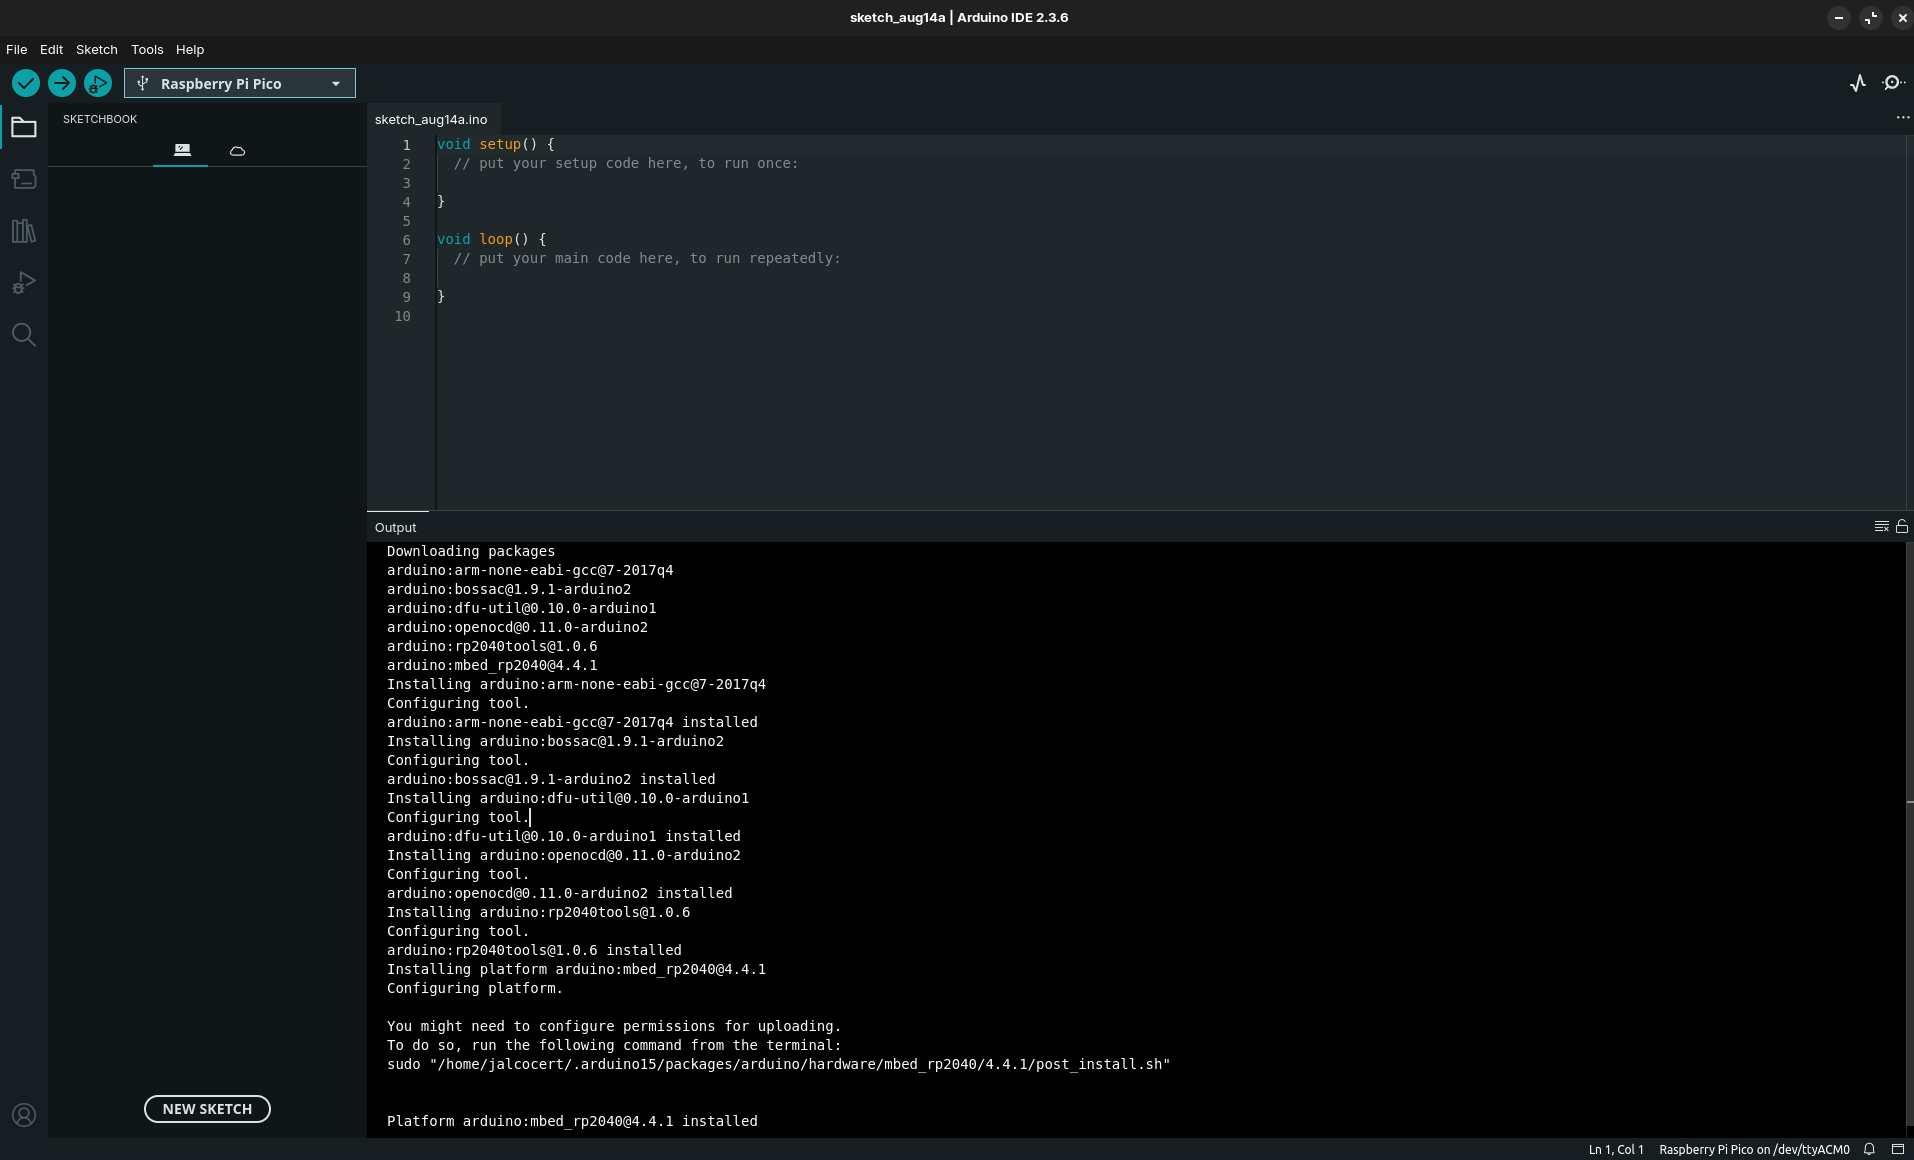
I said yes!
You will also have to:
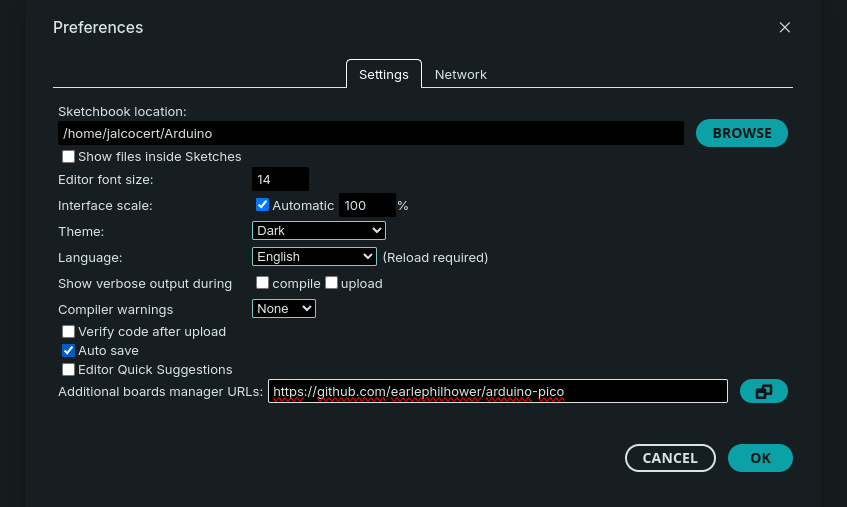
- Go to preferences -> settings and add the json as per: https://github.com/earlephilhower/arduino-pico?tab=readme-ov-file#installation
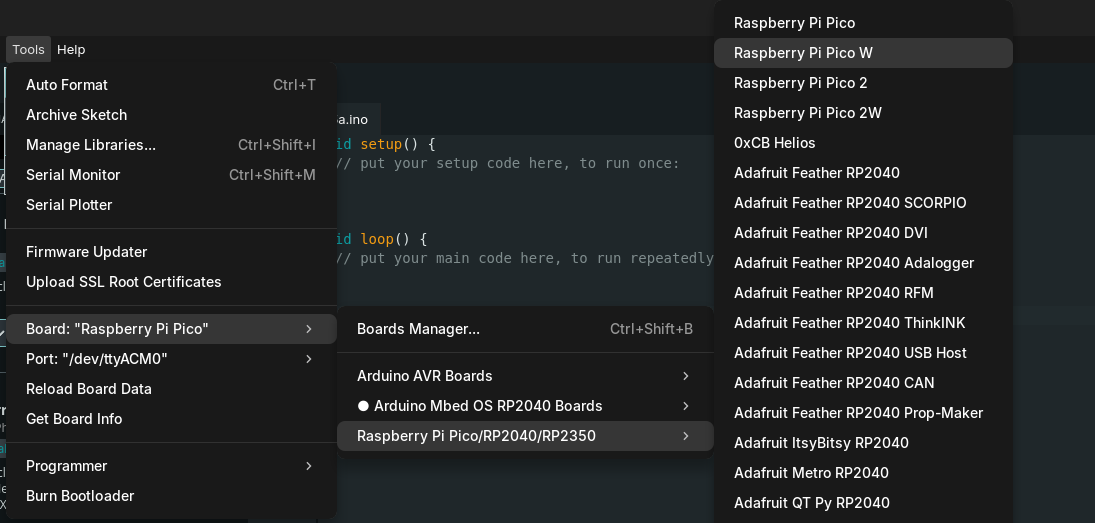
- Then go to Tools -> Board -> Boards Manager and look on the left for pi pico/Rp2040
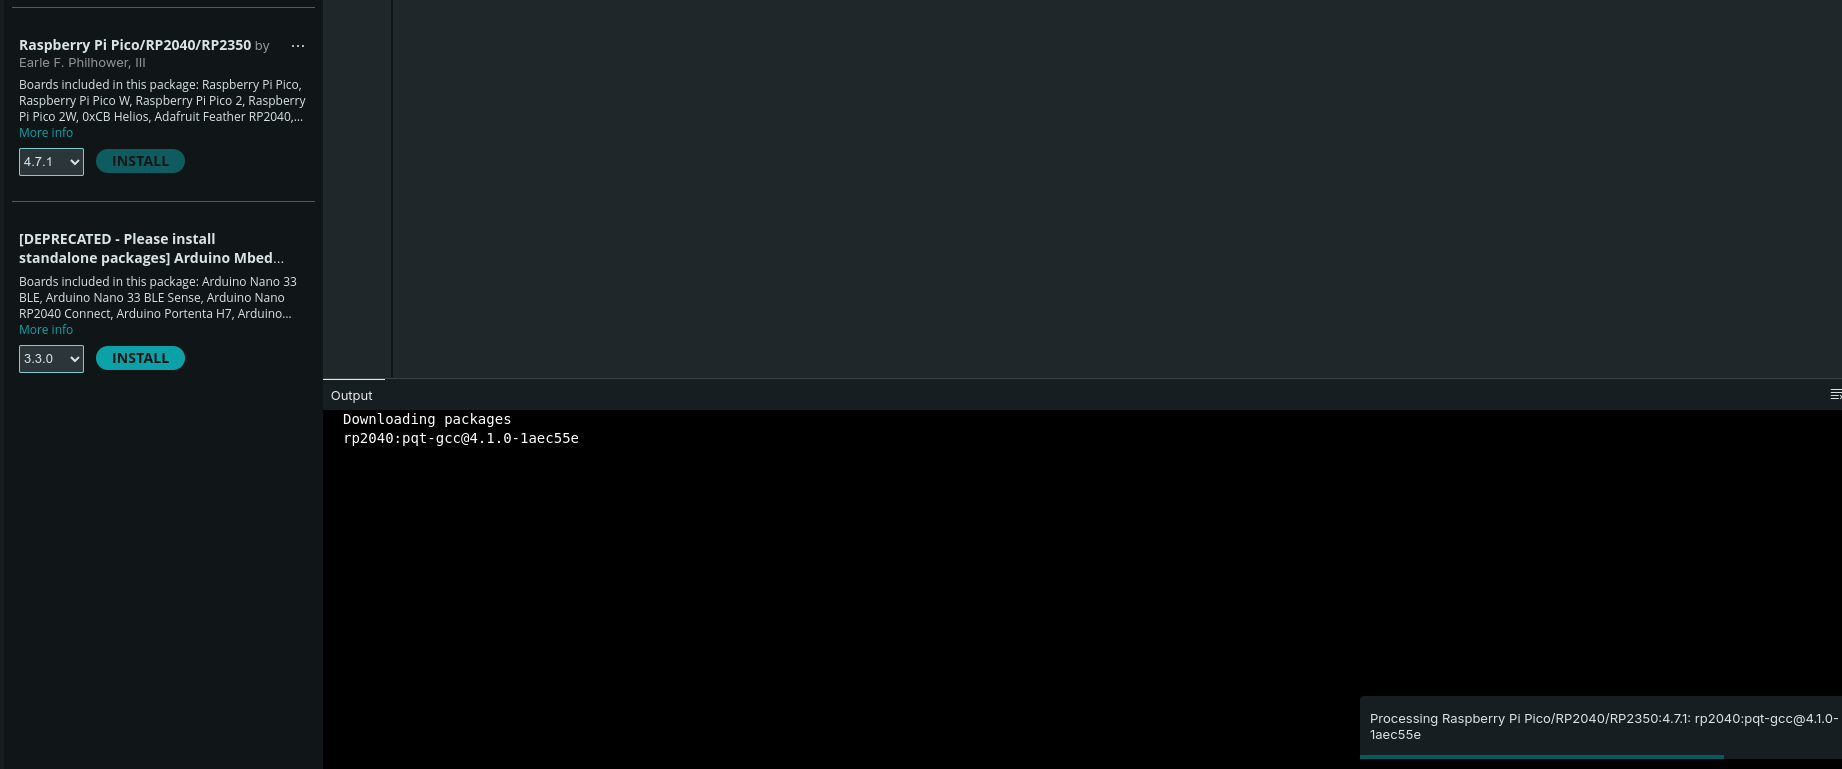
Then the PicoW will be visible at arduinoIDE:
For Thonny installation:
On Windows it was quite simple and the portable Thonny worked
You will need to do sudo usermod -aG dialout $USER so that Thonny wont have permissions
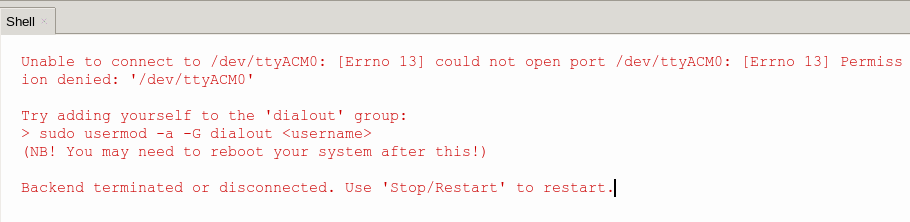
You will have to restart ubuntu so that
id -nG | grep dialoutwill provide output and Thonny’s error will be gone!
You could also check the serial access to the PicoW via:
screen /dev/ttyACM0 115200 #this will show the prints of your picoW scriptsGo to Thonny -> View -> Select Files: Then, go to the bottom right and select your PicoW
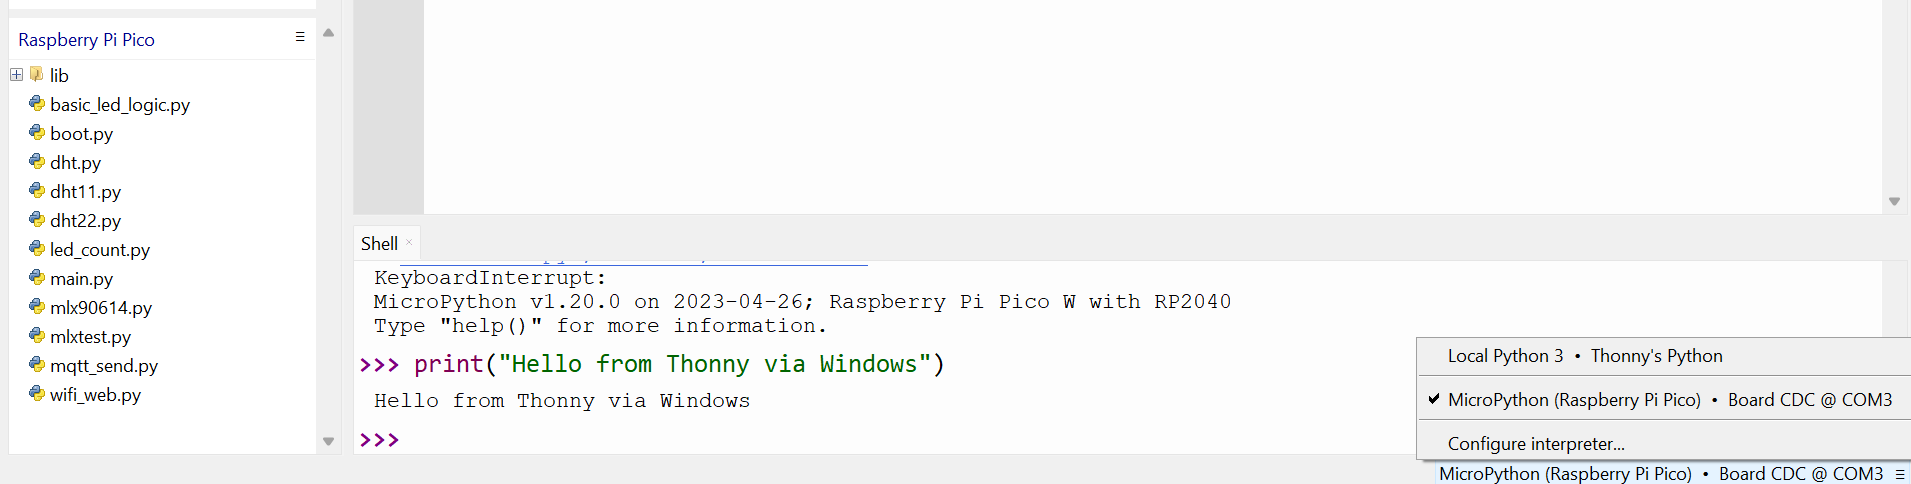
Now you will be able to see your old scripts if any inside your picoW:
Also, VSCode + extensions can work for your IoT projects:
flatpak install flathub com.visualstudio.code
#ext install ms-vscode.vscode-serial-monitor
code --install-extension ms-vscode.vscode-serial-monitor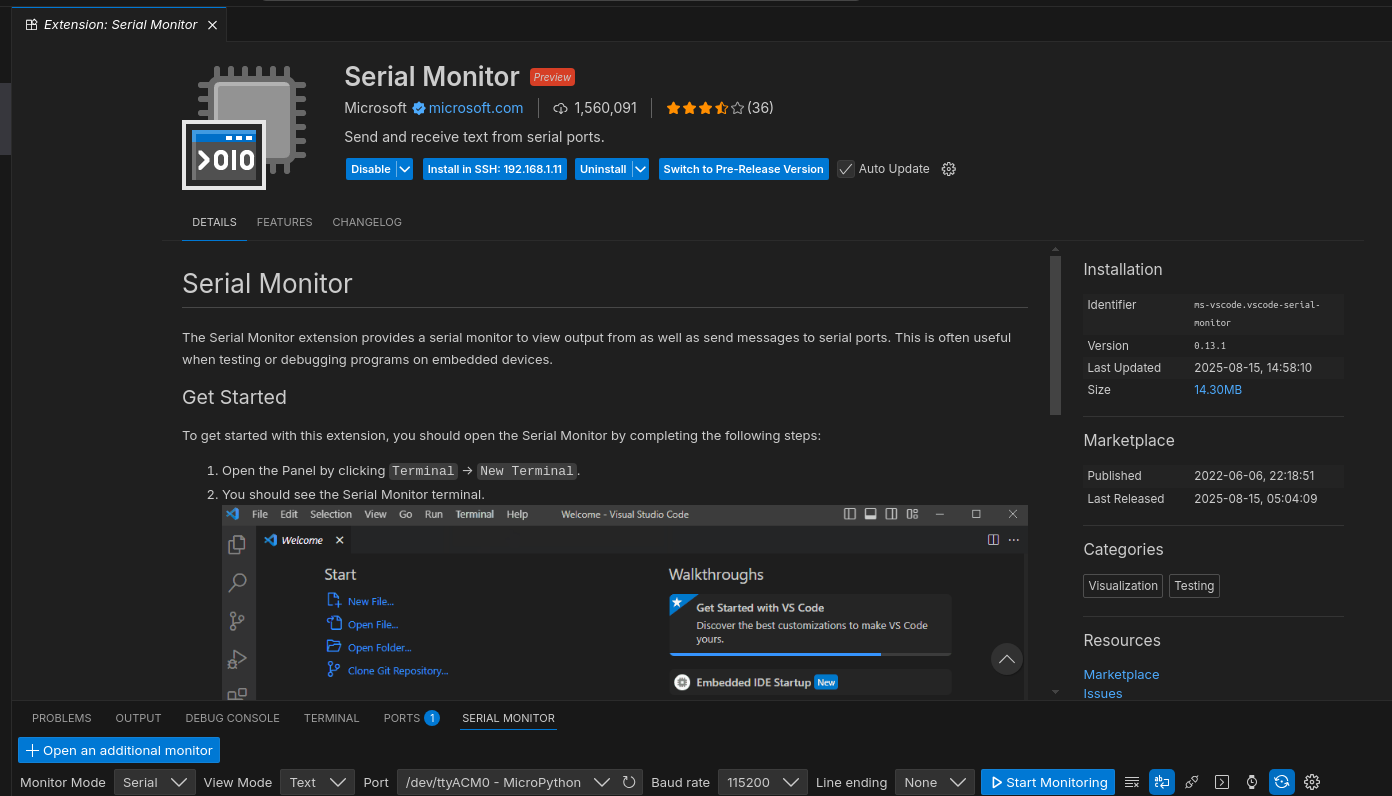
PicoW and MicroPython
The PicoW supports few languages.
But if you are confortable with Python, just stick to this one: MicroPython

Thanks to core-electronics
I was using Windows11 to make this one time setup:
- Hold the
BOOTSELbutton on the Pico W - Connect the Pico W to your computer via the USB cable
- Release the BOOTSEL button -> you will see a new device in the PC.
- Download this and move it to the Pico folder: https://github.com/micropython/micropython/releases
- Mip: https://github.com/micropython/micropython-lib
- Installing from fork: https://micropython.org/download/rp2-pico-w/rp2-pico-w-latest.uf2
import mip
mip.install(PACKAGE_NAME, index="https://USERNAME.github.io/micropython-lib/mip/BRANCH_NAME")
Unplug usb and plug
To install libraries, i have observed that recently upip has been depricated in favour of mip
You can see whats the micropython code running inside your picoW by:
#stop anything reading
#screen -ls
kill -9 9096
mpremote connect /dev/ttyACM0 fs ls
Using the Built in Led
The led is the pin 25 as per the PicoW schema.
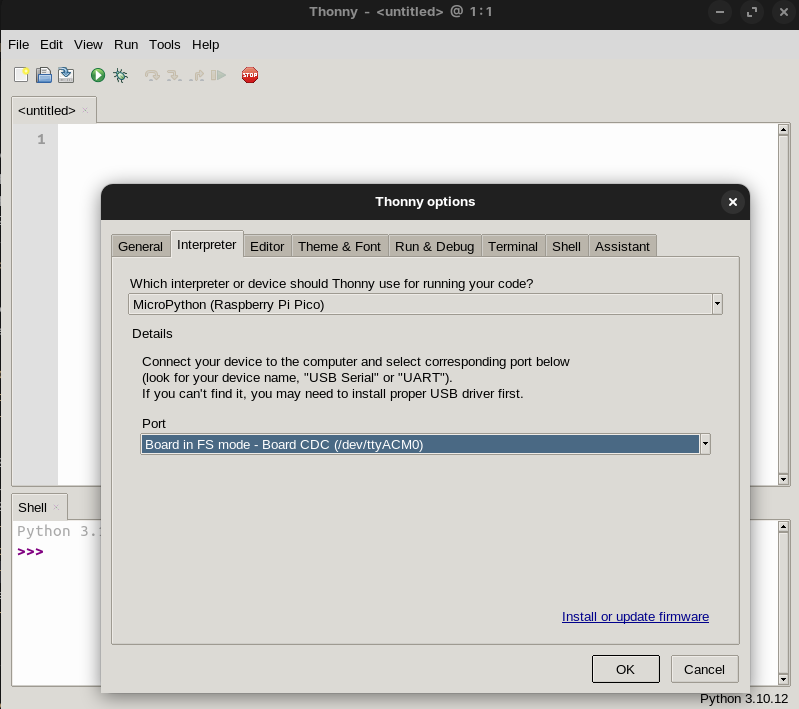
Run -> Configure Interpreter -> Interpreter -> MicroPython (Raspberry Pi Pico)
View -> files
The Pico will look for a main.py to execute in loop
- View -> plotter
Press CTRL+D for soft reboot and load the new program!
Reading internal temp sensor
Required library: https://pypi.org/project/machine/
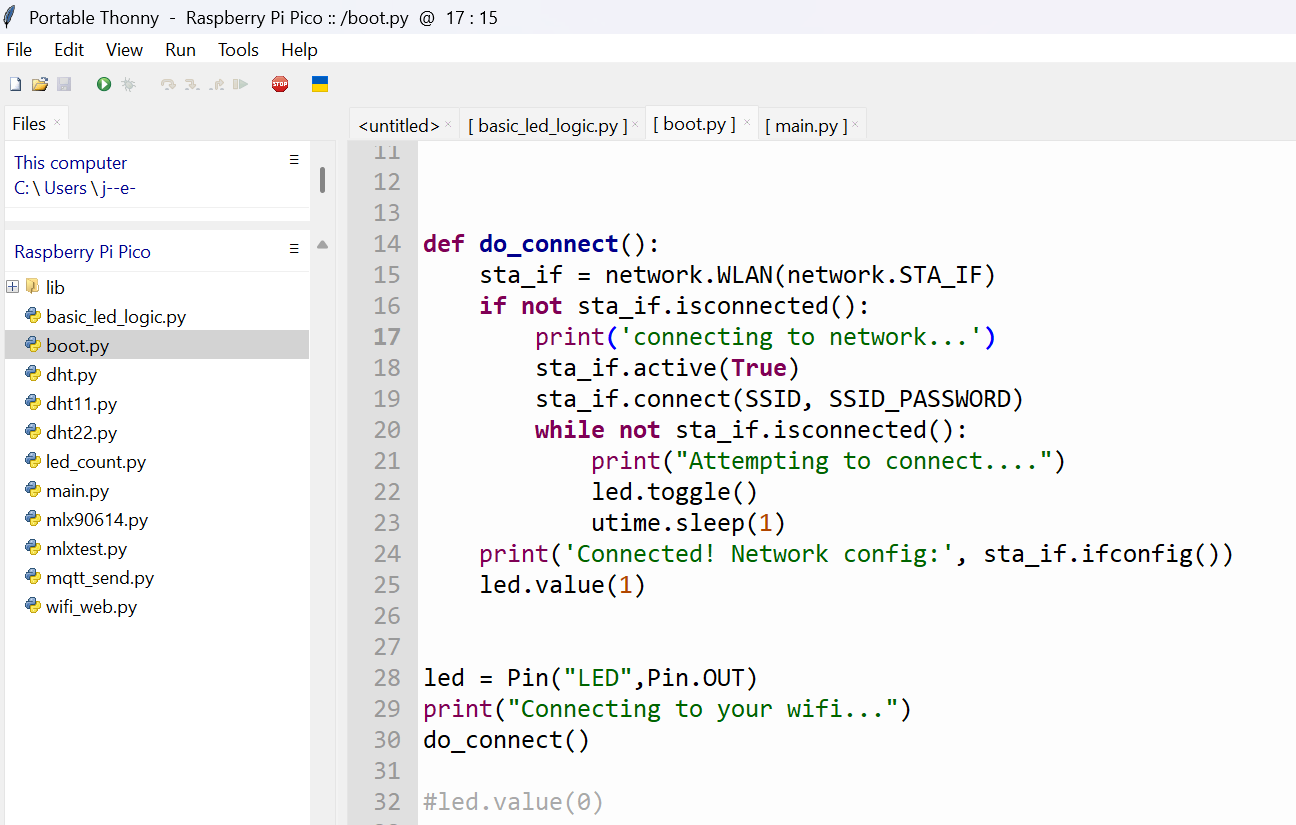
Connecting the Pico to Wifi
Thanks to the video:
Name the file different than
main.pyto avoid the automatic execution.
You can connect your picoW to Wifi and blik the led while attempting to do so with this script.
Even reading html webcontent, with this other script.
You will get something like:
#Starting Wi-Fi connection process...
#Already connected. Network config: ('192.168.1.15', '255.255.255.0', '192.168.1.1', '192.168.1.1')
Pico W with MLX90614
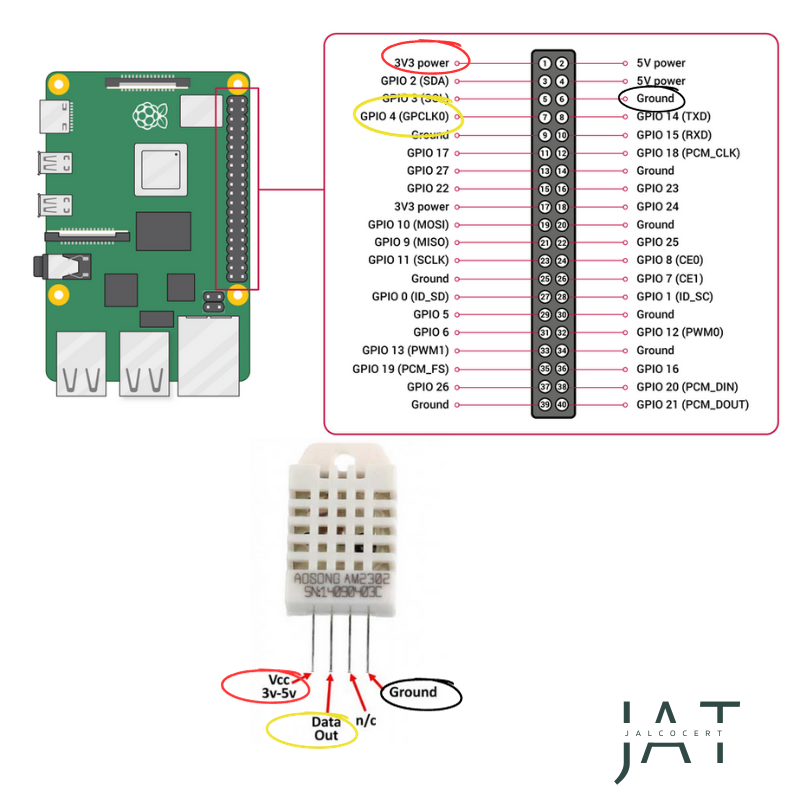
Connect the sensor properly as per:
GND is pin38 3v3 out is pin 36
- 11 (GP8) is I2C0 SDA
- 12 (GP9) is I2C0 SCL
And they are giving their own library: https://github.com/embeddedclub/micropython
We need to install: https://github.com/mcauser/micropython-mlx90614
It is not available in mip, the new package manager
So cloned the repo and copied into /lib/mlx/mlx90614.py
I did not compiled the
.pyfile of the repo into.mpy
In this way, we can import with
from mlx.mlx90614 import MLX90614 #(we import the class)PicoW and MQTT
The Message Queue Telemetry Transport!
I was writing on the Pi Blog a post about MQTT.
But its the time to play with MQTT and the PicoW.
Connect to the UI via:
http://192.168.1.11:18083
The MQTT Architecture operates on a client-server model, and the core of MQTT communication revolves around two main components:
- MQTT Broker (Server): This is the central hub of the system. It’s a server that receives all messages from clients, filters them by topic, and then distributes them to other clients who have subscribed to those specific topics.
A Pi 4 or an ASRock DeskMini X300 acting as a homelab, running an MQTT server like EMQX, fills this role.
- MQTT Client: These are the devices that connect to the broker to either publish messages (send data) or subscribe to topics (receive data). Your Raspberry Pi Pico W, configured to read sensor data and send it to the broker, is the perfect example of an MQTT client.
It will publish its sensor readings to a specific topic on the server. Other devices, which are also clients, can then subscribe to that same topic to receive the data.
This separation of roles is what makes MQTT so efficient and scalable for IoT applications.
The clients don’t need to know anything about each other; they only need to know how to connect to the central broker.
The RPI and mqttx/mosquitto 🌍
If you want to bring the bigger Pi4 to the MQTT game:
https://mqttx.app/ https://github.com/emqx/MQTTX
sudo apt install -y mosquitto
sudo apt install -y mosquitto-clients

#sudo apt install python3-pip
sudo pip3 install paho-mqtt

sudo systemctl status mosquitto.service
In the absence of a direct configuration entry for the port, the port used by Mosquitto could be the default port (1883 for MQTT or 8883 for MQTT over TLS/SSL).
You can check which one is in used with:
netstat -tulnhttps://www.youtube.com/watch?v=GQOqvvei5Do #also hivemq
Without hivemq, just using this GREAT VIDEO: explaining the umqtt.simple library!
To be used mqttx and emqx
PicoW to EMQX Server
Having your EMQX ready and accessing its UI at 192.168.1.11:18083

Login via admin/public and you will be prompted to change the pass
Create a topic via EMQX so that the PicoW will push data 🌍
Yes, you can temporarily allow anonymous clients to publish to a topic. However, this is not recommended for a production environment as it creates a significant security vulnerability. Anyone who can reach your server can then publish data to that topic.
This is primarily useful for initial testing and quick development to confirm that your Pico W’s code and network configuration are correct.
Here’s how to do it in EMQX:
Enable Anonymous Authentication By default, EMQX allows anonymous access. However, if you’ve previously configured a password-based authentication, you may have disabled it. You can check this in the EMQX dashboard.
Navigate to Access Control -> Authentication.
If you see an “anonymous” entry, ensure it is enabled.
If it’s not present or disabled, you may need to add or enable it, but in most default setups, it’s already there.
Configure Anonymous Authorization This is the most critical step. You need to create an Access Control List (ACL) rule that explicitly allows unauthenticated (anonymous) users to publish to your desired topic.
Navigate to Access Control -> Authorization.
Add a new rule.
Set the Type to
All Users.Enter the Topic Filter (e.g.,
house/living_room/sensor_data).Set the Action to
Publish.Set the Permission to
Allow.Save the rule.
This rule will apply to any client that connects without a username and password. Now, your Pico W can connect to the broker using its IP address and port without needing to provide any credentials.
Again, please remember to set up proper authentication and authorization with specific users and passwords before you deploy your project for real-world use.
You don’t need to manually create a topic in EMQX.
Topics are created automatically the first time a client publishes a message to them. You just need to specify the topic name in your Pico W’s code.
How it Works
The MQTT broker operates on a publish-subscribe model. When a client (your Pico W) sends a message, it includes a topic in the message header.
The broker, upon receiving the message, checks if that topic already exists.
If it doesn’t, the broker creates it and then routes the message to any clients that are subscribed to that topic.
What You Need to Do
- Define the Topic Name: In your Pico W’s code, simply decide on a logical and hierarchical topic name. Good examples are:
sensor/livingroom/temperaturedevice/picow_01/statushome/kitchen/light
- Publish to the Topic: When your Pico W’s code publishes its first message, it will automatically create that topic on the EMQX broker.
- Subscribe to the Topic: Any other client (e.g., another Pico W, a dashboard on your computer, or a smartphone app) that wants to receive that data will need to subscribe to the exact same topic name.
This dynamic topic creation is a key feature of MQTT that makes it flexible and easy to use.
Lets make sure that EMQX is ready.
Testing EMQX from W11 with random messages
This did not work:
#snap install mosquitto
choco install mosquitto
So I went and download it as in old school fashion: https://mosquitto.org/download/
And configure the new path variable:
For setting a Windows System Environment Variable, the variable name and value are distinct.
- The variable name you need to edit is
Path. This is a system variable that tells Windows where to look for executable files. - The variable value you need to add is the path to the Mosquitto installation folder:
C:\Program Files\mosquitto.
When you add this value to the existing Path variable, you’re not changing its name. You are simply appending the Mosquitto directory to the list of folders Windows checks for commands.
So that this works:
mosquitto -h #I got mosquitto version 2.0.22And just send a message: from W11 to EMQX at the x300
mosquitto_pub -h 192.168.1.11 -p 1883 -t test/data -m "Hello, World!"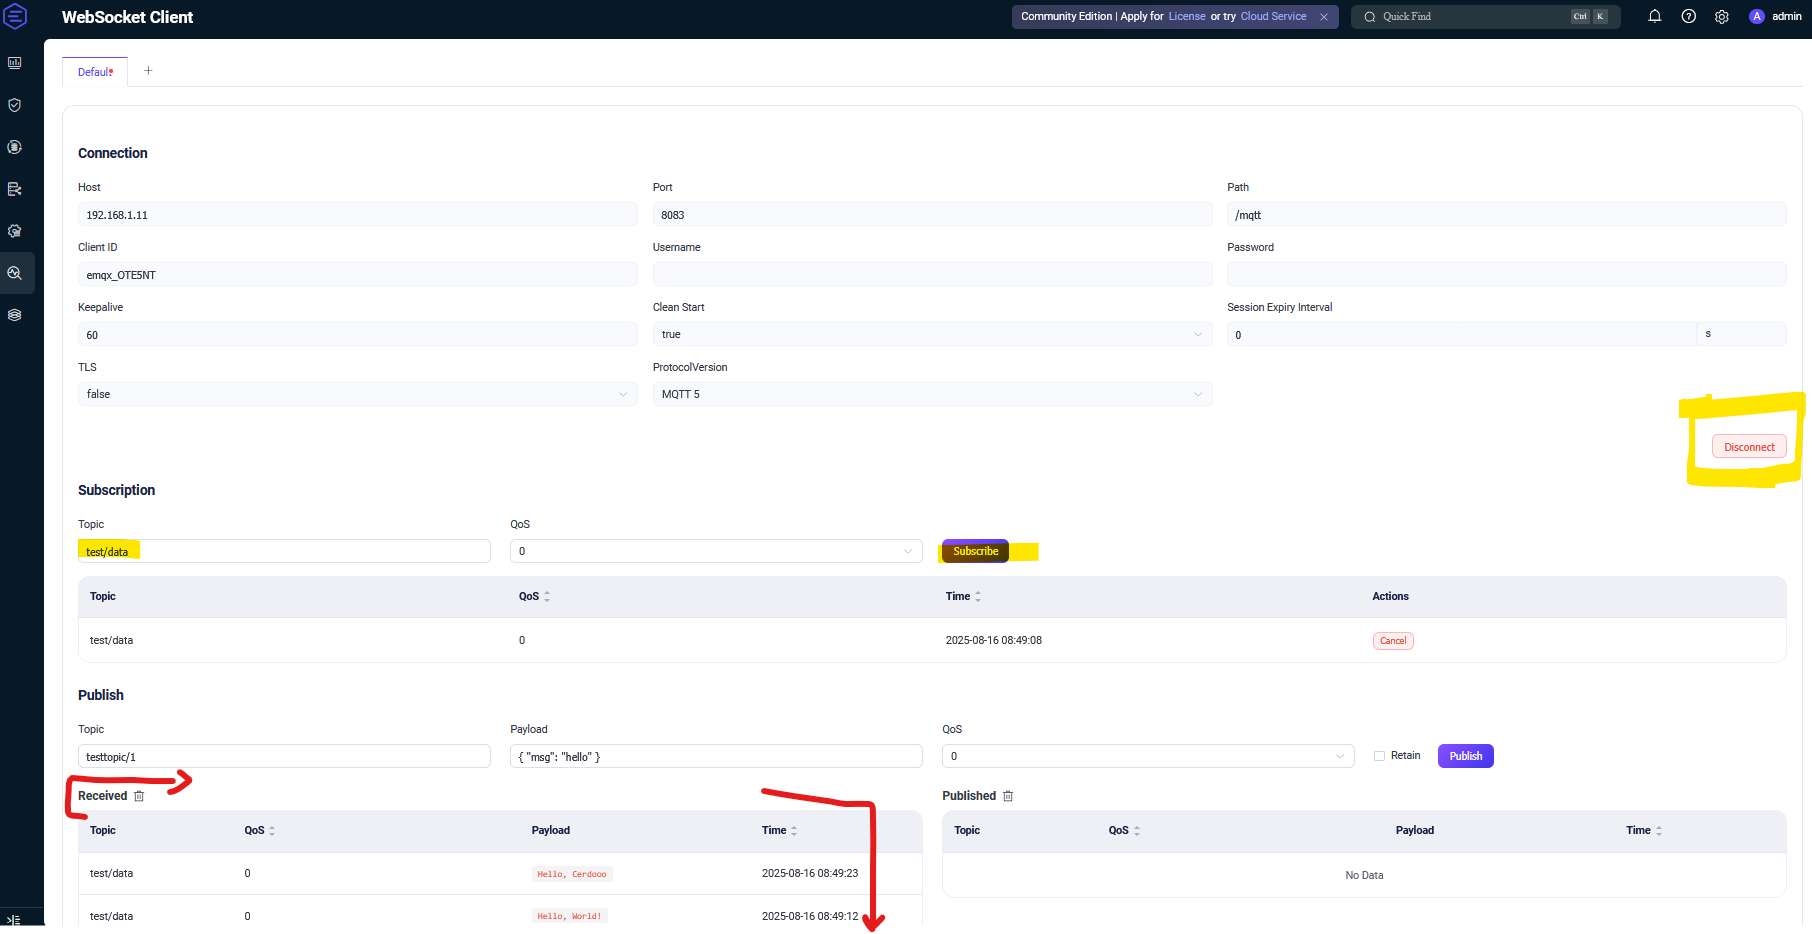
So now that we got that, EMQX works and receives messages from clients, lets continue.
Getting the PicoW ready for MQTT 🌍
Adding the Language of IoT (MQTT) 🗣️
Being online is one thing, but how does your Pico W “talk” to your other devices? It needs a common language, and for IoT, that language is MQTT.
What is MQTT? 🗣️ MQTT stands for Message Queuing Telemetry Transport. It’s a super lightweight and efficient protocol specifically designed for devices with limited power and bandwidth. Unlike a standard web request where one device talks directly to another, MQTT uses a “central hub” model.
- The Broker (Server): This is the central hub. In your case, this is the EMQX server running on your Ubuntu machine. It’s the post office of your IoT system.
- Clients (Publishers & Subscribers): These are the devices that want to send or receive data. Your Pico W is a client.
A client publishes a message to a topic (like putting a letter in a specific mailbox), and any other client that has subscribed to that same topic receives the message. The clients never talk to each other directly; they only communicate with the broker.
Installing the Library 📚 Your Pico W needs a special library to understand and speak MQTT. Your notes point out two ways to install them:
upipand the newermip.#install libraries for mqtt ##with mip mip.install("umqtt.robust") mip.install("umqtt.simple")The
mip.install()commands download the necessary library files directly onto your Pico W’s flash memory. You’re installing two variants:umqtt.simple: A very basic MQTT client.umqtt.robust: A more powerful version that includes features like automatic re-connection if the Pico W loses its Wi-Fi signal. This is highly recommended for any real-world project.
Once these steps are completed, you’ve laid the groundwork.
Your Pico W is connected to the internet, and it has the tools to start sending and receiving data using the MQTT protocol. You are now ready to build the next part of your project: writing the code that actually publishes your sensor data!
#connect to wifi
import network   # handles connecting to WiFi
import urequests # handles making and servicing network requests

# Connect to network
wlan = network.WLAN(network.STA_IF)
wlan.active(True)

# Fill in your network name (ssid) and password here:
ssid = 'HUAWEI P30'
password = 'mokradupa68'
wlan.connect(ssid, password)

#install libraries for mqtt

##with upip
#upip.install("micropython-umqtt-robust")
#upip.install("micropython-umqtt-simple")

##with mip
#https://github.com/micropython/micropython-lib
#https://github.com/micropython/micropython-lib/tree/master/micropython/umqtt.robust
mip.install("umqtt.robust")

#https://github.com/micropython/micropython-lib/tree/master/micropython/umqtt.simple
mip.install("umqtt.simple")
then the code https://github.com/donskytech/micropython-raspberry-pi-pico/tree/main/umqtt.simple
Upip vs MPIP Package Managers
Both upip and mip are package managers for MicroPython.
The key difference is that mip is the new, recommended tool, while upip is the older, deprecated one. mip offers several advantages that make it a better choice for installing libraries on your Pico W.
The Old Way: upip
upip (MicroPython’s Package Installer) was the original tool for downloading and installing libraries from the web.
It worked by fetching the library files from a remote URL, such as micropython-lib, and placing them on your device.
Key Characteristics:
- Simpler Protocol:
upipused a basic HTTP request to download packages. - Deprecation: It’s no longer actively maintained. If you try to use it with newer MicroPython firmware versions, you may encounter errors or discover that it can’t find the necessary packages.
- No
__init__.pyfiles: The packages weren’t properly structured, which could cause issues with module imports.
The New Way: mip ✨
mip (MicroPython Installation Program) is the modern package manager. It was introduced to address the limitations of upip and provide a more robust and reliable way to manage libraries.
Key Characteristics:
- Improved Architecture:
mipuses a better-designed protocol that ensures more stable installations. - Package Source: It primarily fetches libraries from the MicroPython community library on GitHub, which hosts many pre-compiled, optimized packages.
- Dependency Handling:
mipcan automatically handle dependencies, meaning if a library requires another library to function,mipwill install that too.upipcould not do this. - Standardized Installation: It ensures that packages are installed correctly, with all necessary files (
__init__.py, etc.) properly placed for seamless imports.
In summary, mip is the modern, more reliable, and feature-rich way to install libraries on your Pico W, and upip is a legacy tool that you should avoid.
Then, we just need this kind of main.py script to push just random data (from 1 to 20).
And this main.py to push the internal temp sensor to the MQTT server (EMQX):
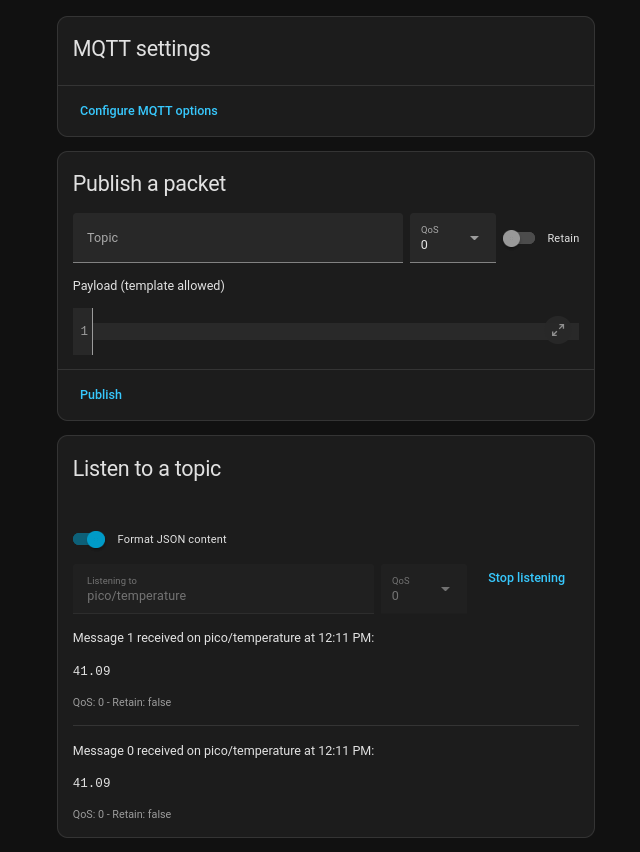
This creates and pushes the pico/temperature MQTT topic, which we can suscribe via EMQX:
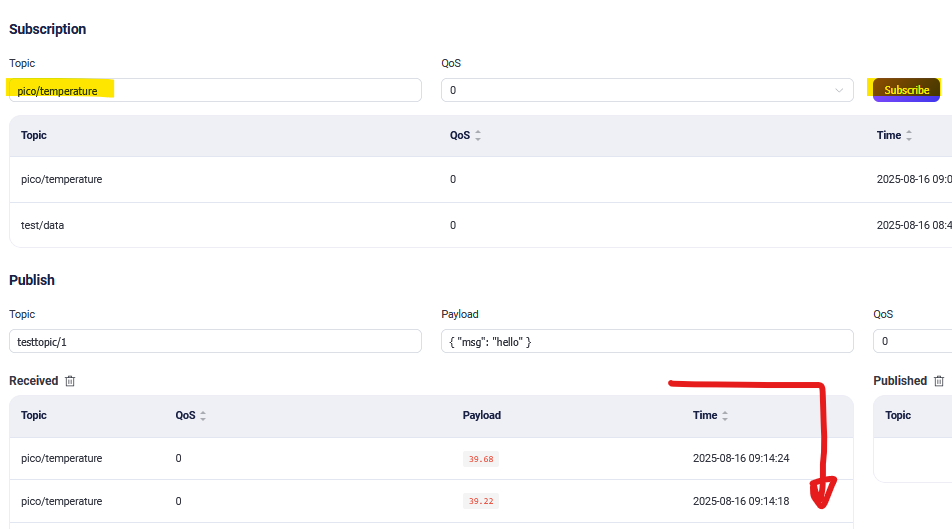
Your Data is now ready at your MQTT server or you to play with it!
Conclusions
I took longer than expected to write this post.
And almost forgot all the things I learnt about the PicoW, just bc I did not document it while learning.
Things of 2023.
To visualize the MQTT Data:
Many business intelligence (BI) tools can connect to MQTT, but usually not directly.
The most common and robust approach is to use an intermediary service to get the MQTT data into a database, which the BI tool can then query.
This is the exact setup we discussed with Grafana:
- MQTT Broker (EMQX): Collects the data from your Pico W.
- MQTT-to-Database Bridge: Listens to a topic and pushes the data into a database.
- Database (e.g., InfluxDB): Stores the time-series data.
- BI Tool (e.g., Grafana): Queries the database to create visualizations.
Th> is model is standard because BI tools are designed for analyzing historical data from databases, not for processing real-time message streams.
ThingsBoard is an Open-source IoT Platform - Device management, data collection, processing and visualization.
- DYI with Flask!
Flask x MQTT 101
For a simple app to just monitor the internal temperature, the Flask application would be relatively simple.
You’d primarily need to set up the communication channels and a basic web page to display the data.
The Backend (Flask)
The Flask side of the application would be the “server” that receives the MQTT messages. You would:
- Initialize the Flask app and an MQTT client.
- Define an MQTT callback function that gets triggered whenever a new temperature message arrives from your Pico W.
- Inside this callback, you would store the most recent temperature value and then broadcast it to any connected web clients using a library like Flask-SocketIO.
This backend script would be continuously running, listening for both MQTT data and requests from web browsers.
The Frontend (HTML/JavaScript)
The frontend is the simple web page that displays the data. You would create a single HTML file with:
- A heading (e.g., “Pico W Temperature Monitor”).
- A space (like a
<div>) to display the temperature value. - A JavaScript script that connects to your Flask server via SocketIO.
- Once connected, the script would listen for the temperature data broadcast from the server and update the content of the
<div>with the new temperature value.
This setup is efficient because it avoids traditional page reloads. Instead, the server pushes new data to the browser as soon as it’s available, creating a real-time, dynamic display.
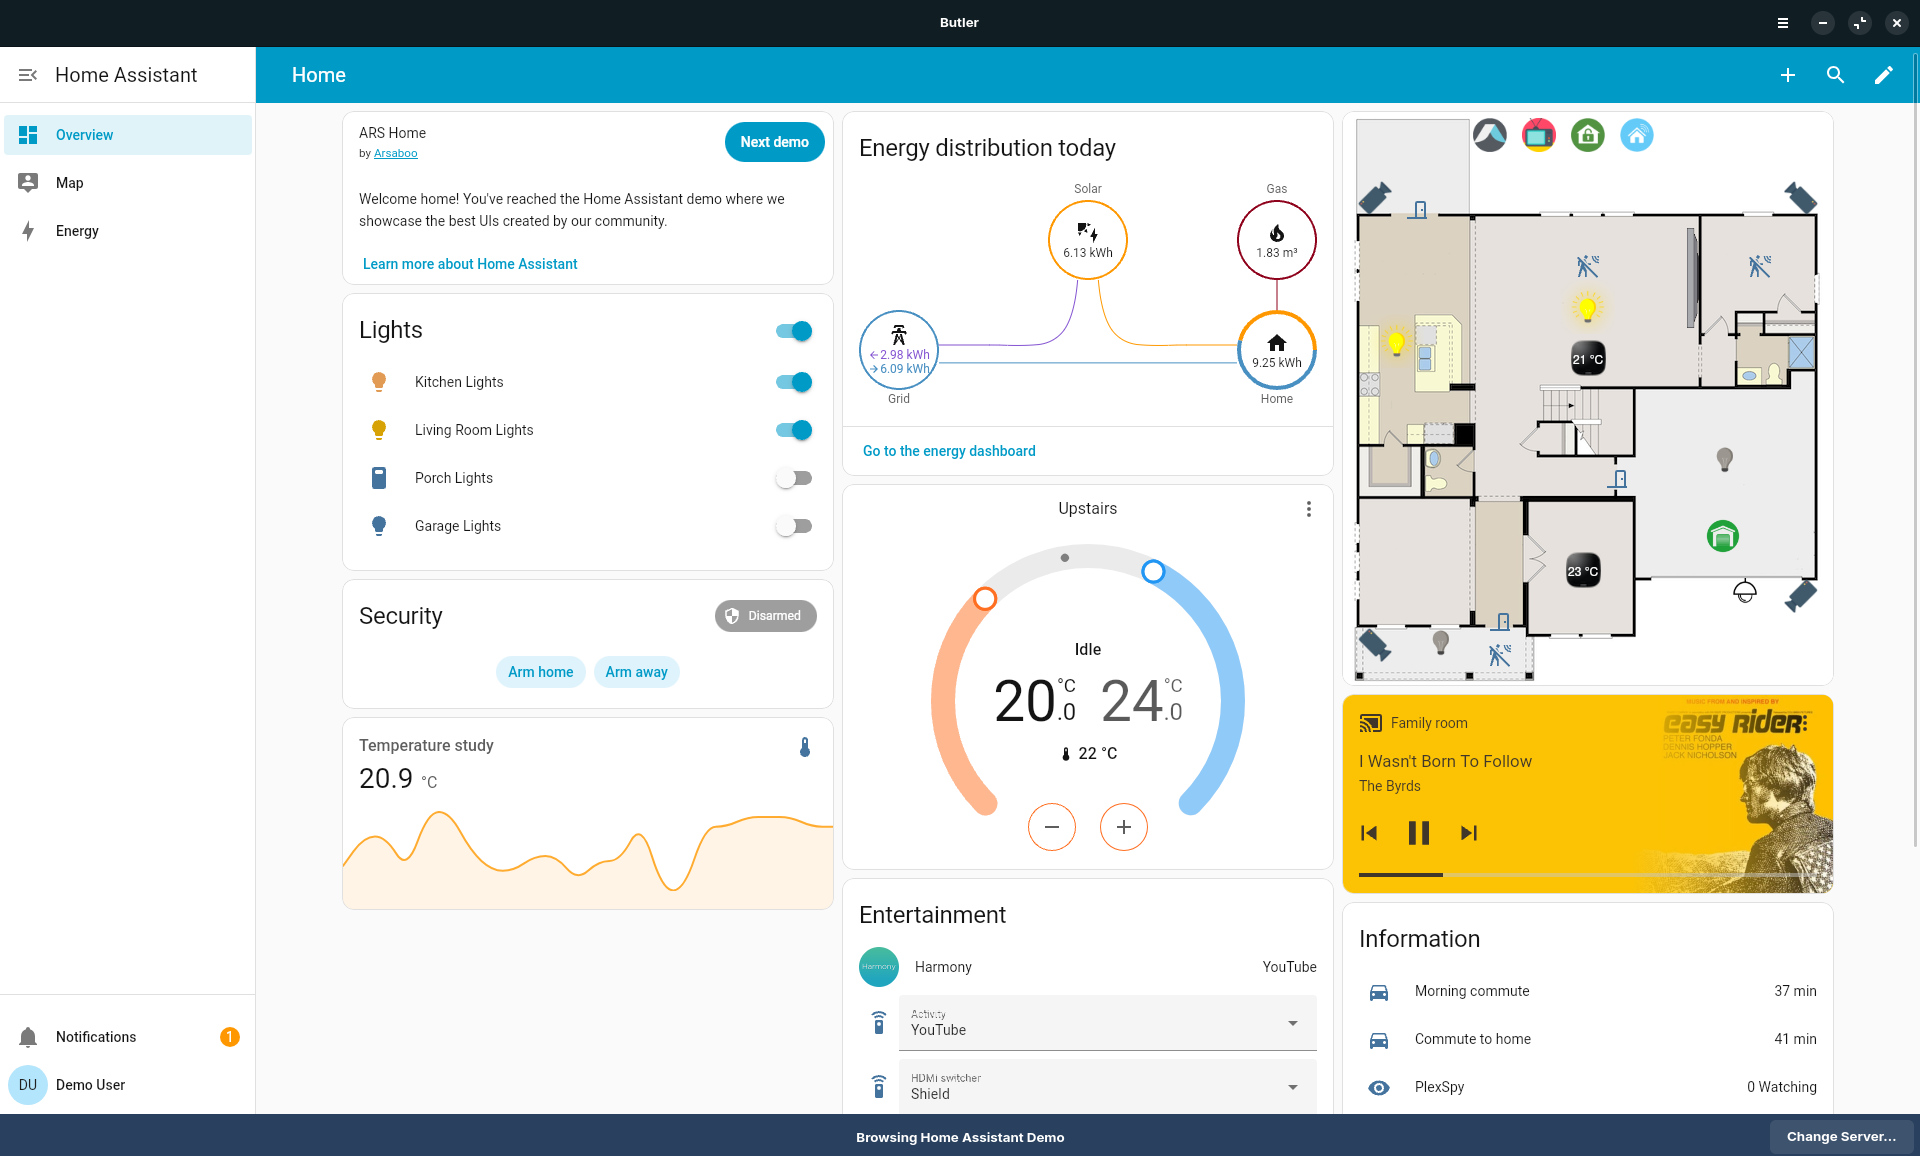
HA is Great
Dont trust me, see what people do:
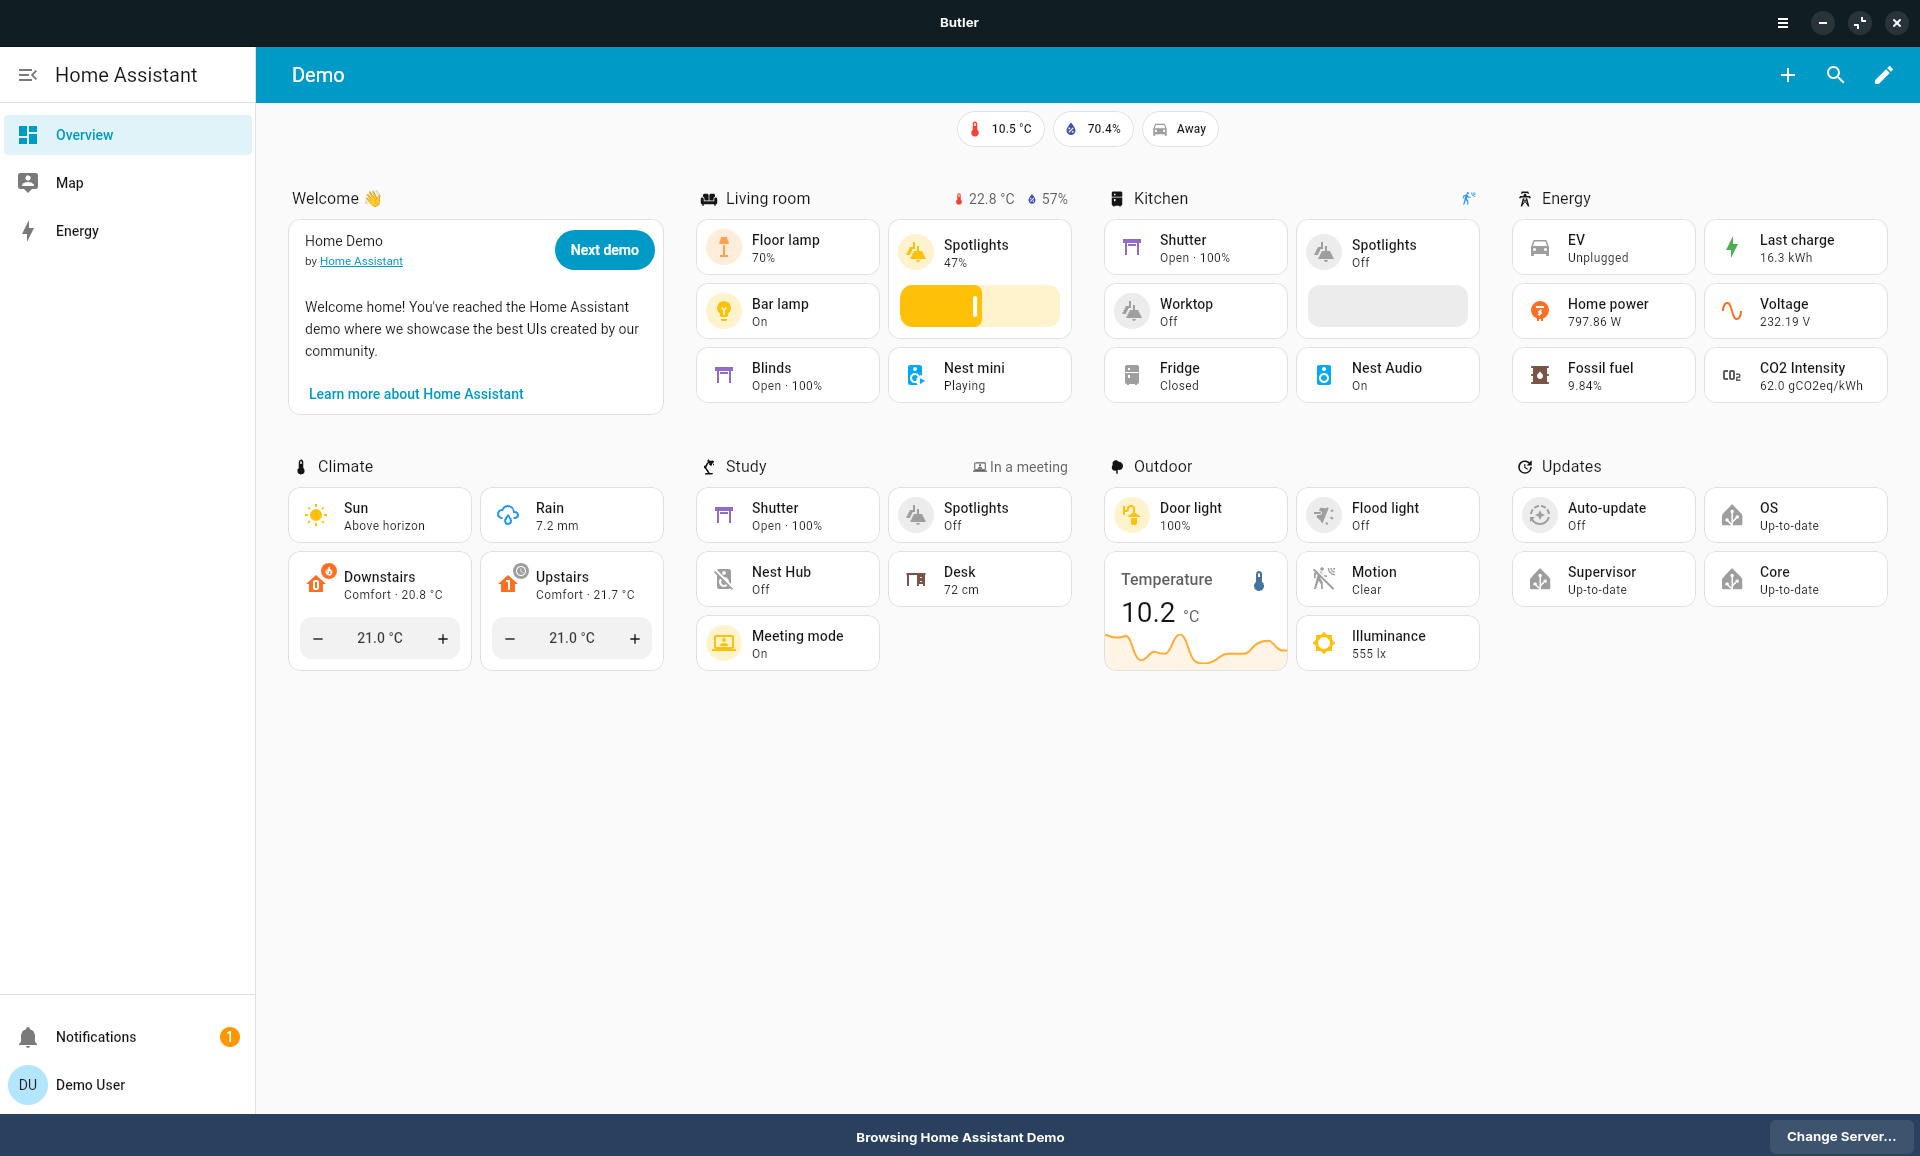
More home assistant inspiration:
Setup Home assistant with:
#git clone https://github.com/JAlcocerT/Home-Lab
cd ./Home-Lab/home-assistant
sudo docker compose up -d- https://github.com/JAlcocerT/Home-Lab/tree/main/home-assistant
- https://github.com/JAlcocerT/Home-Lab/blob/main/home-assistant/configuration.yaml
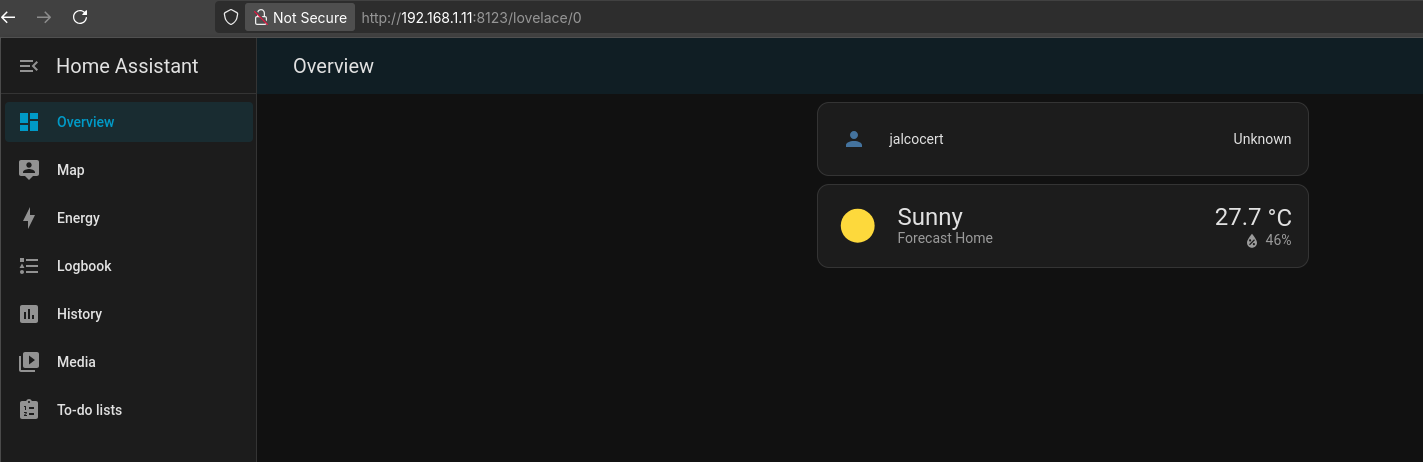
Connect to HA via
http://192.168.1.11:8123
HA x MQTT
How about connecting HA via MQTT to the PicoW so that we can receive the data into a cool dashboard?
You will see this dashboard by default: later we will create one
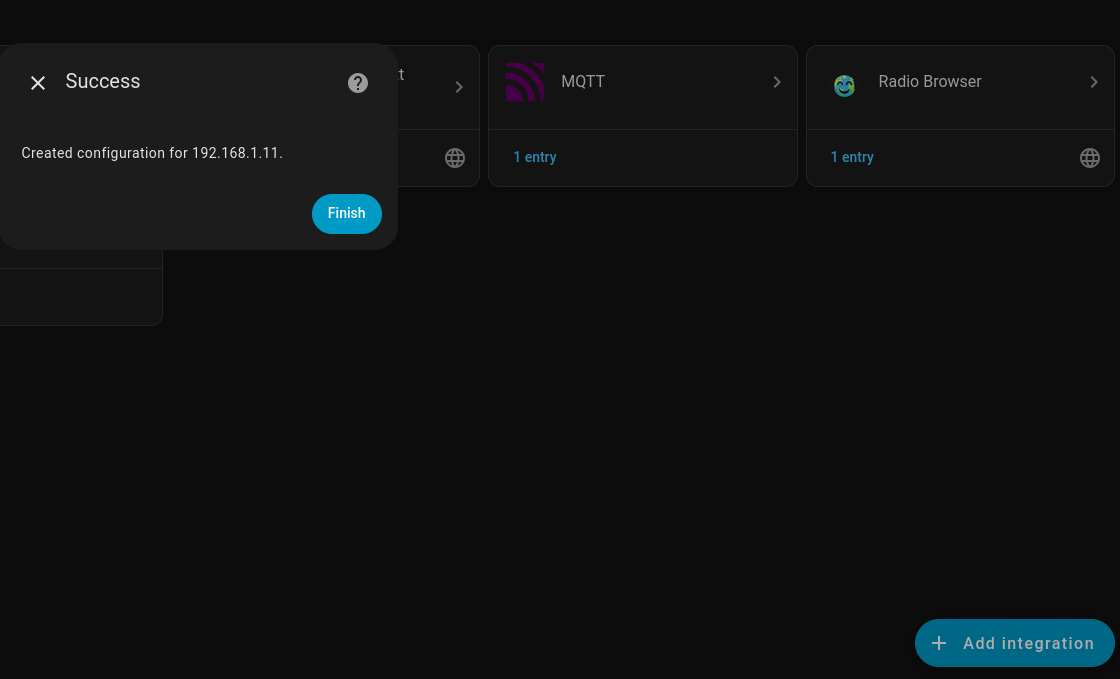
Setup the MQTT Integration and configure your dashboard
For recent Home Assistant versions, you configure the MQTT broker through the UI, not in the configuration.yaml file. The broker, port, username, and password options were deprecated for manual YAML configuration.
Here’s the correct two-step process to get everything running:
- Configure the MQTT Broker in the UI:
- Go to Settings > Devices & Services.
- Click the "+ Add Integration" button.
- Search for and select “MQTT”.
- A pop-up will guide you to enter the broker’s IP address (
192.168.1.11), port (1883), and any credentials you have set.
- Add the Sensor Configuration to YAML:
- After the broker is configured, you’ll add the sensor block to your
configuration.yamlfile. The part you provided is exactly what’s needed. - This tells Home Assistant to create a new entity (
sensor.pico_w_temperature) that will listen for incoming data from the broker on the specified topic.
- After the broker is configured, you’ll add the sensor block to your
After you’ve done both of these steps and restarted Home Assistant, it will automatically connect to your EMQX broker and start listening for the temperature data.
1. Configure the MQTT Broker in the UI
First, you connect Home Assistant to your EMQX broker. This is done entirely through the UI and you should never add the mqtt: broker: details to your YAML file.
2. Add the Sensor Configuration in YAML
This is where you define the entities that listen for data. The error message you received happens when you try to use the old YAML format for the sensor. The correct, modern method is to define the sensor directly under the mqtt: key, like so:
3. Restart Home Assistant
After you save the configuration.yaml file with the correct code, you must restart Home Assistant to apply the changes.
The history integration relies on the recorder integration to actually save the data.
To fix this, you should explicitly enable the recorder in your configuration.yaml file.
How It Works HA to add the MQTT historical temperatura data plot:
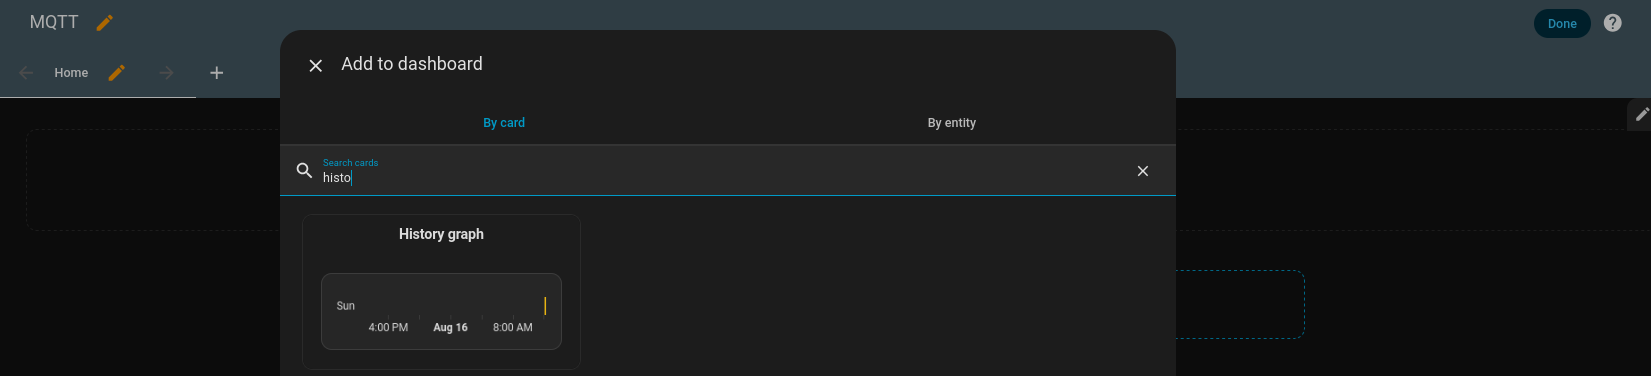
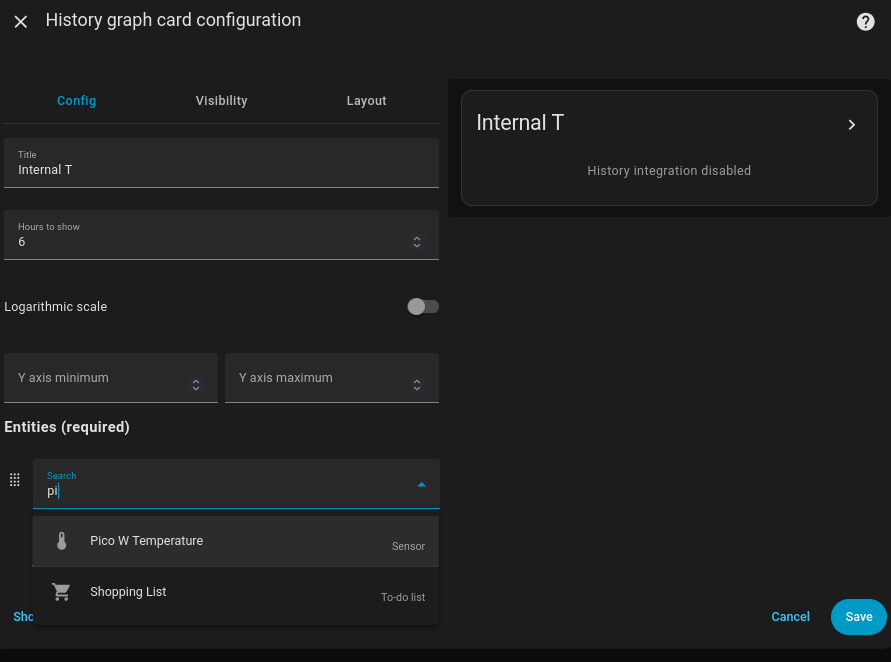
- Card Selection: You’ve correctly chosen the History Graph card. This card is perfect for visualizing time-series data like temperature readings.
- Configuration: The card’s configuration panel allows you to customize the graph.
- Title: You’ve given it a title, “Internal T,” which makes it easy to identify on your dashboard.
- Hours to show: You’ve set the time range to 6 hours, which is good for viewing recent data trends.
- Entities: This is the most crucial part. You’ve correctly selected
Pico W Temperaturefrom the list of available entities. This tells the card to get its data from the sensor you created using the MQTT integration.
Once you click Save, the card will be added to your dashboard and will start plotting the temperature data as it arrives from your Pico W. The “History integration disabled” message you see in the screenshot is a common temporary state; the graph will populate with data as soon as the integration begins collecting it.
Once ready, the data will start flowing:
HA has a buildint SQLite to store and plot MQTT Data!
cd ~/Docker/HomeAssistant
sqlite3 home-assistant_v2.db
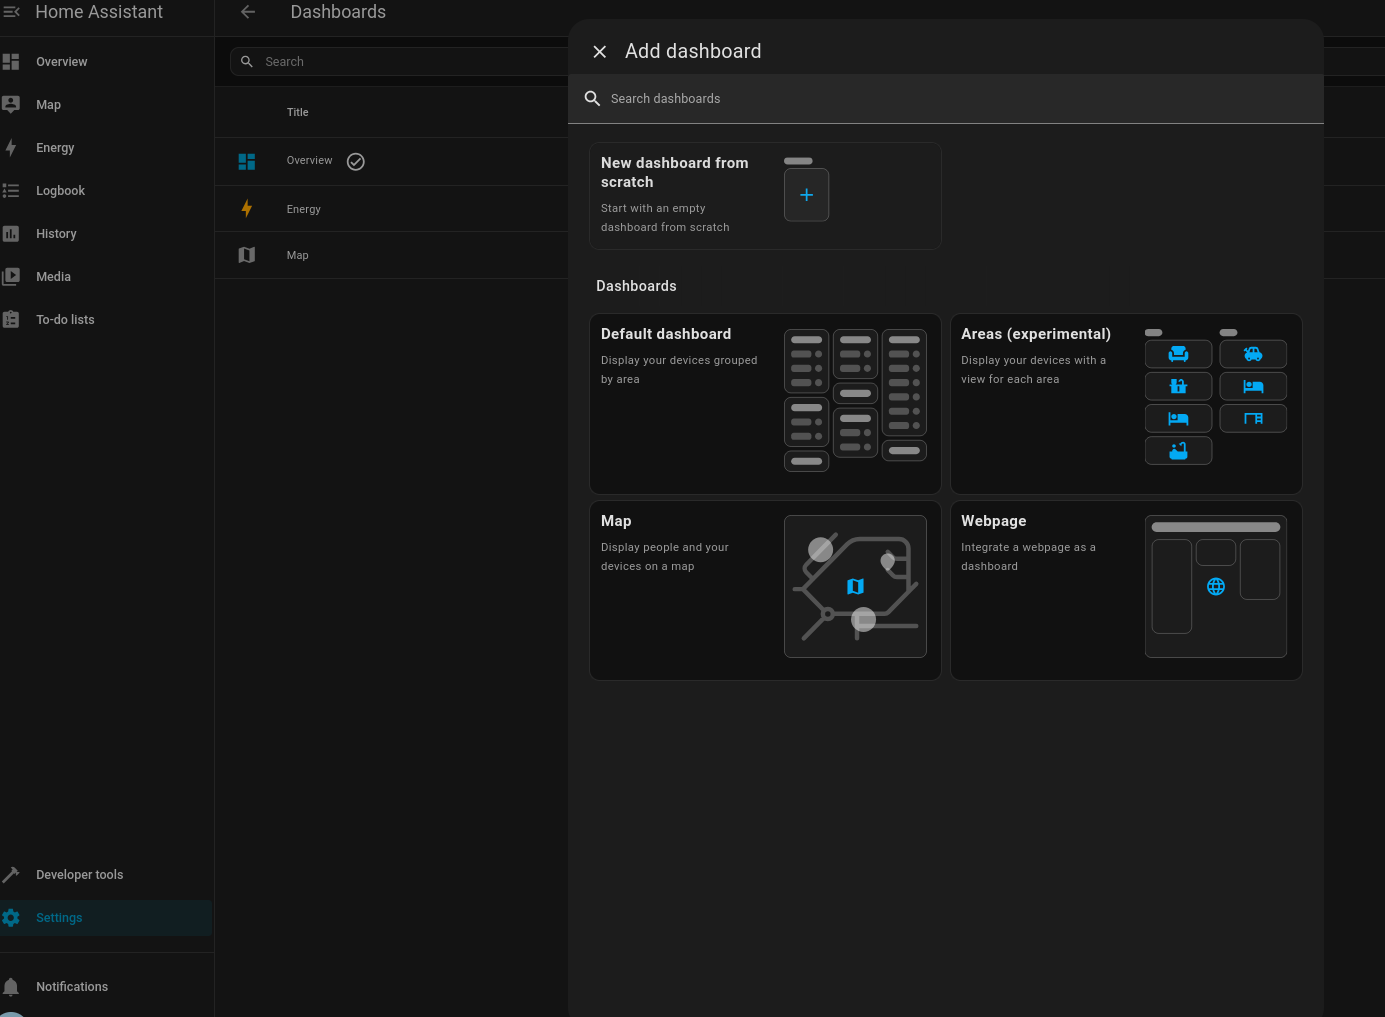
#.tablesCreate a new HA dashboard with the sensor info:
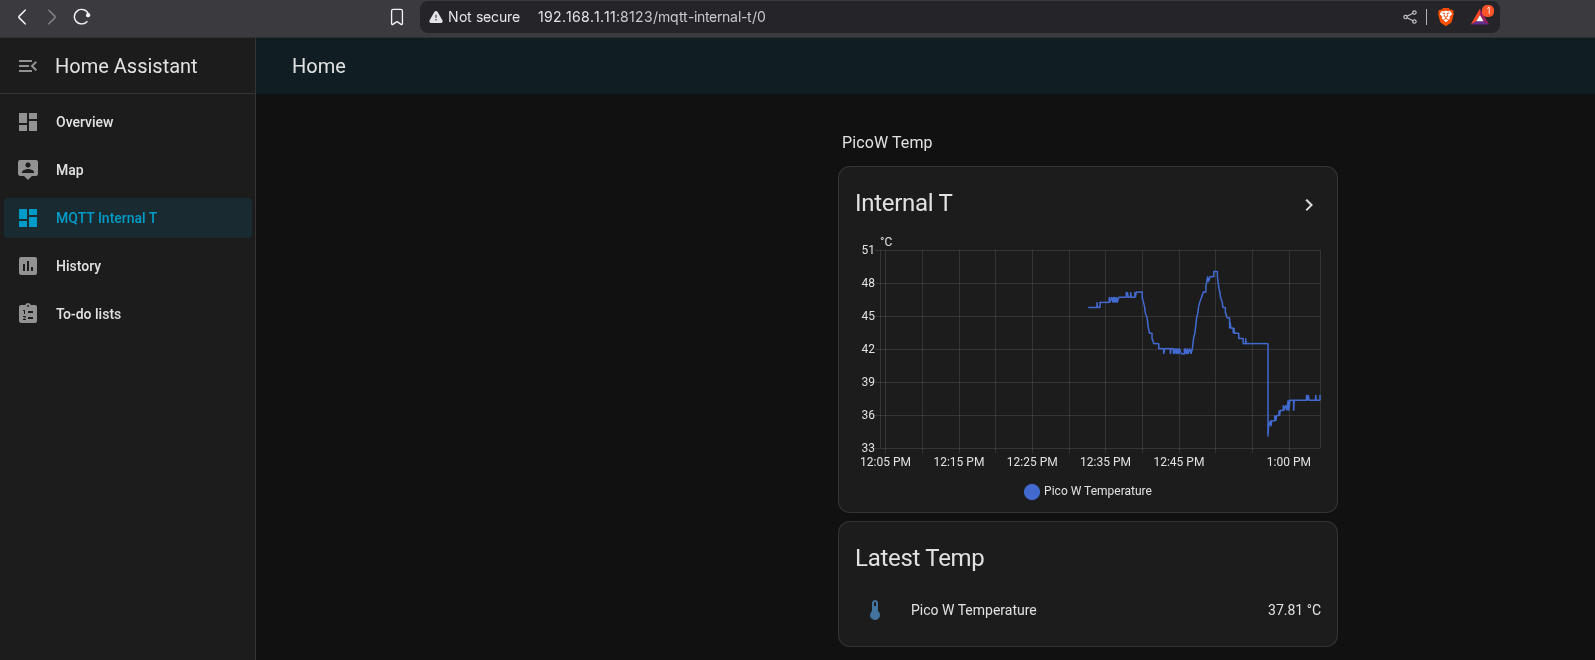
See how the PicoW sends its internal temperature to HomeAssistant looks like:
FAQ
Interesting Resources
- Pico to Pico Wifi communication
- Pico W web server:
See https://www.youtube.com/watch?v=ufK_knxWn08 and also https://www.youtube.com/watch?v=AK8UYh7pMGM
Pico w web server via C, instead of Micropython - https://www.youtube.com/watch?v=C_O0MXGBHsw
- MQTT to NodeRed: NodeRed will subscribe to the MQTT topic.
Supported Languages
C/C++: This is the primary language supported by the Raspberry Pi Pico, with an official SDK (Software Development Kit) provided by the Raspberry Pi Foundation. It offers the fastest performance and the most direct control over the hardware.
MicroPython: A lean and efficient implementation of the Python 3 programming language optimized for microcontrollers. It’s an excellent choice for beginners and for rapid prototyping because of its simpler syntax and a large number of available libraries.
TinyGo: This is an implementation of the Go programming language that is designed for microcontrollers. The Raspberry Pi Pico W is officially supported by the TinyGo project, making it a viable option for those who prefer the Go ecosystem.
CircuitPython: A fork of MicroPython created by Adafruit, it is also well-supported on the Raspberry Pi Pico W. It focuses on ease of use for beginners and has a large collection of hardware-specific libraries.
FreeRTOS: While not a full-fledged operating system in the traditional sense, FreeRTOS is a Real-Time Operating System (RTOS) kernel. It is supported on the Raspberry Pi Pico W, allowing you to run multiple tasks concurrently and manage resources in a time-sensitive manner, which is crucial for complex embedded applications.
Even with RUST?
- https://www.alexdwilson.dev/how-to-program-raspberry-pi-pico-with-rust
- https://www.youtube.com/watch?v=jZT8APrzvc4
If you liked the MQTT section, you could also play with HiveMQ
Checking micropython files inside PicoW via RShell
python3 -m pip install --user rshell
ls -l /dev/serial/by-id/
#fuser -v /dev/ttyACM0 || true
#kill 48470 || kill -9 48470
#fuser -v /dev/ttyACM0 || true
#rshell -p /dev/serial/by-id/usb-MicroPython_Board_in_FS_mode_e66141040370772c-if00 -b 115200
rshell -p /dev/serial/by-id/usb-MicroPython_Board_in_FS_mode_e66141040370772c-if00 --buffer-size 512 -b 115200
How can you see what code is currently inside the microcontroller (Pico W)?
If you used ArduinoIDE…
You cannot directly view or retrieve the code that’s already been uploaded to a microcontroller like the Pico W from the ArduIDE.
Once code is uploaded, it’s compiled into machine code and stored in flash memory — not easily readable or reversible.
Why?
When you upload a sketch to the Pico W through Arduino IDE:
- The human-readable code (
.ino) is compiled into a binary format (.uf2,.bin, or similar). - This binary is uploaded to the Pico W.
- The microcontroller runs that compiled code, but it does not retain the original
.inosketch or any comments.
So, unless you have the original source code saved locally, there’s no official or easy way to recover it from the Pico.
✅ If you just want to know whether there is a sketch on it:
You can check that the board is running something:
- Open the Serial Monitor in Arduino IDE (Ctrl+Shift+M or use the magnifying glass icon).
- Set the correct baud rate (commonly 9600 or 115200).
- Press the reset button on the Pico W and see if anything is printed.
This only helps if the uploaded sketch sends serial output (like using Serial.println()).
🔄 If you want to start fresh:
You can always re-upload your own code.
The old code will be overwritten.
Bonus: Using File System (for MicroPython users)
If you were using MicroPython instead of Arduino IDE, and your Pico W was running MicroPython firmware, you could:
- Access the file system using Thonny or rshell.
- Download the
main.pyor other files from the device.
But since you’re using Arduino IDE, that’s not applicable here.
In Summary:
| Goal | Can You Do It? |
|---|---|
| View the original Arduino sketch code inside Pico W | ❌ Not possible |
| Check if the Pico W is running code | ✅ Via Serial Monitor |
| Retrieve readable code | ❌ Unless you have the original |
| Overwrite with new code | ✅ Always possible |
If you used a MicroPython script, not Arduino….
What if the Pico W was running MicroPython
This boot.py script would have been uploaded to the internal file system of the board.
Let’s break this down and help you check whether this code is still there and how to retrieve or edit it.
✅ Step-by-Step: Check if Your Script is Still on the Pico W
- Install & Open Thonny
Thonny is the recommended editor for MicroPython on the Pico W.
Download: https://thonny.org/
Open Thonny and:
Go to Tools > Options > Interpreter
Select:
- MicroPython (Raspberry Pi Pico)
- The correct port (it often auto-detects)
⚠️ If Thonny says it can’t find the Pico, try holding the BOOTSEL button while plugging in the board, then reflash the MicroPython firmware.
💾 2. Browse the File System
Once connected:
On the left side of Thonny, you should see:
- Files on this computer
- Files on Raspberry Pi Pico
If your script (boot.py) is still there, you’ll see it listed.
Double-click to open and view it.
- What If You Flashed Arduino Code?
If you uploaded an Arduino sketch to the Pico W, the MicroPython firmware would have been overwritten. That means:
- The script is gone.
- The Pico no longer runs MicroPython, so Thonny won’t detect it as a MicroPython device.
To get back to MicroPython:
Re-flash the MicroPython firmware: This is MicroPython dragnDrop install!
- Unplug the Pico W.
- Hold the BOOTSEL button and plug it in.
- It appears as a USB drive.
- Download the
.uf2MicroPython firmware from here. - Drag and drop the
.uf2file onto the Pico’s USB drive. - It will reboot into MicroPython.
Now, you can reconnect using Thonny and upload scripts like boot.py again.
🔐 Bonus Tip: Hide Credentials in Production
Your current script hardcodes the Wi-Fi credentials — that’s fine for testing, but for more security:
- Store them in a separate
secrets.pyfile. - Or use environment variables if working with more complex setups.
For me, the easiest was with Thonny + Windows11.