Having a look to KeyStatic CMS. Markdown Powering Websites.
Tl;DR
Ive tried the theme https://github.com/Boston343/landingpad

To get keystatic working with github pages.
Intro
In this post, we will see:
- How to setup Keystatic CMS
- Explain markdown and share some tools
Thanks to Jankraus
Why bothering with all of this?
Because there are many reasons to love markdown.
And tools like:
- Dilinger
- StackEdit
- HackMD extension
- FrontMatter as seen here
Might not be for everyone
Se…we need a CMS!
KeyStatic
I got to know about Keystatic CMS thanks to:
Made by https://webreaper.dev/ | GPL3.0 | A free and open source template to host your links and socials. Built with Astro, Tailwind CSS, and Keystatic CMS by Cosmic Themes.
MIT | First class CMS experience, TypeScript API, Markdown & YAML/JSON based, no DB
Keystatic is capable to store your data in multiple formats: YAML, JSON, Markdoc and MDX.
By default, entries will be stored in a YAML file.
I love such kind of theme, to get a one pager of all our important links/ linkinbios.
git clone https://github.com/Boston343/landingpad
#rm -rf .git

npm install
npm run dev
And thats it! We can see localhost:4321 and keystatic applied to the theme at localhost:4321/admin.

Local vs Github Mode
https://keystatic.com/docs/github-mode
One of the important files is keystatic.config.tsx:
For local mode, we just used:
import { config } from "@keystatic/core";
import { collection, fields, singleton } from "@keystatic/core";

export default config({
	// works in local mode in dev, then cloud mode in prod
	storage: import.meta.env.DEV === true ? { kind: "local" } : { kind: "cloud" },
	// cloud deployment is free to sign up (up to 3 users per team)
	// docs: https://keystatic.com/docs/cloud
	// create a Keystatic Cloud account here: https://keystatic.cloud/
	cloud: { project: "cosmic-themes/landingpad" },
	ui: {
		brand: { name: "Cosmic Themes" },
	},
But for Github mode: http://127.0.0.1:4321/keystatic/setup
import { config } from "@keystatic/core";
import { collection, fields, singleton } from "@keystatic/core";

export default config({
	// works in local mode in dev, then cloud mode in prod

	//storage: import.meta.env.DEV === true ? { kind: "local" } : { kind: "cloud" },

	storage: {
				kind: "github",
				pathPrefix: "prod",
				repo: {
					owner: "JAlcocerT",
					name: "landingpad"
				}
	},
I followed the steps of the video and got this:
It looks like you just tried to create a GitHub App for Keystatic but there is already a GitHub App configured for Keystatic.
You may be here because you started creating a GitHub App but then started the process again elsewhere and completed it there. You should likely go back to Keystatic and sign in with GitHub to continue.
Then, I went back to localhost:4321/admin and could see
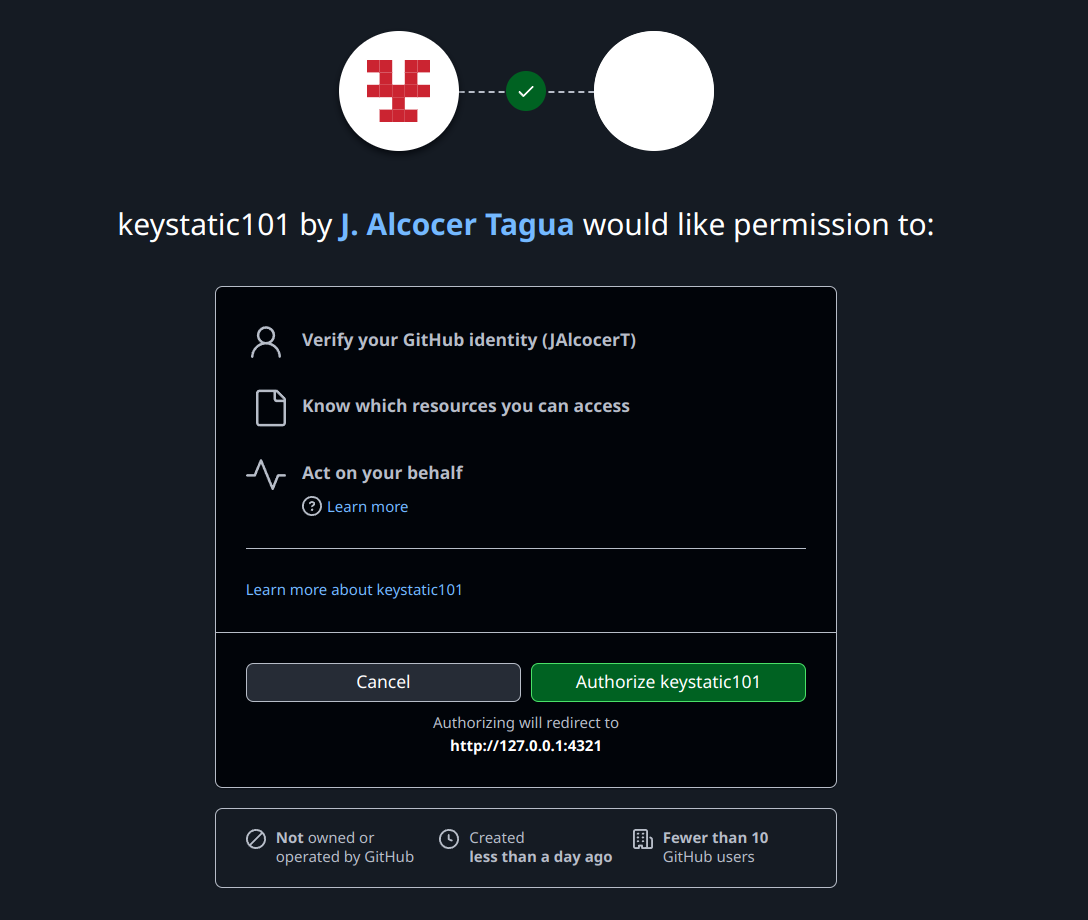
keystatic101 was the name i gave to the app
Then I went to github general settings, developer settings:
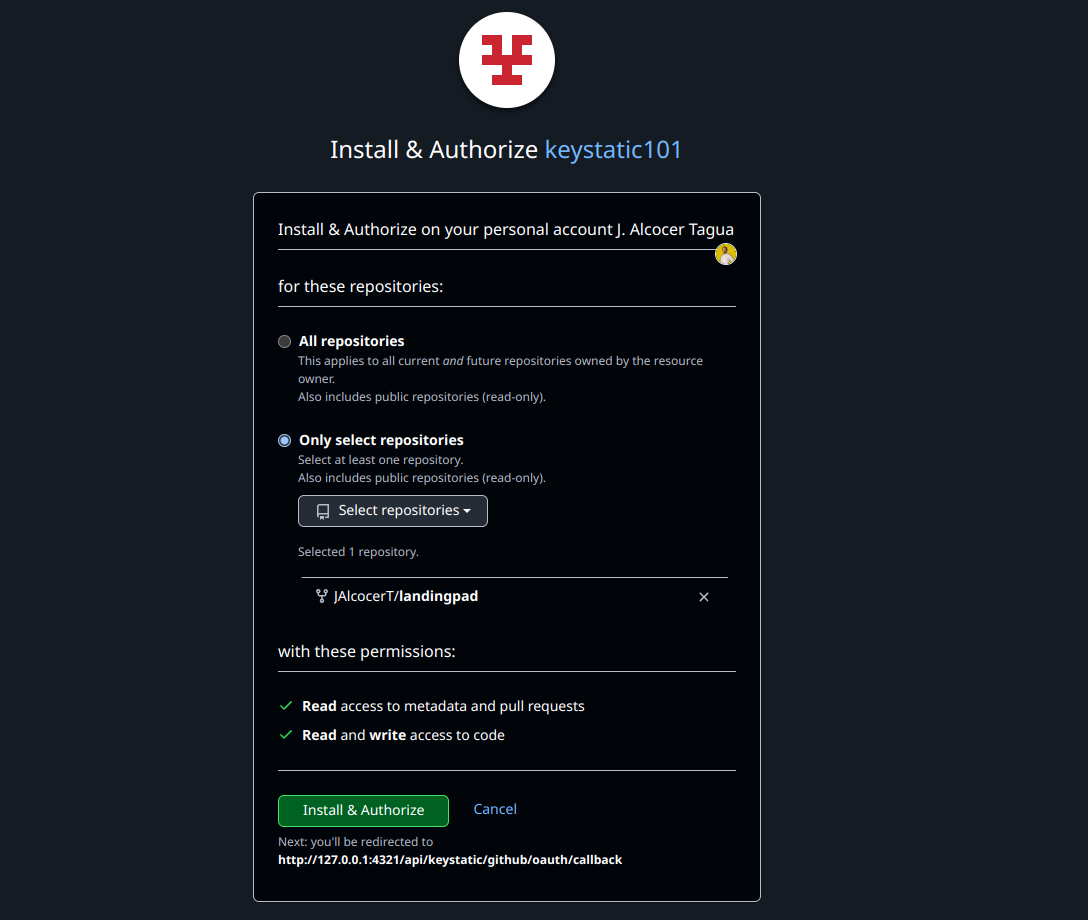
Now, you wont see any error like:
It looks like you just tried to create a GitHub App for Keystatic but there is already a GitHub App configured for Keystatic.You may be here because you started creating a GitHub App but then started the process again elsewhere and completed it there. You should likely go back to Keystatic and sign in with GitHub to continue.
And whatever you edit with the theme via localhost:4321/admin will be automatically pushed to the main branch of you repository.
git pull to bring themGithub Mode with Github Pages
Im a big fan of github pages.
And this was resonating so much with this setup.
I had to sync locally the changes done previously:
#git config pull.rebase true
git pull
Then, you just have to add the well known /.github/workflows/pages.yml
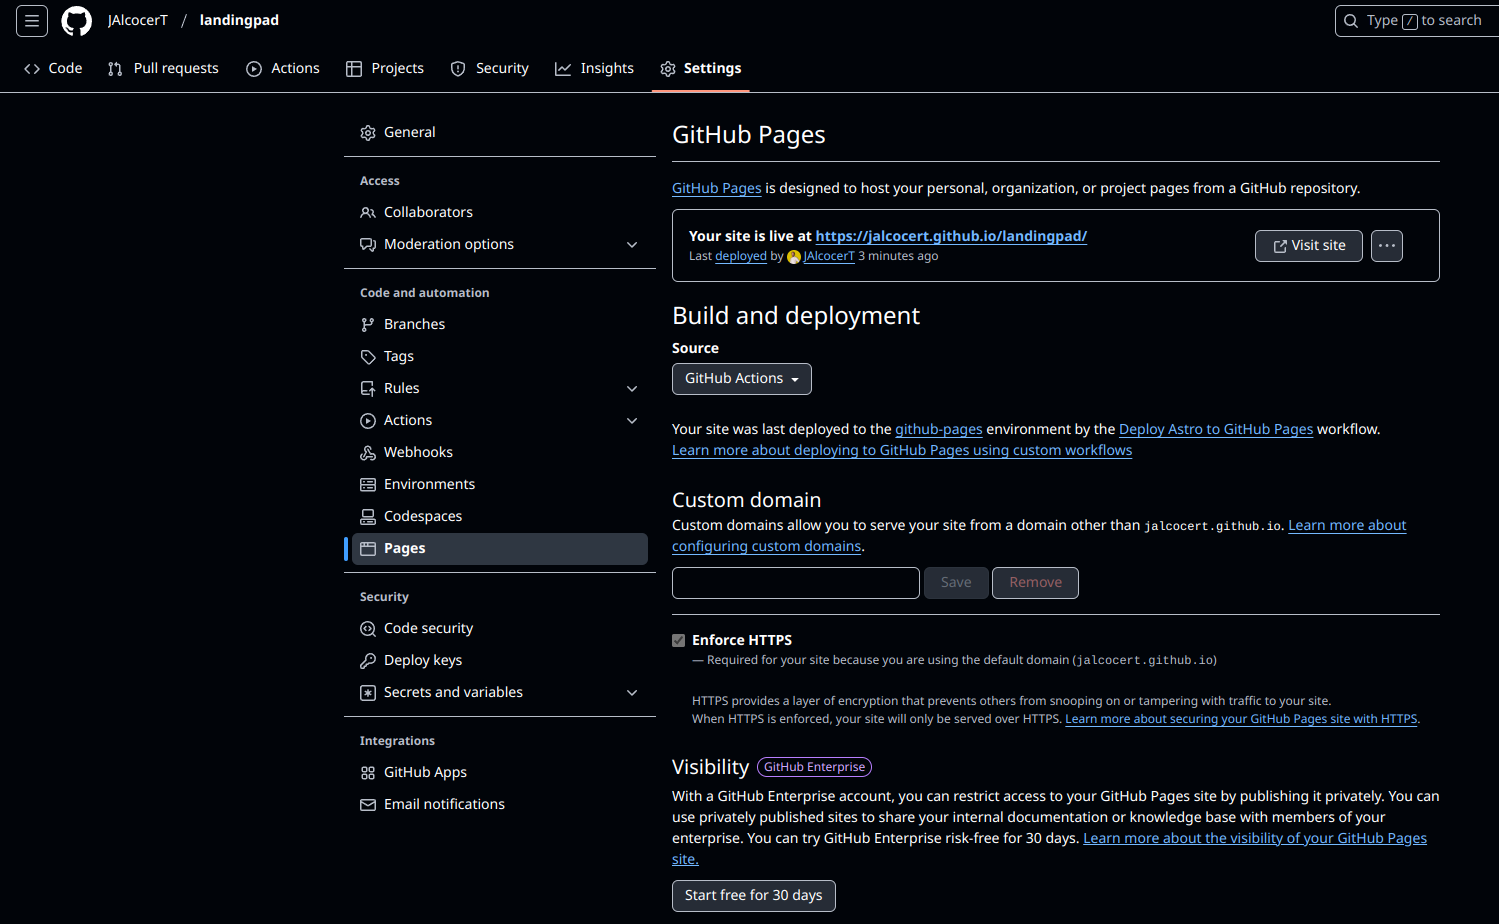
And dont forget to activate GH Pages within the github project UI
You will notice, that when you use npm run dev and what it gets generated to GH Pages is the original theme content, instead of whats being edited.
Whats the trick?
That we are editing the content of ./prod/src/... with Keystatic.
So lets adjust keystatic.config.tsx and content.config/ts:
	singletons: {
		/**
		 * * Bio and Config singleton
		 * This gets used by Astro Content Collections, so if you update this, you'll need to update the Astro Content Collections schema
		 */
		config: singleton({
			label: "Bio and Config",
			//path: `src/data/bio/`,
			path: `prod/src/data/bio/`,
and also the astro content collection file accordingly:
const bioCollection = defineCollection({
	//loader: glob({ pattern: "**/[^_]*{md,mdx}", base: "./src/data/bio" }),
	loader: glob({ pattern: "**/[^_]*{md,mdx}", base: "./prod/src/data/bio" }),
	schema: ({ image }) =>
		z.object({
			name: z.string(),
			theme: z.enum(["dark", "light"]),
			blur: z.enum(["no blur", "blur"]),
			avatar: image(),
			background: image(),
		}),
});
Dont forget to add proper astro.config.mjs
// https://astro.build/config
export default defineConfig({
	site: "https://jalcocert.github.io/landingpad/",
	adapter: netlify({
		imageCDN: false,
	}),
And make sure to change the static path to use the base url, as we are deploying to github pages we need that /landingpad/ everywhere.
KeyStatic Concepts
- Singleton: “About Page”, “Contact Info”, “Global Settings”
- Multi-entry: “Blog Posts”, “Projects”, “Team Members”
Adding KeyStatic to Astro Themes
The text you’ve quoted indicates that the guide for adding Keystatic to an Astro project assumes you’re using Server-Side Rendering (SSR) mode, specifically with the output: 'hybrid' or output: 'server' configuration options in your Astro project.
This implies that the guide doesn’t directly address how to use Keystatic with Static Site Generation (SSG) mode.
SSR vs SSG? 📌
- SSR (Server-Side Rendering): In SSR, your Astro components are rendered on the server when a user requests a page. This means the server generates the HTML and sends it to the client (the user’s browser).
Keystatic, as a content management system (CMS), likely needs a server-side component to interact with its data and serve it to your Astro components.
The server can dynamically fetch content from Keystatic and incorporate it into the page before sending it to the user.
- SSG (Static Site Generation): In SSG, your Astro project is built into a set of static HTML files at build time. This means there’s no server involved when a user visits your site; the pre-generated HTML is simply served.
This presents a challenge for Keystatic because it typically requires a server to function.
If you’re generating static pages, there’s no server to dynamically fetch content from Keystatic during runtime.
Why the guide likely focuses on SSR:
The guide probably focuses on SSR because it’s the more straightforward approach for integrating a CMS like Keystatic.
With SSR, you have a server that can:
- Connect to Keystatic: The server can make requests to Keystatic’s API to retrieve content.
- Dynamically generate pages: Based on the content from Keystatic, the server can render the appropriate Astro components and generate the HTML.
- Serve the HTML: The server sends the generated HTML to the user’s browser.
Can you use Keystatic with SSG?
It’s possible to use Keystatic with SSG, but it usually requires a different approach.
Here are some potential strategies:
Build-time fetching: You could fetch the content from Keystatic during the build process. This would involve using a build script or plugin that connects to Keystatic, retrieves the necessary data, and then uses that data to generate the static HTML files. This means your content would be “baked into” the static site. Any changes in Keystatic would require a rebuild of your site.
Client-side fetching (with limitations): You might be able to use Keystatic’s API directly in your Astro components on the client-side. However, this approach often has limitations, especially if Keystatic requires any server-side logic or authentication. It also might not be ideal for SEO, as the content would be loaded after the initial HTML is rendered.
Hybrid approach: You could potentially use a hybrid approach where some parts of your site are statically generated, and other parts (like a blog or news section) are rendered using SSR. This would allow you to use Keystatic for the dynamic parts of your site.
In summary: The guide you quoted likely focuses on SSR because it’s the most common and easiest way to integrate Keystatic with Astro. Using Keystatic with SSG is possible but generally requires more advanced techniques like build-time fetching or a hybrid approach. You’ll need to consult Keystatic’s documentation or community forums for specific instructions on how to use it with SSG.
Conclusion
This is how the LandingPag Theme looks, hosted statically on github pages: https://jalcocert.github.io/landingpad/
KeyStatic + GH Pages + a Server
Clone the repository to your VPS:
git clone https://github.com/JAlcocerT/landingpad
cd landingpad
Get the server ready for astro:
# Verify installation
node -v   # Should show Node.js version - 20.18.1
npm -v    # Should show npm version - 10.8.2

npm install #dependencies
npm run devYou will need to add to astro.config.mjs the following so that you can see the dev version
server: {
host: '0.0.0.0', // Listen on all network interfaces (for local network access)
// OR
// host: true, // Listen on all network interfaces (simpler alternative)
// OR
// host: 'your_server_ip_address', // Replace with your server's actual IP (less common)
port: 4321, // Optional: Specify the port (if you want something other than the default 4321)
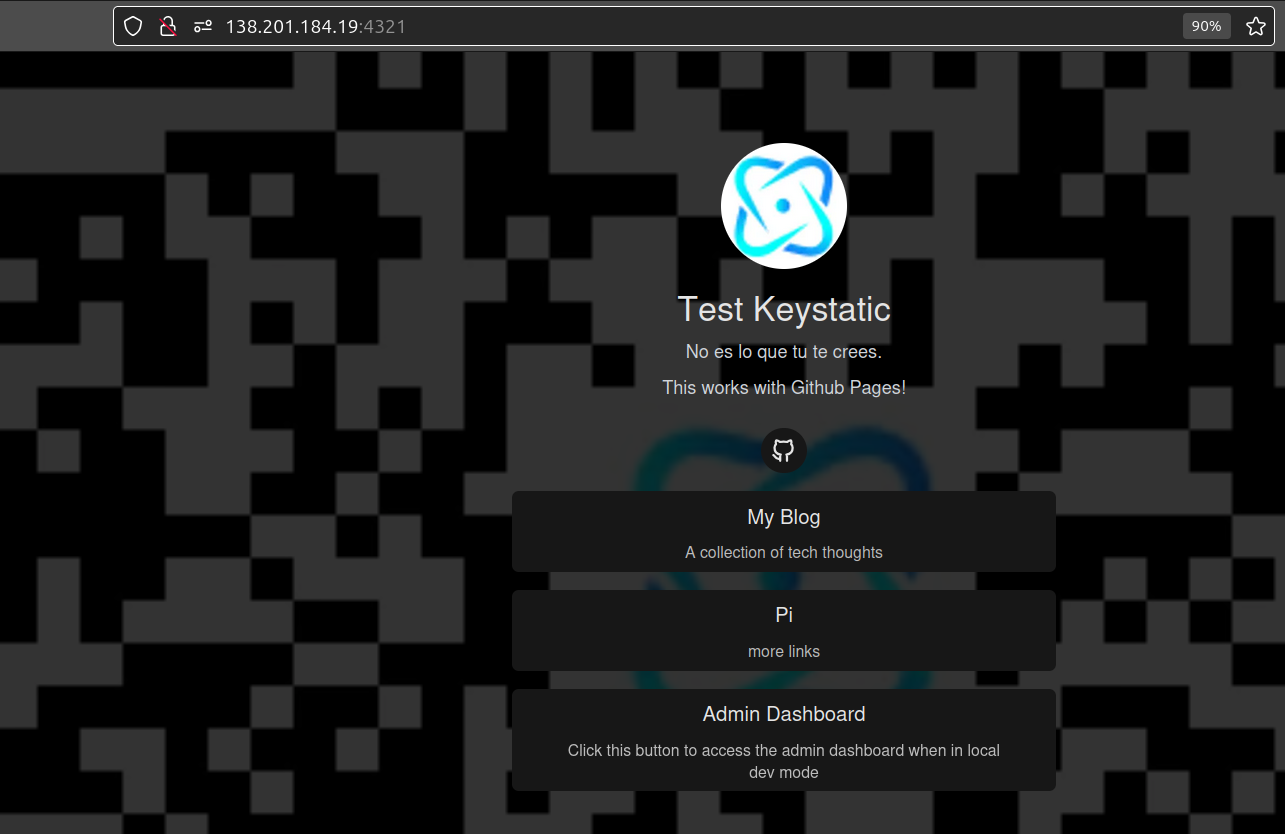
},And now you will be able to access it via the server IP:
Container for Astro
But server ip and http…
lets make it better: with a container for astro and NGINX for https
- Container for Astro (Node) - https://jalcocert.github.io/JAlcocerT/blog/dev-in-docker/#node
- NGINX Setup Guide
Node Docker Files 📌
sudo docker pull node:20.12.2
#docker build -t mynode_webapp:cyclingthere .
docker build -t astrokeystatic:landingpad .
The built took ~2min 25s on a CX22 Hetzner VPS
Now, you just have to get inside the container and run it:
sudo docker run -d -p 4321:4321 --name astrokeystaticvps astrokeystatic:landingpad tail -f /dev/null

docker exec -it astrokeystaticvps /bin/bash
#git --version
#npm -v
#node -v #you will see the specified version in the image

npm run dev
And it is available at serverip:4321, as the container has the same port mapped on the VPS host!
# Use the official Node.js image.
# https://hub.docker.com/_/node
FROM node:20.12.2
#https://hub.docker.com/layers/library/node/20.12.2/images/sha256-740804d1d9a2a05282a7a359446398ec5f233eea431824dd42f7ba452fa5ab98?context=explore

# Create and change to the app directory.
WORKDIR /usr/src/app

# Install Astro globally
#RUN npm install -g astro

# Copy application dependency manifests to the container image.
# A wildcard is used to ensure both package.json AND package-lock.json are copied.
# Copying this separately prevents re-running npm install on every code change.
COPY package*.json ./

# Install production dependencies.
RUN npm install

# Copy local code to the container image.
COPY . .

#If you'd like to set npm run dev as the default command for the container
# Add this line at the end of your Dockerfile
#CMD ["npm", "run", "dev"]
#version: '3'
services:
app:
image: mynode_webapp:cyclingthere #node:20.12.2
container_name: webcyclingthere
volumes:
- /home/reisipi/dirty_repositories/cyclingthere:/app
- .:/app
working_dir: /app
command: tail -f /dev/null
#command: bash -c "npm install && npm run dev"
ports:
- 4321:4321
- 3000:3000#version: '3.8'
services:
gatsby-dev:
image: gatsby-dev:latest
ports:
- "8001:8000"
volumes:
- app_data:/usr/src/app
- node_modules:/usr/src/app/node_modules
# environment:
# - NODE_ENV=development
command: tail -f /dev/null #keep it running
volumes:
node_modules:
app_data:Node Dockerfile for Astro Cntainer 📌
sudo docker pull node:20.12.2
#docker build -t mynode_webapp:cyclingthere .
docker build -t mynode_web:web3 .
Depending where you run this, it will take more or less time.
- With a Opi5 I had ~2min33s
- With a Pi4 4GB ~2min18s
sudo docker run -d -p 4321:4321 --name astro-web3 mynode_web:web3 tail -f /dev/null
#docker run -d -p 3000:3000 --name astro-web3 mynode_web:web3
docker exec -it astro-web3 bash
npm run dev --host

#docker run -d -p 3001:3000 --name astro-web33 mynode_web:web3 npm run dev
The dockerfile would look:
# Use the official Node.js image.
# https://hub.docker.com/_/node
FROM node:20.12.2
#https://hub.docker.com/layers/library/node/20.12.2/images/sha256-740804d1d9a2a05282a7a359446398ec5f233eea431824dd42f7ba452fa5ab98?context=explore

# Create and change to the app directory.
WORKDIR /usr/src/app

# Install Astro globally
#RUN npm install -g astro

# Copy application dependency manifests to the container image.
# A wildcard is used to ensure both package.json AND package-lock.json are copied.
# Copying this separately prevents re-running npm install on every code change.
COPY package*.json ./

# Install production dependencies.
RUN npm install

# Copy local code to the container image.
COPY . .

#If you'd like to set npm run dev as the default command for the container
# Add this line at the end of your Dockerfile
#CMD ["npm", "run", "dev"]Now, what about https?
Recently, I made a post on how to setup NGINX on a VPS.
If you are done with it, you will have:
sudo docker network lsA NGINX docker network available, like nginx_nginx_default in my case.
We will apply it, to the running container with the astro (landingpad) + KeystaticCMS:
docker ps --filter "status=running"For me, that will be astrokeystaticvps, as I defined it with:
#sudo docker run -d -p 4321:4321 --name astrokeystaticvps astrokeystatic:landingpad tail -f /dev/null

#now, we will use the nginx network and make it npm run dev directly
sudo docker run -d \
  --network nginx_nginx_default \
  -p 4321:4321 \
  --name astrokeystaticvps \
  astrokeystatic:landingpad \
  npm run dev
Now, just get the key for the DNS challenge, and go to NGINX UI:

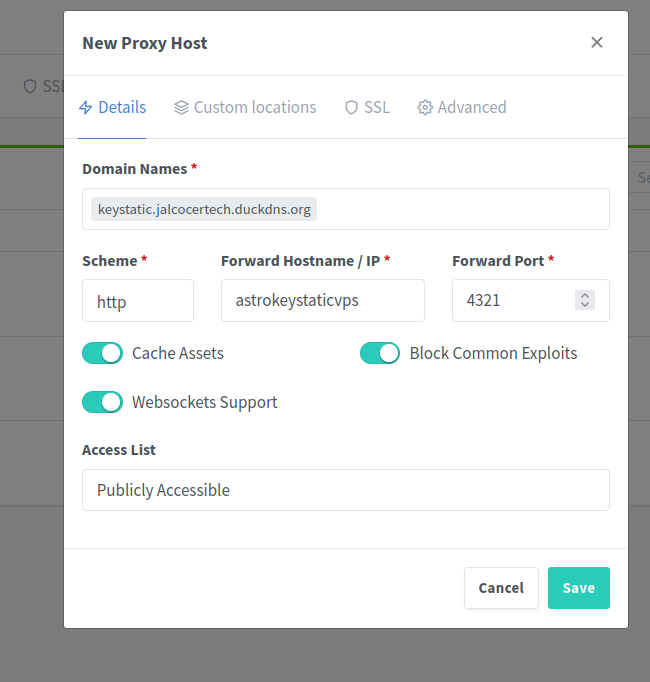
More KeyStatic
But, if you go to keystatic path…you need to authenticate?
Not really, just copy the .env that you have locally and that it has not been synced to github for security reasons.
What about Adding Auth?
So now, anyone can just go and edit the website?
Recently I got to know about TinyAuth… so you could place that in front of /admin
KeyStatic from Scratch
As per https://keystatic.com/docs/quick-start
npm create @keystatic@latest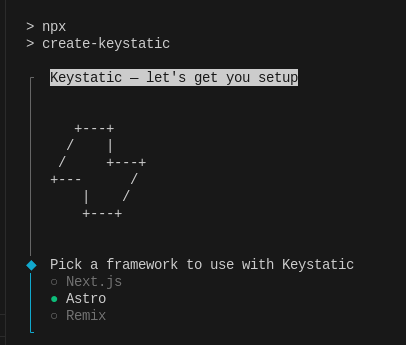
FAQ
Markdown vs MDX vs Markdoc
Some markdown tools, to make cooler websites
Recently I read this xda post on why markdown to power up your notes.
Markdown
Imagine you want to write text that looks good on the web, with headings, lists, bold text, etc., but you only want to use a simple text editor.
That’s where Markdown comes in.
And Im sure you care about it, as for sure you have been trolled and not just once with Word formatting
- Lightweight Markup Language: Markdown is a simple way to format text using plain text syntax. Think of it as adding special characters to your regular text to tell a program how to display it.
- Easy to Read and Write: One of its main goals is to be readable even in its raw, unformatted state. The syntax is intuitive and doesn’t get in the way of the content.
- Basic Formatting: It allows you to do common things like:
- Create bold and italic text.
- Make headings (like
# My Main Headingor## Subheading). - Create lists (
* Item 1,1. Item A). - Add links (
[Link Text](https://example.com)). - Display code (
```javascript ... ```). - Insert images (
).
- Widely Used: You’ll find Markdown used everywhere from writing README files for software projects to formatting comments on platforms like Reddit and GitHub, and for creating blog posts and documentation.
- Conversion to HTML: A Markdown processor takes your
.mdfile and converts it into standard HTML (the language of web pages), which web browsers can then display beautifully.
In essence, Markdown is a simple and efficient way to write formatted content for the web using a plain text editor.
MDX
MDX takes Markdown a step further by allowing you to embed JSX (JavaScript XML) directly within your Markdown content.
- Markdown + JSX: Think of it as supercharged Markdown. You get all the simplicity of Markdown with the power and flexibility of React (a popular JavaScript library for building user interfaces) components.
- Component Integration: This means you can import and use interactive components, like charts, buttons, alerts, or any custom React component you create, right inside your
.mdxfiles. - Dynamic Content: This opens up possibilities for creating more dynamic and interactive documentation, blog posts, or websites. Imagine embedding a live graph or a small interactive quiz directly within your text.
- Use Cases: MDX is popular in modern web development frameworks like Next.js and Gatsby for building content-rich websites and documentation sites that need interactive elements.
In short, MDX lets you write Markdown with the ability to seamlessly integrate and render interactive React components within your content.
Markdoc
Markdoc is a powerful Markdown-based authoring framework created by Stripe.
It’s designed for building custom documentation sites and content experiences with a focus on flexibility and extensibility.
- Markdown Extension: Markdoc builds upon the familiar Markdown syntax but adds a system for defining custom tags and nodes. This allows developers to create their own specialized syntax for authors to use.
- Declarative Approach: Unlike MDX where you embed JSX directly, Markdoc uses a more declarative approach. Developers define custom tags (which are backed by React components or other rendering logic), and authors use these tags in their Markdown without needing to know the underlying implementation.
- Configuration and Validation: Markdoc emphasizes configuration and validation. You can define schemas for your custom tags and content structures, ensuring consistency and preventing errors.
- Developer and Writer Friendly: It aims to provide a good experience for both developers (who can extend the system) and writers (who can use a familiar Markdown-based syntax with powerful custom elements).
- Use Cases: Markdoc is well-suited for large, complex documentation sites where consistency, reusability, and custom interactive elements are important.
To summarize, Markdoc is a comprehensive framework built on Markdown that allows for highly customizable and structured content creation through the definition of custom tags and a focus on configuration and validation.
| Feature | Markdown | MDX | Markdoc |
|---|---|---|---|
| Core Concept | Simple text-to-HTML formatting | Markdown + JSX embedding | Extensible Markdown framework with custom tags |
| Interactivity | Limited to HTML elements | Full power of React components | Achieved through pre-defined custom tags |
| Extensibility | Primarily through HTML passthrough | Direct use of JavaScript and React | Through defining custom tags and renderers |
| Complexity | Simple | Moderate (requires understanding of JSX) | More complex setup for developers, simpler for authors using defined tags |
| Use Cases | Basic web content, READMEs, simple docs | Dynamic blogs, interactive documentation | Large, structured, custom documentation sites |
| Creator/Origin | John Gruber | Open source community | Stripe |
| File Extension | .md | .mdx | .md, potentially with custom tag syntax |
What are markdown directives
I got to know these thanks to fuwari theme and its about section.
A Markdown directive is a custom extension to the standard Markdown syntax that allows you to embed dynamic or interactive components directly within your Markdown content.
Here’s a breakdown of its characteristics and how it’s used in your project:
Not Standard Markdown: The text explicitly states, “This is not a standard Markdown feature but an extension.” Standard Markdown is primarily for static text formatting (headings, lists, bold, italics, links, etc.). Directives go beyond this to introduce more complex, structured content.
Custom Syntax: In your case, the custom syntax is
::github{repo="sooperset/mcp-atlassian"}.- The
::prefix indicates a directive. githubis the name of the directive, which your system maps to a specific component.{repo="sooperset/mcp-atlassian"}are “attributes” or “arguments” passed to the directive, providing data or configuration for the component it represents. Here, it specifies which GitHub repository to display.
- The
Purpose: Embedding Components/Dynamic Content: The primary purpose of a Markdown directive is to serve as a placeholder or instruction to render a specific component or generate dynamic content within your static Markdown file. Instead of writing complex HTML or JavaScript directly in your Markdown (which can be messy and hard to maintain), you use a clean, concise directive.
Processing Pipeline Integration: Markdown directives require a sophisticated processing pipeline to work. In your Astro setup, this involves:
remarkDirective: This is aremarkplugin that specifically understands and parses the::directive{...}syntax, converting it into a structured node in the Markdown Abstract Syntax Tree (AST).parseDirectiveNode: This appears to be a custom parser that further processes the directive node, likely transforming it into a format thatrehype(which handles HTML) can understand and map to components.rehypeComponents: Thisrehypeplugin is the crucial link. It takes the processed directive nodes and maps them to actual JavaScript/Astro components. In your example, it maps the “github” directive to theGithubCardComponent.
Component Rendering: Once mapped, the associated component (
GithubCardComponentin your case) is responsible for generating the actual HTML, CSS, and JavaScript needed to display the desired content (the GitHub repository card).
This allows for complex functionality (like fetching data from an API) to be encapsulated within a component rather than being directly within the Markdown.
In simpler terms:
Imagine you’re writing a document in Markdown, and you want to include a special interactive element, like a real-time weather widget or, as in your example, a dynamic GitHub repository card. Standard Markdown doesn’t have a way to do this.
A Markdown directive acts like a special tag or instruction that tells your build system: “Hey, at this point in the document, I want you to insert a ‘github card’ and here’s the repository I want it to display.”
Your build system then processes this instruction, finds the corresponding component, and injects the necessary HTML, CSS, and JavaScript to render that interactive card when the page loads.
This approach keeps your Markdown clean and focused on content, while offloading the complexity of rendering dynamic elements to dedicated components and a robust build pipeline.