Web Apps with Flask and cool ChartJS
Tl;DR
For quite some time I wanted to give it a try to Flask (as an alternative to Streamlit) and Websockets.
Intro
What it is Flask for?
Its a Python framework to build Web Apps (and pretty fast!).
The Python micro framework for building web applications.
 Flask Intro Post
 Flask Sensor Display
These are the main files and structure of a Python Flask Project:
- app.py
- index.html
python3 app.pyAs you can see, with Flask we need to be creative with html.
Within the html, the content of the variables processed via python are represented.
Be aware about the routes! 📌
Imagine your web application as a house with different rooms, and each room serves a specific purpose. When someone (a user’s web browser) comes to your house (your web application), they need a way to get to the room they want.
A Flask route is essentially a specific URL (a web address) that, when accessed, tells your Flask application which “room” (which piece of code or function) should handle the request and what to show to the user.
Here’s a breakdown of the key concepts:
URL (Uniform Resource Locator): This is the web address you type into your browser (e.g.,
http://yourwebsite.com/about,http://yourwebsite.com/products/123).Endpoint: In Flask terminology, a route is associated with a specific endpoint, which is the name of the Python function that will be executed when that URL is accessed.
Mapping: Flask uses a mechanism to map specific URLs to these endpoint functions. This mapping is what we call a route.
HTTP Methods: When you access a URL, your browser sends an HTTP request. Common HTTP methods include:
- GET: Used to retrieve data from the server (e.g., viewing a webpage).
- POST: Used to send data to the server (e.g., submitting a form).
- PUT: Used to update existing data on the server.
- DELETE: Used to remove data from the server.
Flask routes can be defined to handle specific HTTP methods for a given URL.
How Routes are Defined in Flask:
You typically define routes in your Flask application using the @app.route() decorator above a Python function.
from flask import Flask, render_template

app = Flask(__name__)

@app.route('/')
def home():
    return render_template('index.html')

@app.route('/about')
def about():
    return "This is the about page."

@app.route('/products/<int:product_id>')
def product_detail(product_id):
    return f"Details for product with ID: {product_id}"
Explanation of the Examples:
@app.route('/'): This creates a route for the root URL of your application (e.g.,http://yourwebsite.com/). When a user accesses this URL using a GET request (which is the default), thehome()function will be executed. Thehome()function then renders theindex.htmltemplate.@app.route('/about'): This creates a route for the/aboutURL (e.g.,http://yourwebsite.com/about). When accessed with a GET request, theabout()function will be executed, and it returns a simple string.@app.route('/products/<int:product_id>'): This creates a route for URLs that start with/products/followed by an integer.<int:product_id>is a dynamic route parameter. Flask will capture the integer part of the URL and pass it as an argument to theproduct_detail()function.- For example, if a user accesses
http://yourwebsite.com/products/123, theproduct_detail()function will be called withproduct_idset to123.
For every route, i should be pointing to a certain index.html?
No, not necessarily. While the root route (/) often points to your main index.html (or a similar homepage), different routes in your Flask application can (and often do) point to different HTML templates, generate dynamic HTML directly, or even return other types of data like JSON.
Think back to the “house with rooms” analogy:
/(the homepage) might lead to your main living room, which is represented byindex.html./aboutmight lead to a different room, perhaps represented by anabout.htmltemplate./products/123might dynamically generate information about a specific product and could use aproduct_detail.htmltemplate to display that information, but the content within that template would change based on theproduct_idin the URL./api/datamight be a route that doesn’t return any HTML at all. Instead, it might return data in JSON format, which could be used by JavaScript on your frontend or by other applications.
Here’s a more detailed breakdown:
- Serving Static HTML: You can definitely have routes that directly render specific HTML files. This is common for static pages like “About Us,” “Contact,” or specific sections of your site.
@app.route('/about')
def about_page():
    return render_template('about.html')

@app.route('/contact')
def contact_page():
return render_template('contact.html')- Generating Dynamic HTML: Many routes will involve generating HTML dynamically based on data. This is where you use template engines like Jinja2 (which comes with Flask). The route function fetches data and passes it to a template, which then renders the final HTML. Different routes will likely fetch different data and might use different templates to display that data.
@app.route('/users/<username>')
def user_profile(username):
    user = get_user_data(username)  # Fetch user data
return render_template('profile.html', user=user)- Returning Other Data Formats: Flask routes aren’t limited to returning HTML. They can return other data formats, which is common for building APIs (Application Programming Interfaces):
from flask import jsonify

@app.route('/api/users')
def get_all_users():
    users = fetch_all_users()
    return jsonify(users)  # Returns data as JSON
A Flask route acts as a traffic controller for your web application.
It listens for specific URLs and, based on the URL and the HTTP method used, directs the request to the appropriate Python function to generate a response for the user’s browser.
It’s the fundamental way you define the different “pages” and functionalities of your web application and how users can interact with them.
Use routes to structure your web application and define how different URLs are handled.
See how ChartJS renders here within the HUGO post thanks to this shortcode:
Flask will work for you even better if you use uv as package manager
uv init
uv add flask
uv sync
Sensors Data
How about using some sensor data to be displayed into a Flask Web app?
We can use the data from IoT Sensors, or directly data from our own devices: laptops, server, sbc…


Ready with Python?
sudo apt update
sudo apt install build-essential software-properties-common -y
sudo add-apt-repository ppa:deadsnakes/ppa
sudo apt update

sudo apt install python3.11 -y
sudo apt install python3-pip
sudo apt install python3.10-venv
#apt install python3.12-venv
#sudo apt install python3.12-dev#python -m venv solvingerror_venv #create the venv
python3 -m venv solvingerror_venv #create the venv
#solvingerror_venv\Scripts\activate #activate venv (windows)
source solvingerror_venv/bin/activate #(linux)
#git clone https://github.com/KarolPWr/flask_sensor_display.git
#git checkout tags/v1.0.0
pip3 install -r requirements.txt
See the temperature of a Raspberry Pi CPU:
vcgencmd measure_tempWith a script:
python3 ./Sensors/RPi4/pi_loger.pyAnd for the x300 with ubuntu:
sudo apt update
sudo apt install lm-sensors

sudo sensors-detect
sudo modprobe nct6775
sensors
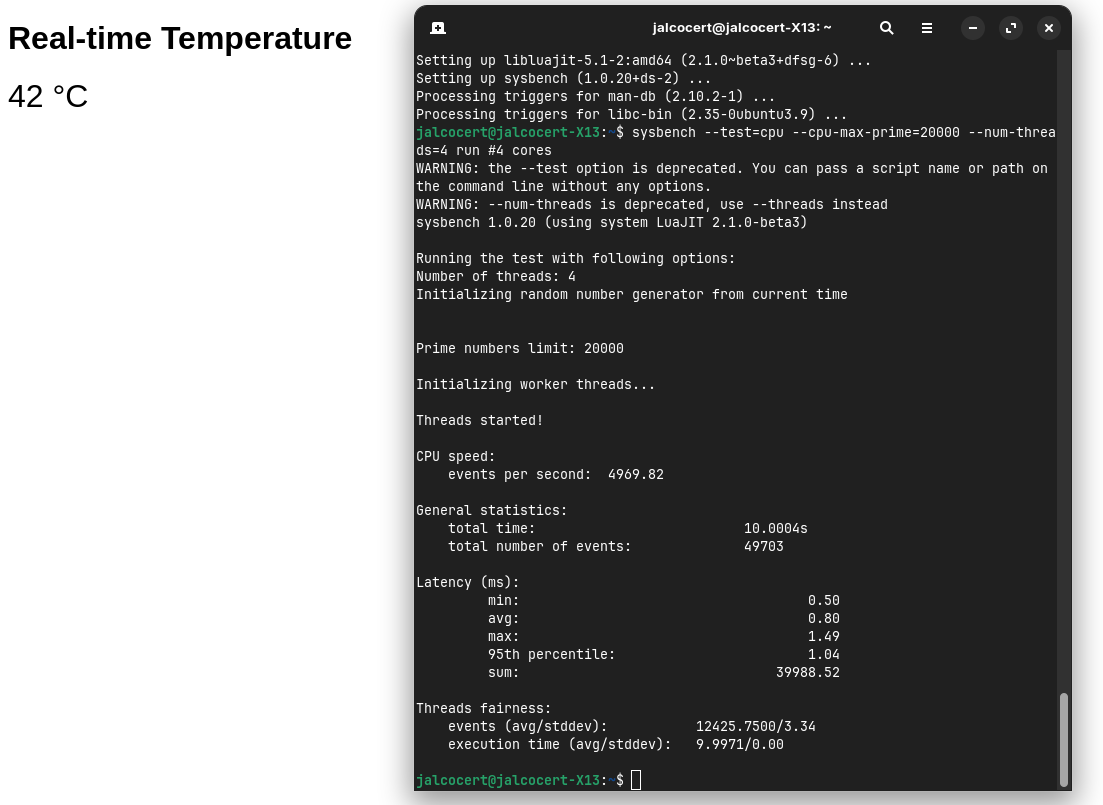
#sensors > sensor_output.txtIf we run some benchmarks, you can see how these CPU Temps, fan speeds…change:
sysbench --test=cpu --cpu-max-prime=20000 --num-threads=4 run #4 cores
#See the variables quickly
sensors | grep "Tctl"
sensors | grep -E "Tctl|fan2|PPT"
x300
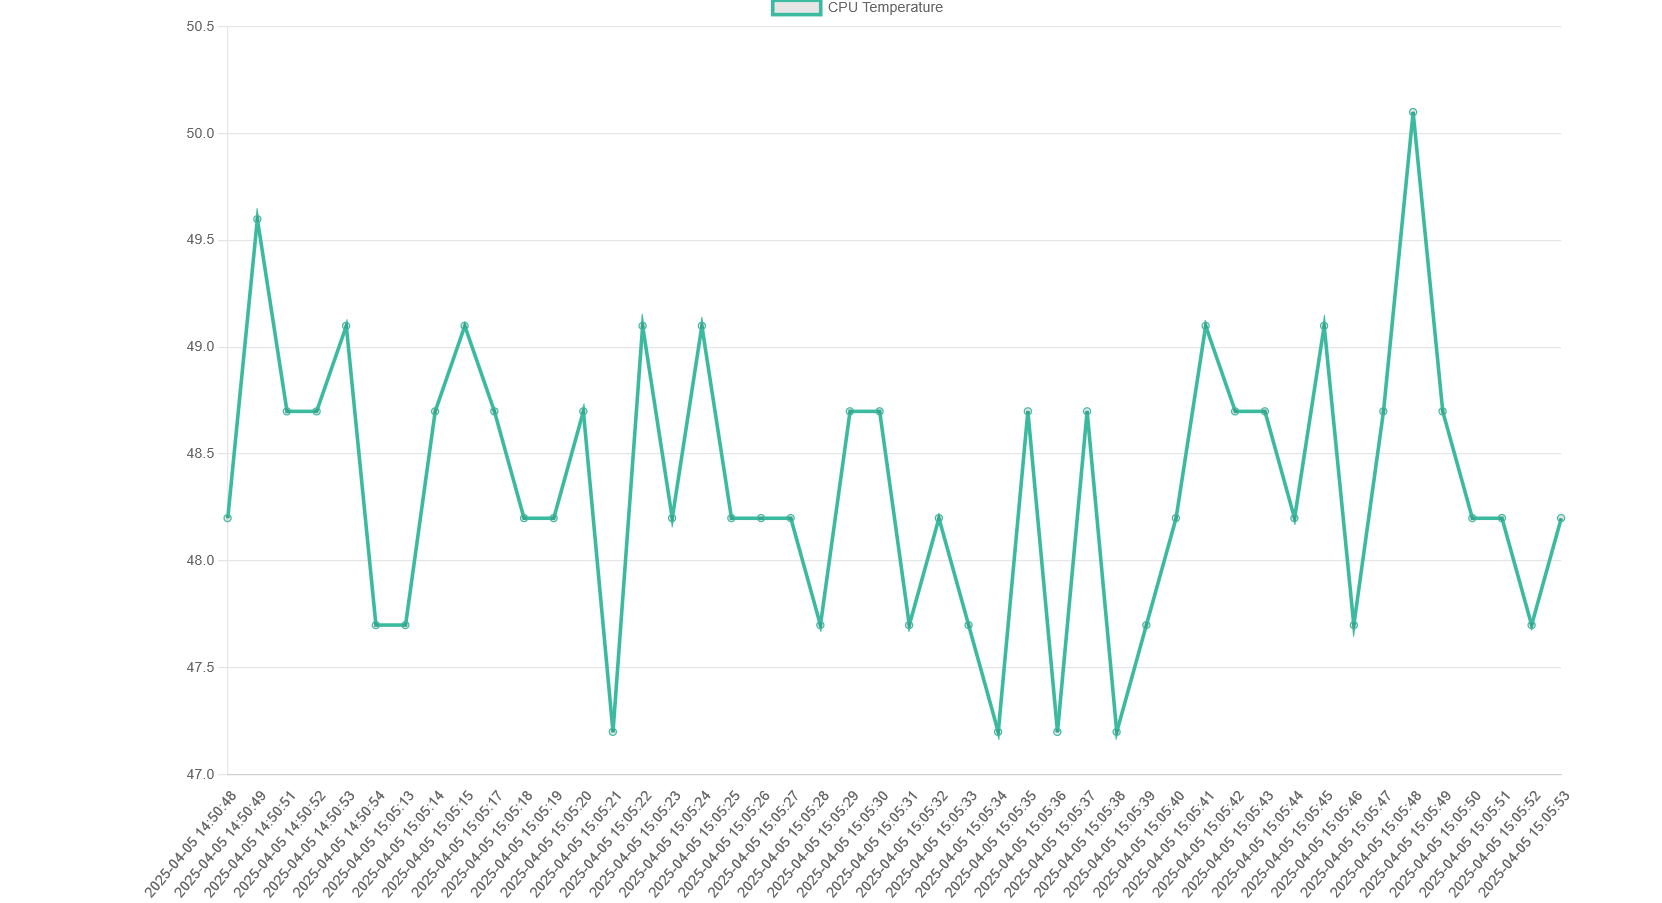
We are going to get to this:
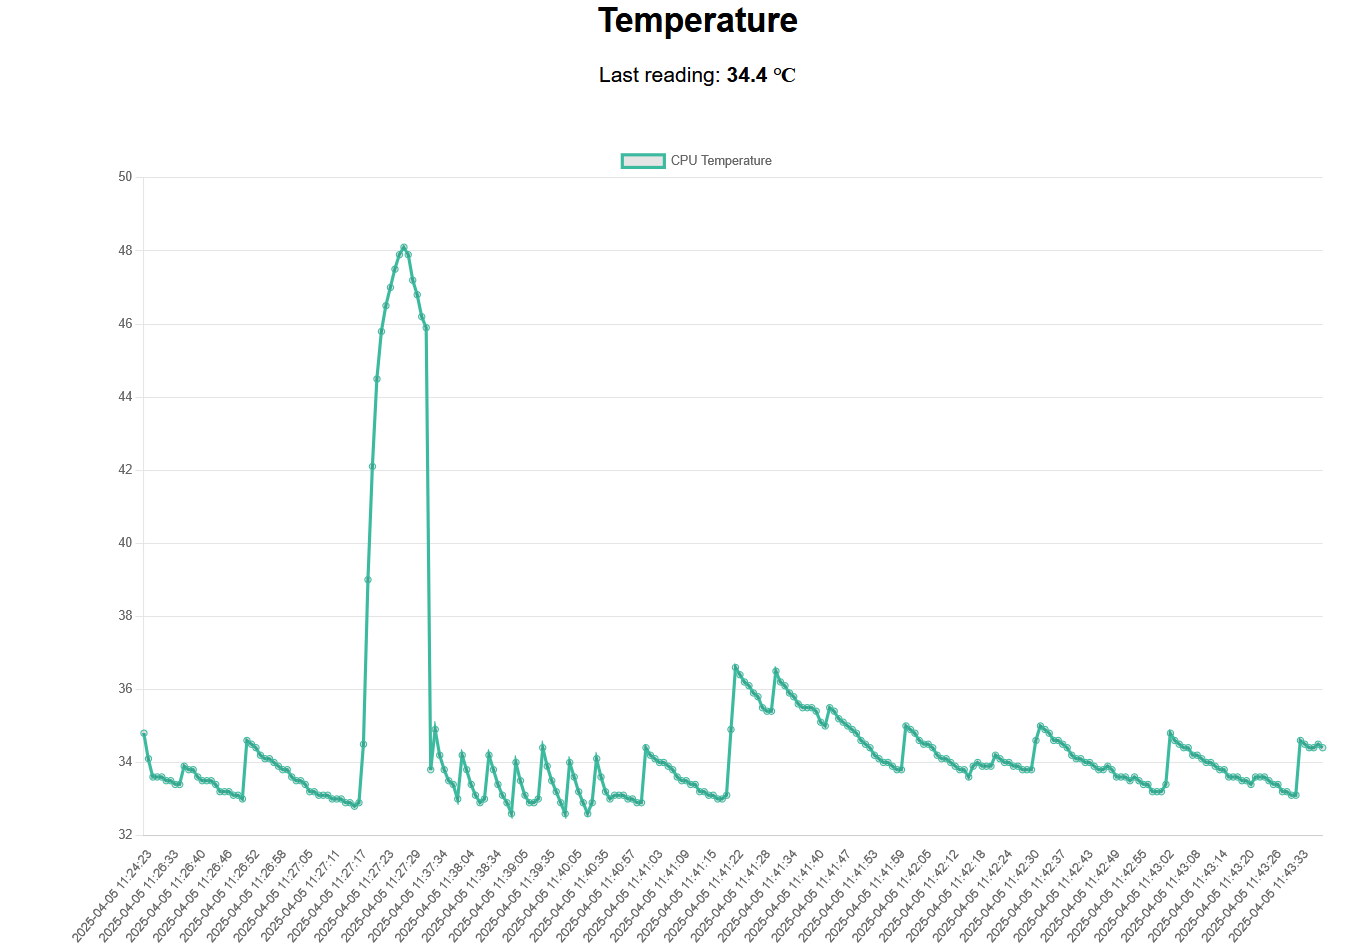
A historical trend of CPU Temperature!
For the x300 small factor computer
sudo apt update
sudo apt install lm-sensors

sudo sensors-detect
sudo modprobe nct6775
sensors
#sensors > sensor_output.txtIf we run some benchmarks, you can see how these CPU Temps, fan speeds…change:
sysbench --test=cpu --cpu-max-prime=20000 --num-threads=4 run #4 cores
#See the variables quickly
sensors | grep "Tctl"
sensors | grep -E "Tctl|fan2|PPT"
See the data from the x300:
python3 data.pySave it into a DB:
python3 ./Sensors/x300/sensor_loger.pySee whats loaded:
sudo apt install sqlite3
sqlite3 --version

sqlite3 ./sensor_data.db

#SELECT name FROM sqlite_master WHERE type='table';
#.tables
#.schema sensor_data

SELECT * FROM sensor_data;
SELECT * FROM sensor_data ORDER BY timestamp DESC LIMIT 5;
#.quit #when you are done!
Pi4
The idea of this feature, is to get the Pi CPU Temperature as we go.
As seen here, we can read Pi temps:
echo "The CPU is at $(vcgencmd measure_temp) degrees."Or via script:
#vcgencmd measure_temp
python3 ./Sensors/RPi4/pi_loger.py
See the data pushed to the DB:
sqlite3 ./pi_sensor_data.db
#.tables
#.schema pi_sensor_data
SELECT * FROM pi_sensor_data ORDER BY DATE DESC LIMIT 5;
#.exit
And when we have everything plugged on the Flask WebAPP:
Deployment Testing
At this point, we can make a quick container:
docker build -t flask_sensor .

docker run --name flask_sensor_webapp \
-v flask_webapp:/app \
-w /app \
-p 9999:9999 \
--restart always \
flask_sensor \
tail -f /dev/null
#ghcr.io/jalcocert/flask_sensor_display \
#/bin/sh -c "python3 app.py"
If we get inside the container:
sudo docker exec -it flask_sensor_webapp /bin/bash
python3 app.py
We can see that the vcgencmd is not found.
Actually, it cant be installed in the container…
…trying to install vcgencmd inside a Docker image based on python:3.12.4-slim.
This base image is a minimal Debian-based image with Python. vcgencmd is specific to Raspberry Pi hardware and its firmware.
It is not a general Linux utility and therefore will not be available in or easily installable within a standard Debian-based Docker image like the one you are using.
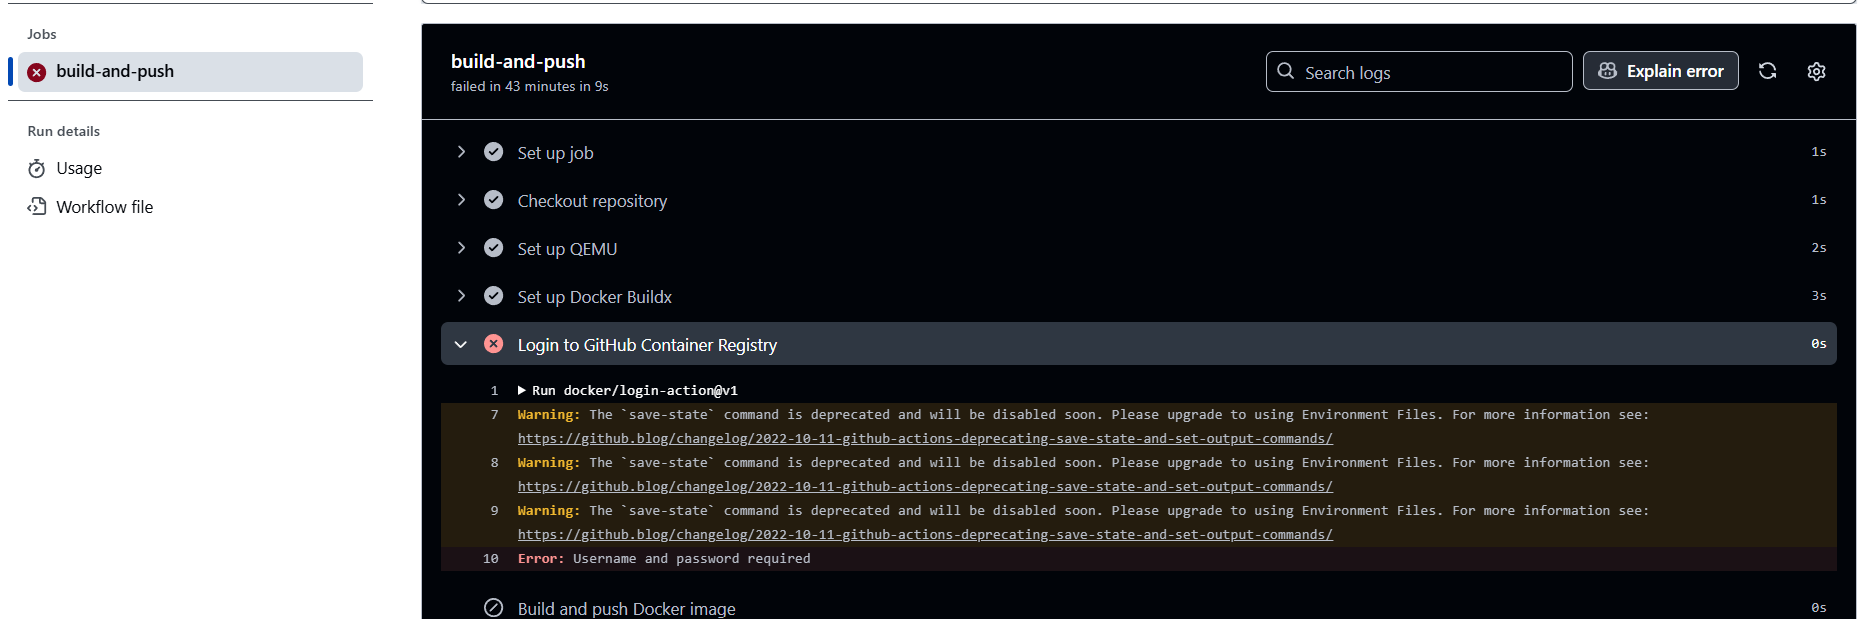
With that taken into consideration, lets put this in GHA: https://github.com/JAlcocerT/flask_sensor_display/actions/runs/14283273534
Which has run perfectly: https://github.com/users/JAlcocerT/packages/container/package/flask_sensor_display
And created this container image:
docker pull ghcr.io/jalcocert/flask_sensor_display:latestAnd made public:
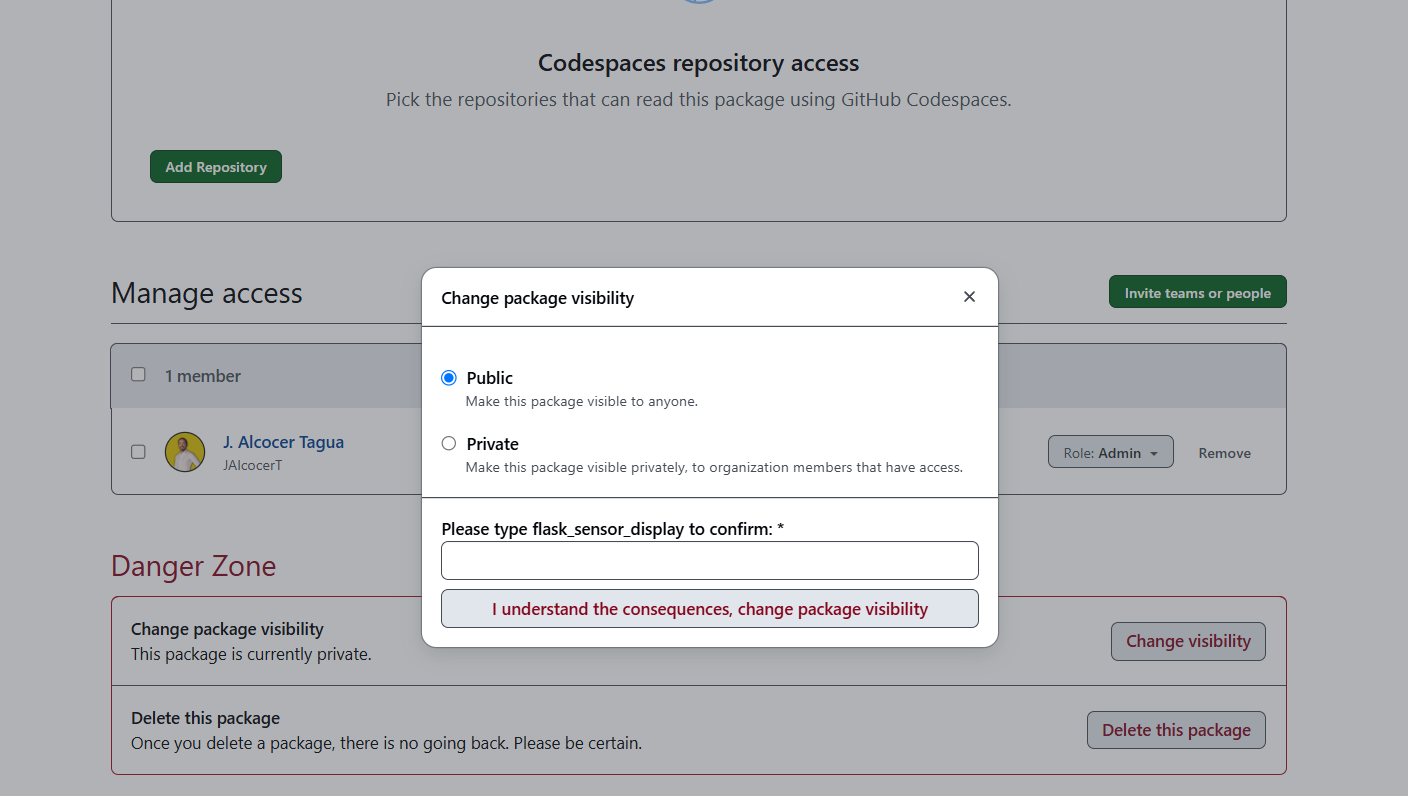
If you are pushing the container to GHCR, remember to set your PAT:
x13
For the x13 laptop, I needed to use:
sudo apt update
sudo apt install acpi
acpi -t #41C !
cat /sys/class/thermal/thermal_zone0/type
#acpitz
jalcocert@jalcocert-X13:~$ cat /sys/class/thermal/thermal_zone0/temp
#41000Real Time Data with Flask
For some time I wanted to try this Flask Feature:
A Flask app can refresh automatically in the browser when new data is added to the database.
But it doesn’t happen magically with standard HTTP requests.
You need to employ specific techniques to achieve this “push” behavior from the server to the client:
- Client Side Polling
- SSE - Server Sent Events
- WebSockets
More about each Flask Refresh Approach 📌
1. Client-Side Polling (Simple but Less Efficient):
How it works: Your web page (using JavaScript) periodically sends requests to the Flask server (e.g., every few seconds) to check if there’s new data. If the server detects new data, it sends it back, and the JavaScript updates the page.
Implementation:
- In your
life_info.htmltemplate, use JavaScript’ssetInterval()function to make an AJAX request to a Flask route (e.g.,/life/latest). - Create a new Flask route (
/life/latest) that queries the database for the most recent data and returns it as JSON. - The JavaScript on the page receives the JSON response and updates the displayed values.
- In your
Pros: Relatively simple to implement.
Cons: Inefficient. The client makes requests even when there’s no new data, wasting bandwidth and server resources. The updates might not be perfectly real-time, depending on the polling interval.
2. Server-Sent Events (SSE) (More Efficient for One-Way Updates):
- How it works: The server establishes a persistent, one-way connection with the client (browser).
When new data is available on the server, it “pushes” that data to the client as a stream of events.
The client-side JavaScript listens for these events and updates the page accordingly.
Implementation:
- You’ll need a Flask library that supports SSE (e.g.,
flask-sse). - Create a Flask route that generates an event stream. This route will continuously check for new data in your database and, when found, format it as an SSE event and send it to the client.
- In your
life_info.htmltemplate, use JavaScript’sEventSourceAPI to connect to the SSE endpoint and listen for incoming events. - When an event is received, the JavaScript updates the page.
- You’ll need a Flask library that supports SSE (e.g.,
Pros: More efficient than polling as the server only sends data when there’s an update. Near real-time updates.
Cons: Primarily for one-way communication (server to client). Can be slightly more complex to set up than simple polling. Flask’s built-in development server has limitations with SSE; you might need a production-ready WSGI server.
3. WebSockets (Most Flexible for Real-Time Bi-Directional Communication):
How it works: WebSockets provide a full-duplex (bi-directional) communication channel over a single, long-lived connection between the client and the server. Either side can send data at any time.
Implementation:
- You’ll need a Flask extension for WebSockets (e.g.,
Flask-SocketIO). - Set up WebSocket event handlers on both the server (Flask) and the client (JavaScript).
- When new data is added to the database (either by your background thread or any other process), the Flask server can emit a WebSocket event containing the new data.
- The client-side JavaScript listens for this event and updates the page.
- You’ll need a Flask extension for WebSockets (e.g.,
Pros: Highly efficient for real-time applications with potential for bi-directional communication.
Cons: More complex to implement than polling or SSE. Requires managing WebSocket connections.
Which method should you choose?
For a simple dashboard showing relatively infrequent updates, client-side polling might be sufficient to get started, but be aware of its inefficiency.
For a more efficient solution where you primarily need the server to push updates to the client, Server-Sent Events (SSE) is a good choice.
More about SSE 📌
Let’s break down how to set up Flask real-time updates in a browser using Server-Sent Events (SSE) and address the role of Redis in this context.
Setting up Flask Real-time Updates with SSE*
Server-Sent Events (SSE) is a simple, standards-based way for a web server to push updates to a web browser over a persistent HTTP connection.
Once the connection is established, the server can send data to the client whenever new information is available, without the client needing to make repeated requests.
Why Might You Need Redis for Real-time Updates?
In the basic example above, the real-time updates are generated directly within the Flask process. This works fine for simple scenarios where the data source and the event generation are tightly coupled and the application runs on a single server.
However, in more complex applications, you might consider using a message broker like Redis for several reasons:
Decoupling of Producers and Consumers: Imagine you have multiple parts of your application (or even separate services) that generate events that need to be pushed to clients. Using Redis as a central message broker allows these different parts (producers) to publish events to specific channels without needing to know about the clients (consumers) or the Flask application directly. The Flask application then subscribes to these channels and pushes the events to the connected browsers. This decoupling makes your architecture more modular and easier to maintain and scale.
- Example: You might have a separate process that monitors database changes, another that tracks user activity, and another that handles sensor data. Each of these can publish events to different Redis channels. Your Flask application can subscribe to the relevant channels and broadcast the updates to the appropriate users.
Scalability: If your application needs to handle a large number of concurrent users and generate a high volume of real-time events, a single Flask process might become overwhelmed. You can scale your application by running multiple Flask instances. With Redis as a message broker, each Flask instance can subscribe to the same channels and receive the events, ensuring that all connected clients receive the updates, regardless of which Flask instance they are connected to.
- Without Redis: You would need to implement a mechanism for different Flask processes to communicate and share the events, which can be complex.
Reliability and Persistence (Optional): Redis offers different levels of persistence. If your real-time updates are critical and you cannot afford to lose events if a server restarts, you can configure Redis to persist data to disk. While SSE itself doesn’t guarantee delivery, using a persistent message broker can improve the overall reliability of your real-time update system.
Fan-out: Redis Pub/Sub (Publish/Subscribe) allows you to easily implement a fan-out pattern where a single event published to a channel is received by multiple subscribers (your Flask application instances). This is essential for broadcasting updates to many connected clients.
Managing State: In some real-time applications, you might need to maintain some state related to the real-time connections or the data being streamed.
Redis can be used as a fast and efficient in-memory data store for managing this state.
You don’t strictly need Redis for basic SSE with Flask, especially if your data source is directly accessible within your Flask application and you are running on a single server.
However, Redis (or another message broker) becomes increasingly valuable as your application grows in complexity, scale, and the number of event producers.**
docker run --name my-redis -d -p 6379:6379 -v redis_data:/data redisIt provides a robust and scalable way to manage and distribute real-time events across different parts of your system.
When would you not necessarily need Redis for SSE?
- Small, single-server applications where the event source is directly integrated with the Flask application.
- Simple dashboards or monitoring tools where the data updates are generated within the same Flask process.
By using Redis, you shift the responsibility of managing and distributing events from your Flask application to a dedicated, highly optimized message broker, allowing your Flask application to focus on serving HTTP requests and handling the SSE connections.
To use Redis with your Flask SSE application, you would typically:
- Install the
redisPython library (pip install redis). - Connect to your Redis server from your Flask application.
- In your event-generating parts of the application, publish events to specific Redis channels.
- In your Flask SSE route, subscribe to these Redis channels using a separate thread or an asynchronous mechanism.
- When a new message is received from Redis, format it as an SSE event and yield it to the client.
This setup provides a more scalable and maintainable architecture for real-time web applications with Flask and SSE.
- If you anticipate needing more interactive features or bi-directional communication in the future, WebSockets offer the most flexibility.
What are WS and Where are they supported? 📌
What are WebSockets?
Imagine a traditional HTTP request. Your browser (the client) sends a request to a server, and the server sends back a response.
This is a one-way street, and each interaction requires a new connection.
If the server has new information to share, the client has to keep asking (polling) or use other more complex techniques like long-polling.
WebSockets offer a different paradigm. They establish a full-duplex communication channel over a single, long-lived connection between the client and the server.
Think of it like a persistent phone call where both parties can talk and listen simultaneously without having to hang up and redial for each message.
Key Characteristics of WebSockets:
Full-Duplex: Data can flow in both directions (client to server and server to client) at the same time.
Persistent Connection: Once established, the connection remains open until explicitly closed by either the client or the server. This eliminates the overhead of repeatedly establishing and tearing down connections for each message.
Low Latency: Because the connection is persistent, data can be exchanged with minimal delay, making it ideal for real-time applications.
Event-Driven: Communication happens through the exchange of messages (events) over the open connection.
Standardized Protocol: WebSockets are a standardized protocol (RFC 6455) that is supported by most modern web browsers and server-side technologies.
Uses HTTP Handshake: The WebSocket connection starts with an HTTP handshake. The client sends a special HTTP request to the server indicating its desire to upgrade the connection to WebSocket. If the server supports WebSockets, it sends back a specific HTTP response acknowledging the upgrade. After this handshake, the communication switches to the WebSocket protocol.
Different Protocol: After the initial HTTP handshake, WebSockets use a different, more lightweight protocol for data transmission, which reduces overhead compared to repeated HTTP requests.
Python and WebSockets:
Python has excellent support for WebSockets through various libraries, the most popular being:
websockets: A library focused on providing a clean and efficient implementation of the WebSocket protocol. It’s often used for building both clients and servers.asynciointegration:websocketsis built on top of Python’sasynciolibrary, making it well-suited for asynchronous programming and handling many concurrent WebSocket connections efficiently.- Framework Integrations: Many popular Python web frameworks like Django (with
channels), Flask (with extensions likeFlask-SocketsorFlask-SocketIO), and FastAPI offer convenient ways to integrate WebSocket functionality into your applications. These frameworks often handle the underlying WebSocket details and provide higher-level abstractions.
Other Languages:
WebSockets are also widely supported in many other programming languages, including:
- Node.js (JavaScript on the server-side): Has built-in support and popular libraries like
ws. - Java: Libraries like
javax.websocket(part of the Java EE specification) and others likeNettyprovide WebSocket support. - Go: Libraries like
gorilla/websocketare commonly used. - Ruby: Gems like
faye-websocketand Action Cable (in Ruby on Rails) offer WebSocket capabilities. - C# (.NET): Has built-in support through the
System.Net.WebSocketsnamespace and libraries like SignalR. - And many more!
In summary: WebSockets are a powerful protocol for enabling real-time, bidirectional communication between clients and servers over a persistent connection.
As long as a programming language has libraries or built-in support for handling the WebSocket protocol, you can use WebSockets in that language.
More about WS implementation 📌
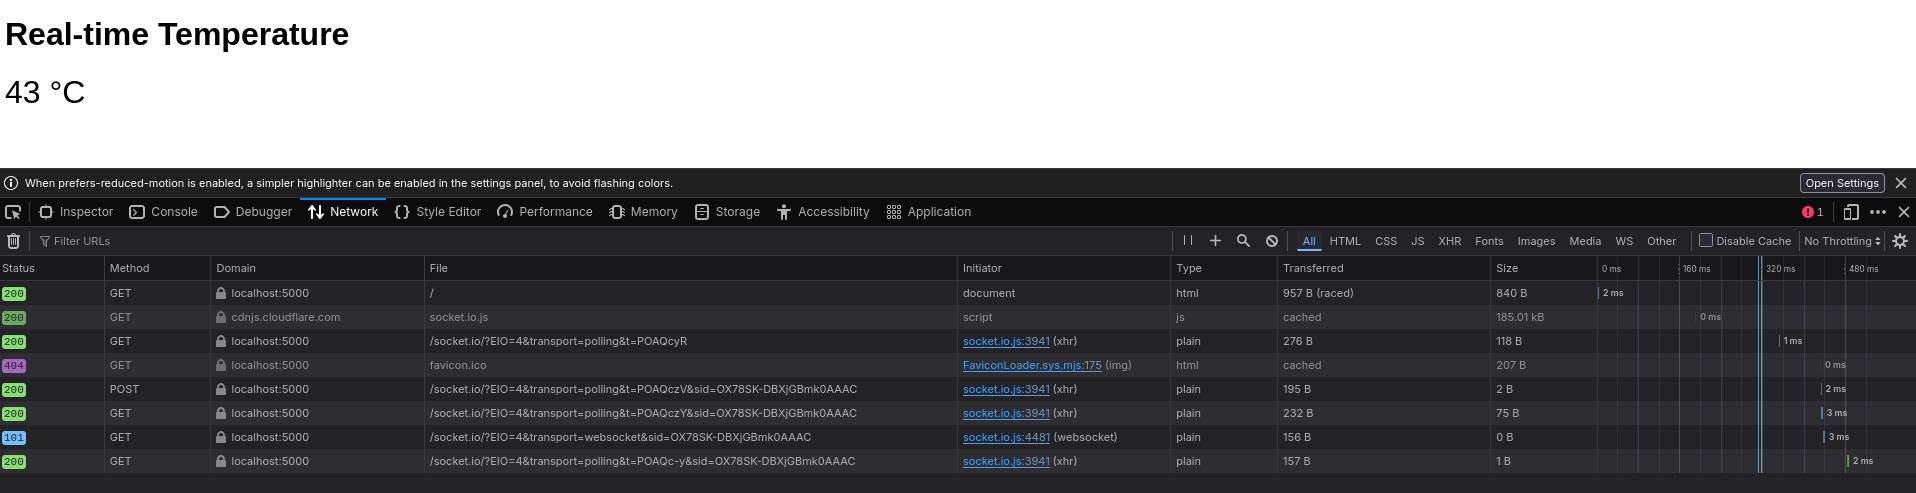
We can make this kind of quick Flask Web socket Web App:
python3 ./Z_Tests/app-x13-we-chartjs.pyYou can see how it works on this video
A trick to debug is with the browser console:
flask-sse or Flask-SocketIO) if you choose those approaches.Conclusions
Starting from the awsome project: https://github.com/KarolPWr/flask_sensor_display
With the BME280 sensor is the original feature from KarolPWr original version!
Which KarolPWr explained at the video:
I have made couple of tweaks to it here:
Added Github Actions support with multiarch container
Select which sensor you want to pull from via
.envordocker-compose.ymlAdded x300, x13 and Pi4 Sensor support
Tested the real time data refresh with SSE and WS, but found out that with Taipy seems more intuitive, as seen with this project web dashboard
Definitely will come back to this technology with some bigger IoT project.
Deploying
Make sure to get docker/container installed
Pull the container image:
docker pull ghcr.io/jalcocert/flask_sensor_display:latest- Use the docker-compose
wget https://github.com/JAlcocerT/flask_sensor_display/blob/main/Z_DeployMe/docker-compose.yml
sudo docker-compose up -d
Or, a quick CLI:
docker run --name flask_sensor_webapp \
-v flask_webapp:/app \
-w /app \
-p 9999:9999 \
--restart always \
ghcr.io/jalcocert/flask_sensor_display \
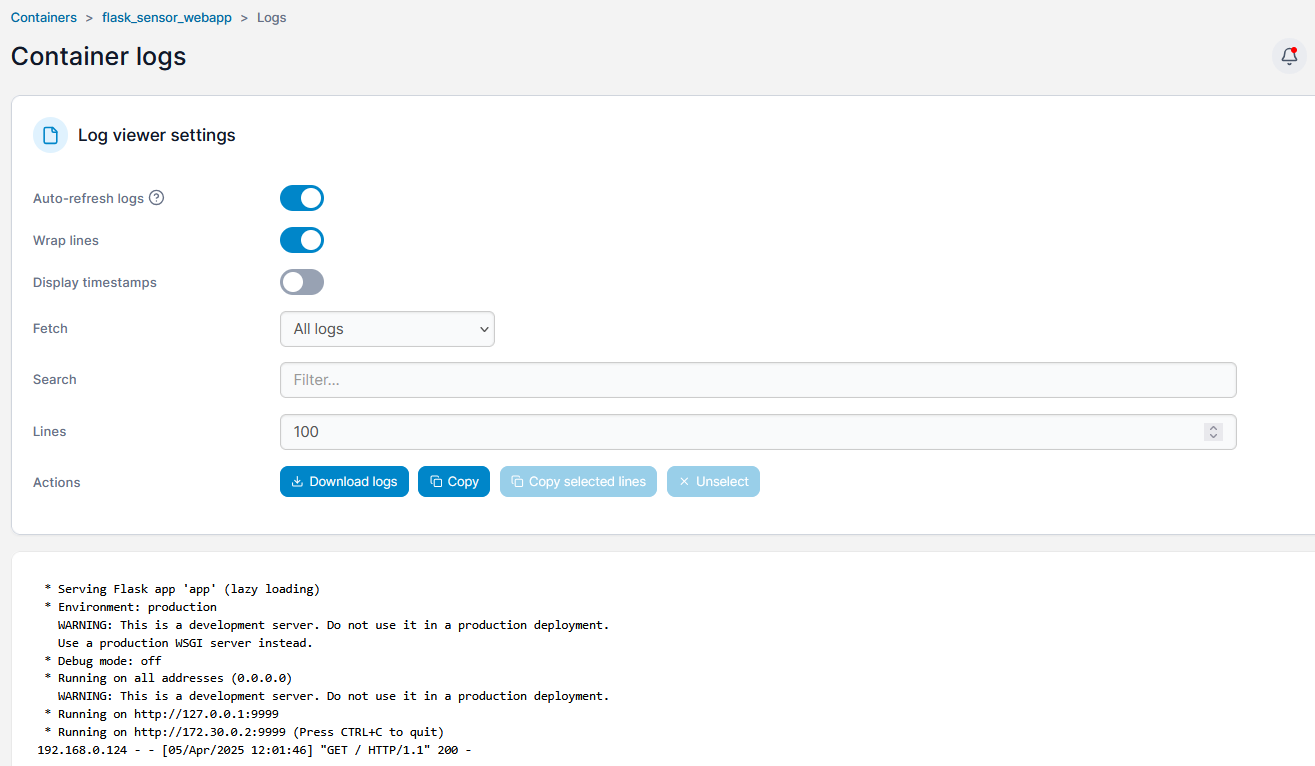
/bin/sh -c "python3 app.py"See the logs at Portainer:
About ChartJS
ChartJS has been an interesting discovery.
It can work within:
- Python Apps, like the Flask we have tinkered with
- HUGO Themes, like this example, HEXTRA, as a shortcode
- Ideally, should be possible to create a component for ChartJS to work with Astro SSG Themes!
FAQ
If you want simpler Dashbards, check: