Battle of Boards - Raspberry Pi 4 (vs) Orange Pi 5
The Orange Pi 5 is a versatile device suitable for high-end tablets, Home Assistant integration, edge computing, AI, cloud computing, AR/VR, and smart security.
With its advanced 8nm LP fabrication technology and the Rockchip RK3588S chip, it provides exceptional performance and reduced power consumption.
On the other hand, the Raspberry Pi 4 supports multimedia playback and video output, making it ideal for home media centers and retro gaming.
It is also suitable for IoT projects, offers educational opportunities, and is compatible with various sensors and actuators.
The Raspberry Pi 4 is a popular choice for academic projects and provides hands-on learning in programming, electronics, and computer concepts.
Thanks to iBug for inspiration on the post
Exploring the Orange Pi 5
In my recent journey towards self-hosting, I discovered the Orange Pi 5, a powerful single-board computer that has become an invaluable asset for my independence from cloud services, like Google Cloud Run.
It has been an empowering experience as I also learnt how to expose the services securely with Cloudflare Tunnels.
And the Orange Pi 5 has played a significant role in this transition as being ARM64 makes it Compatible with Cloudflare Tunnels
After few benchmarking iterations, I have created these guidelies to follow across all my devices
Orange Pi 5 Specs
Its reliability and energy efficiency make it ideal for running my self-hosted services, offering a reliable and cost-effective alternative to cloud-based solutions.
- Rockchip RK3588S that features eight Arm Cores (4xCortex-A76 @ 2.4GHz plus 4x1.8GHz Cortex-A55).
- The Rockchip SoC also features a Mali G510 MP4 graphics processor, which has open-source driver hope via the Panfrost driver stack - providing solid graphics processing capabilities.
- Dimensions - 100mm×62mm×18mm -> 0.1116L
You can download OS for the OrangePi from the manufacturer website or from this repo
Orange Pi 5 - CPU Benchmark
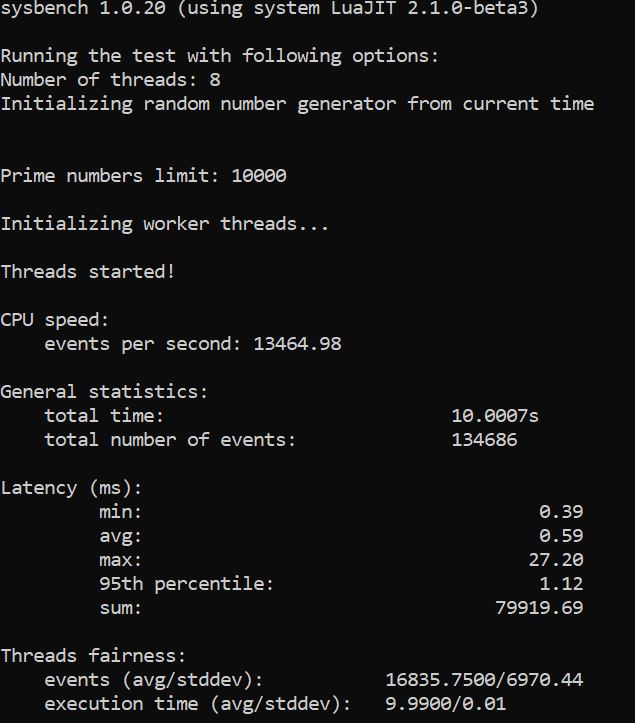
The CPU benchmark (8 threads) provided: ~13.4k events/s

And to have kneck to kneck comparison - I tried with 4 threads with the Orange Pi 5: ~10.2k events/s 
The Raspberry Pi 4
- The Raspberry Pi 4 is powered by a quad-core ARM Cortex-A72 CPU, providing reliable performance for a range of applications.
- The Raspberry Pi 4 is equipped with a VideoCore VI GPU, ensuring smooth graphics rendering and multimedia performance.
- RPi4 Model B Dimensions - 85.6mm×56.5mm×17mm - Which makes a volume of 82,096.8 mm³
- The Raspberry Pi 4 is approximately 26.44% smaller in volume compared to the Orange Pi 5.
Raspberry Pi 4 - CPU Benchmark
The CPU benchmark (4 threads) provided: ~11.3k events/s
Orange Pi vs Raspberry - Real CPU Test
Recently, I have been working on my Python Trip Planner with Weather to have an open source tool that allows anyone to look for historical weather patterns with an interactive UI.
This provided me with the perfect opportunity to test the CPU performance of both, Raspberry Pi 4 and Orange Pi 5 in a real scenario - building the docker containers for that Python App.
To check how both SBC’s were keeping up with the temperatures and how the CPUs struggled, I used netdata.
Benchmarking the Docker Build Process
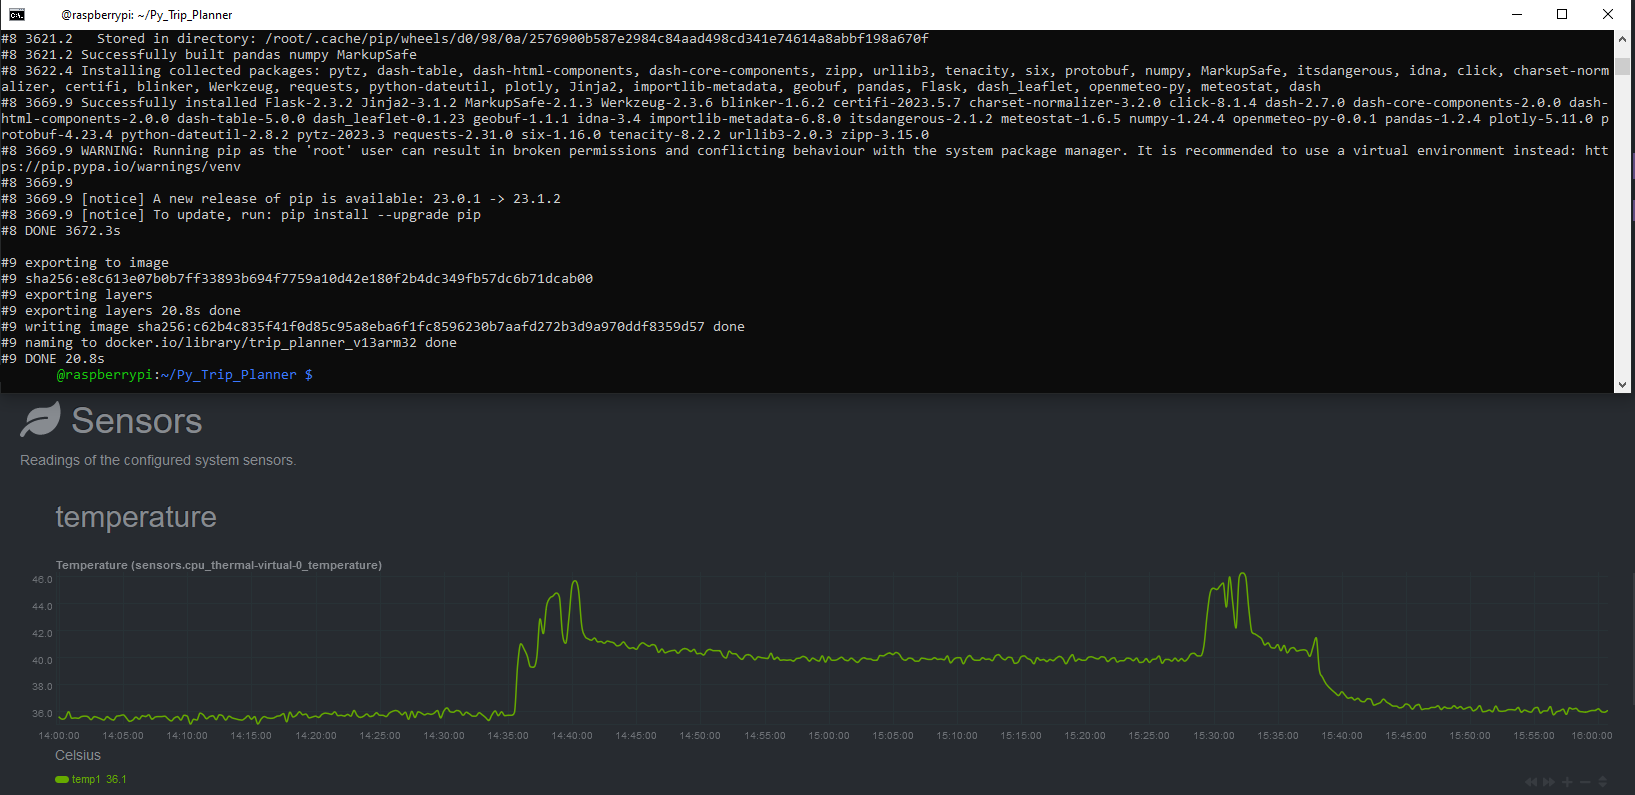
And here we have the results. The Raspberry Pi 4 (2GB ARM32) took ~ 3672s

The CPU use was ~25%, that’s 1/4 cores that were used during the build process
And the Orange Pi 5 (8GB) ~ 1777s

As you can see here, the CPU use was ~13%, that’s 1/8 cores that were used during the build process.
This gives a clear result: the Orange Pi 5 is x2 faster per CPU core than the Raspberry Pi 4. At least for Docker Builds.
Benchmarking Temperature during Docker Build Process
That’s great, but how where their temperature doing? Again, Netdata has something to show us:
- The Raspberry Pi 4 had a peak of ~46C and was bouncing around ~39C:

- The Orange Pi 5 had a peak of ~65C and was around 50C when using the 13% of CPU:

FAQ
- Orange Pi PWM Fan control
How to Run the Synthetic Benchmarks?
1
2
sudo apt install sysbench
sysbench cpu --threads=8 run #https://github.com/akopytov/sysbench#general-command-line-options
How to Stress the CPU?
1
2
apt install s-tui stress
s-tui
- How to check the number of cores?
1
nproc
- How to check the CPU information?
1
lscpu
or with:
1
cat /proc/cpuinfo
Tweaking the Orange Pi 5
Installing Updates
1
2
sudo apt update &&
sudo apt upgrade
1
orangepi-config
1
sudo fdisk -l
1
ip r
1
sudo apt-get install openssh-client
GPU Acceleration - Armbian and Orange Pi 5
The Armbian project recently added GPU acceleration support for the Orange Pi 5:
To enable it, we can benefit of the great contribution of liujianfeng1994:
1
2
3
4
5
sudo add-apt-repository ppa:liujianfeng1994/panfork-mesa
sudo add-apt-repository ppa:liujianfeng1994/rockchip-multimedia
sudo apt update
sudo apt dist-upgrade
sudo apt install mali-g610-firmware rockchip-multimedia-config
Testing GPU in the Orange Pi 5
1
chrome://gpu
Also we can test it with: https://www.wirple.com/bmark/
1
2
apt install mesa-utils
glxgears
Fixing no space left on device with ARMBIAN
you can check with
1
df -h
and you will see that there is something wrong at /var/log…
Then, we can remove the 5 oldest:
1
ls -rt /var/log/sysstat/sa* | head -5 | sudo xargs rm
See with this command that they are actually out:
1
2
sudo du -sh /var/log/sysstat | sort -hr
#sudo shutdown -h now "System is shutting down. Please save your work."
Using NVMe with the Orange Pi 5
- Check that the NMVe disk is recognized:
1
sudo fdisk -l | grep "nvme0n1"
Use GParted to format the new disk: ext4 would do the trick
- Balena Etcher: 1st step
- Copy uboot to orangepi mem: flash from file
- Source: /usr/lib/linux-u-boot-legacy-orangepi5_1.1.4_arm64/rkspi_loader.img
- Target: the flash memory -> /dev/mtdblock0
- Copy uboot to orangepi mem: flash from file
- Balena Etcher: 2nd step and optional
- Clone drive: from your sd card, to the ssd if you want to keep everything as it is
- Source: /dev/mmcblk1
- Target: /dev/nvme0n1
- Clone drive: from your sd card, to the ssd if you want to keep everything as it is

