RPi IoT Project - Temperature and Humidity with DHT11/22 & MongoDB
Raspberry IoT with MongoDB and Metabase
In this IoT Project we will be collecting Temperature and Humidity Data from a DHT11 or a DHT22 Sensor working together with a Raspberry Pi.
The data store will be in MongoDB, which will live in a Docker container.
Then, we will visualize the IoT data with a Metabase dashboard.
In a rush? There is a quick setup
Before Starting
This is what we will be doing…🔜
- Send DHT Data to MongoDB and Visualize it in Metadata
| Hardware | Code | Data Analytics Stack |
|---|---|---|
Raspberry Pi 4 ✓ | Python 🐍 | MongoDB |
DHT11 or DHT22 ✓ | Dockerfile | Metabase |
Wires ✓ | Docker-compose Stack | Docker Container |
Few things to Refresh
We will be, among other tasks, selfhosting - Setup with - https://jalcocert.github.io/Linux/docs/linux__cloud/selfhosting/
For Python - https://jalcocert.github.io/JAlcocerT/guide-python/
Raspbian OS installed and ssh ready `ssh -V`
- To work out of the box can use Raspberry Pi 64 bits for this project (by default MongoDB Image is ARM64).
- Or to run the Python script in a 32bits RPi and Official Mongo with Docker image in ARM64/X86.
- We can use unofficial apcheamitru/arm32v7-mongo image as well.
- For Metabase visualization, we need x86.
 From DHT sensor to Metabase - Our Workflow
I have used this Python Diagram script to generate the flow above 😁
The Sensor - DHT
Temperature and Humidity Data can be provided with DHT11 or DHT22 for this project:
| Pins | Description |
|---|---|
+ | Connect 5V or 3.3V |
data | Temp and Humidity data will be flowing here |
- | Ground (0V) |
Connecting a DHT to a Raspberry Pi 4
To connect the DHT11 or DHT22 sensor to the Raspberry, you can follow this schema:
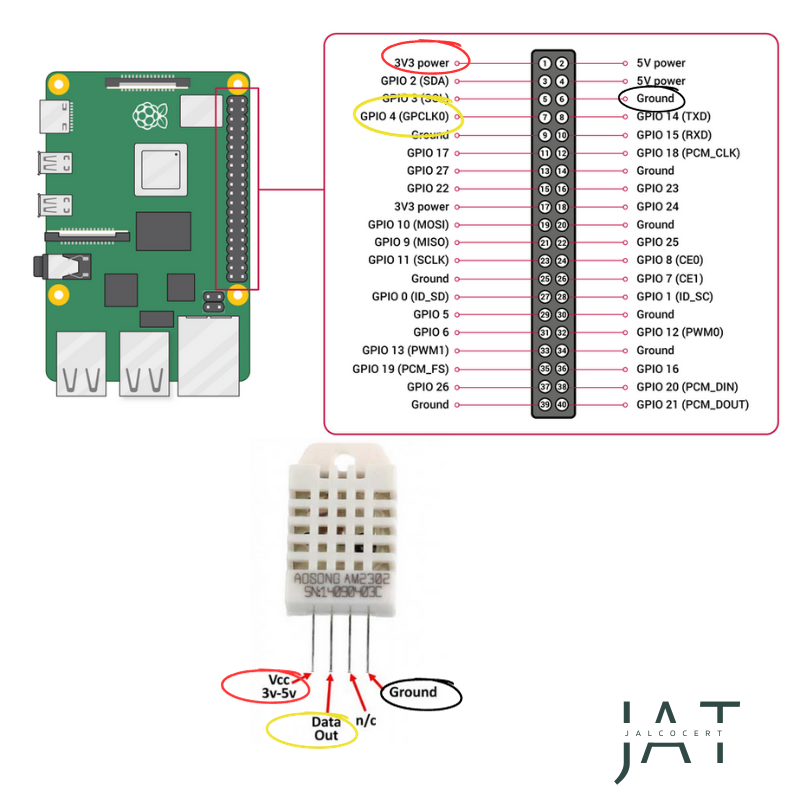 DHT22 connection to a Raspberry Pi 4
I prefer to use the 3.3V for the DHT sensor (will work perfectly with 5V as well)
In the RPi Official web you can find the original GPIO schema.
You can always go to the terminal and check with:
1
pinout
Python DHT to Mongo
We need to use the following libraries:
1
2
pip install Adafruit_DHT
pip show Adafruit_DHT
More About Adafruit_CircuitPython_DHT and in Github
We will be using the pymongo client to push the Data that Python reads from the Sensor to MongoDB.
1
2
pip install pymongo
#pip show pymongo
- To Connect to our MongoDB server we are using:
1
2
mongo_client = pymongo.MongoClient("mongodb://localhost:27017/")
#replace with your server's connection details
- Select the MongoDB database and collection you want to work with:
1
2
3
4
5
6
7
# Select a database
db = mongo_client["your_database_name"]

# Select a collection within the database
collection = db["your_collection_name"]

#  We will be using proper naming here
- And we will insert data with:
1
2
3
4
5
6
7
8
9
10
11
12
13
14
# Define the data to insert (as a Python dictionary)
data_to_insert = {
       "field1": "value1",
       "field2": "value2",
      # Add more fields as needed
    }

# Insert the data into the collection
result = collection.insert_one(data_to_insert)

# Print the inserted document's ID
print(f"Inserted document ID: {result.inserted_id}")

#   Customize the `data_to_insert` dictionary with your data fields and values.
Here is the full Python Code ready for the container:
1
2
3
4
5
6
7
8
9
10
11
12
13
14
15
16
17
18
19
20
21
22
23
24
25
26
27
28
29
import Adafruit_DHT
import time
import os
from pymongo import MongoClient

DHT_SENSOR = Adafruit_DHT.DHT11 #example with DHT11, we can use DHT22 as well
DHT_PIN = 4

# Get MongoDB host from environment variable
mongodb_host = os.environ.get('MONGODB_HOST', 'localhost')  # Default to 'localhost' if not set

# Configure MongoDB connection
mongo_client = MongoClient(f'mongodb://{mongodb_host}:27017/')
db = mongo_client['sensor_data']
collection = db['dht_sensor']

while True:
    humidity, temperature = Adafruit_DHT.read(DHT_SENSOR, DHT_PIN)
    if humidity is not None and temperature is not None:
        data = {
            "timestamp": time.strftime('%Y-%m-%dT%H:%M:%SZ'),
            "temperature": temperature,
            "humidity": humidity
        }
        collection.insert_one(data)
        print("Data sent to MongoDB")
    else:
        print("Sensor failure. Check wiring.")
    time.sleep(3)
It is ready to detect the mongoDB configuration from our Docker-Compose stack. As well as the type of sensor that we are using DHT11 or DHT22.
How ro Build the DHT to Mongo Image
Let’s put that code inside a Docker container, so that the dependencies will be covered forever.
1
docker build -t dht_sensor_mongo .
- Send DHT Data to MongoDB
- Hardware Check
- Python Script: and even inside a Docker container!
- The Database: MongoDB 👇
The DataBase: MongoDB
This is the database were Python will be storing the DHT sensor data.
We will use the latest Docker image of MongoDB:
1
2
3
4
5
6
7
8
9
10
11
12
13
14
15
16
version: '3'
services:
  mongodb:
    image: mongo:latest
    container_name: mongodb
    environment:
      MONGO_INITDB_ROOT_USERNAME: yourusername
      MONGO_INITDB_ROOT_PASSWORD: yourpassword
    volumes:
      - mongodb_data:/data/db
    ports:
      - "27017:27017"
    restart: always

volumes:
  mongodb_data:
Start a new mongosh shell and check everything works:
1
2
3
4
5
6
7
8
9
docker exec -it mongodb sh #get inside mongo container

mongo -u yourusername -p yourpassword --authenticationDatabase admin #start MongoDB Shell with credentials
#mongosh --username yourusername --password yourpassword --authenticationDatabase admin

show dbs
use sensor_data
db.dht_sensor.find().sort({timestamp: -1}).limit(5)
#show collections
Why MongoDB for IoT Projects?
Scalability
- Sharding: Enables distribution of data across multiple servers, crucial for handling vast IoT data.
- Load Balancing: Manages large data volumes efficiently, ensuring performance stability.
Flexibility
- Schema-less: Stores data in JSON-like documents, ideal for the diverse data types in IoT.
- Data Aggregation: Supports complex processing, enhancing data analysis capabilities.
Performance
- Advanced Indexing: Offers efficient data retrieval, critical for real-time IoT operations.
- High Throughput: Maintains fast read and write speeds, vital for IoT data integrity.
Robust Ecosystem
- Integration: Works well with key IoT platforms and tools like Kafka and Spark.
- Strong Community: Provides extensive support and resources for IoT development.
Real-Time Processing
- Change Streams: Allows applications to access real-time data changes, enabling immediate IoT responses.
Quick Setup
We will be using the Docker-Compose Stack that consolidates the Python Code I have created, together with provisioning a MongoDB.
You will need to build the image with the files from this folder
1
2
3
4
5
6
7
8
9
10
11
12
13
14
15
16
17
18
19
20
21
22
23
24
25
26
27
28
29
30
31
32
33
version: '3'
services:
  mongodb:
    image: mongo:latest
    container_name: mongodb
    environment:
      MONGO_INITDB_ROOT_USERNAME: yourusername
      MONGO_INITDB_ROOT_PASSWORD: yourpassword
      MONGO_INITDB_DATABASE: sensor_data
    volumes:
      - mongodb_data:/data/db
    ports:
      - "27017:27017"
    restart: always

  dht_sensor_mongo:
    image: dht_sensor_mongo:latest  # Use the name of your custom image
    container_name: dht_sensor_mongo
    privileged: true
    depends_on:
      - mongodb
    environment:
      MONGODB_HOST: mongodb
      MONGODB_PORT: 27017  # Specify the MongoDB port
      MONGO_INITDB_ROOT_USERNAME: yourusername  # Specify the MongoDB root username
      MONGO_INITDB_ROOT_PASSWORD: yourpassword  # Specify the MongoDB root password
      MONGO_DB_NAME: sensor_data  # Specify the MongoDB database name
      MONGO_COLLECTION_NAME: dht_sensor  # Specify the MongoDB collection name
      DHT_SENSOR_TYPE: DHT22  # Set the DHT sensor type here (DHT11 or DHT22)
      DHT_PIN: 4  # Set the DHT sensor pin here

volumes:
  mongodb_data:
- Send DHT Data to MongoDB
- Hardware Check
- Python Script
- The Database Setup: MongoDB
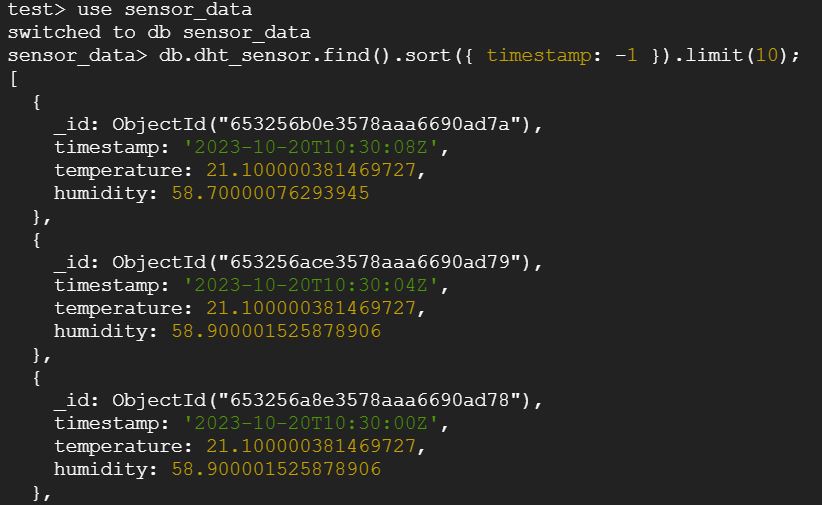 Sending Temp and Humidity data successfully from a Raspberry Pi 4 and DHT sensor to MongoDB
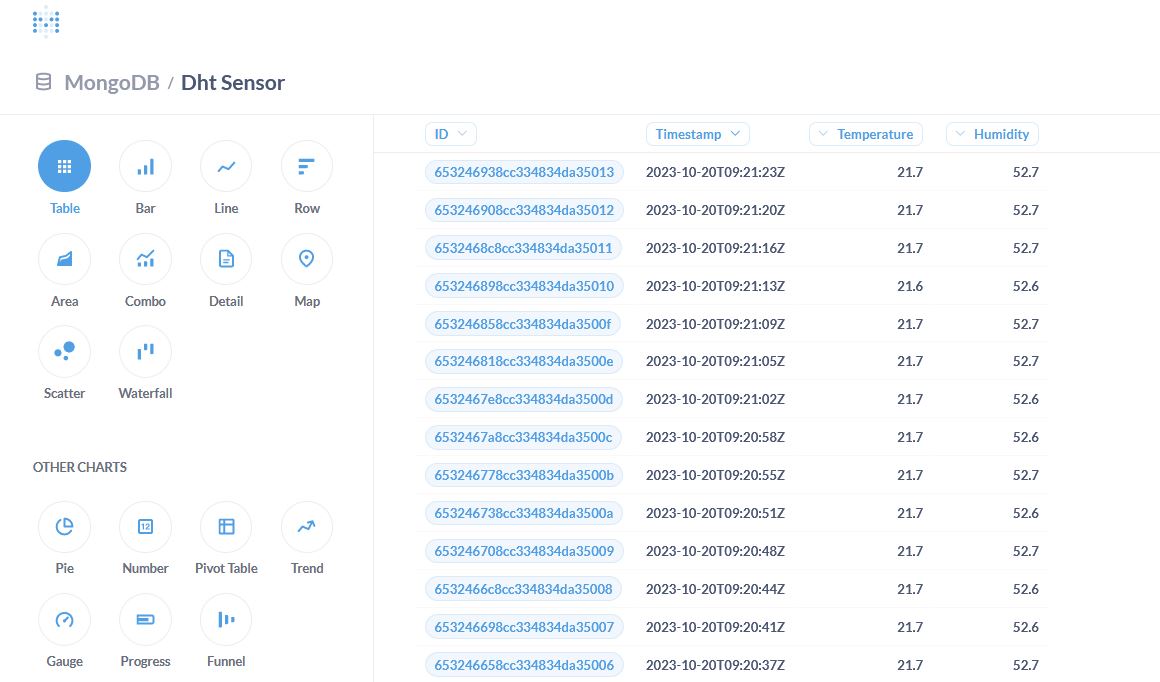
Metabase DHT Sensor Visualization
What about the visualization? Let’s give it a try to Metabase
We can install it with Docker by using this configuration below:
1
2
3
4
5
6
7
8
9
10
11
12
13
version: '3'
services:
  metabase:
    image: metabase/metabase
    container_name: metabase
    ports:
      - "3000:3000"
    volumes:
      - metabase_data:/metabase-data
    restart: always

volumes:
  metabase_data:
Acces Metabase UI at: http://localhost:3000
 Metabase Ready to Roll
FAQ
Useful MongoDB Shell commands
Some examples of MongoDB commands that you can run using the mongosh client:
1
2
3
4
5
6
7
8
9
10
11
12
13
14
15
16
17
18
19
20
21
22
23
# List all databases
show dbs

# Switch to the "my_database" database (it will create it if it does not exist)
use sensor_data

# List all collections in the "sensor_data" database
show collections

# Create a new collection called "my_collection"
db.createCollection("my_collection")

# Insert a document into the "my_collection" collection
db.my_collection.insertOne({name: "John Doe", age: 30})

# Find documents in the "my_collection" collection
db.my_collection.find()

# You can check the the data is inserted on our future collection with
db.dht_sensor.find()

# And to get the latest ones
db.dht_sensor.find().sort({ timestamp: -1 }).limit(10);
More about Metabase
How to embed a Metabase Dashboard?
Metabase provides an embedding code snippet that you can use to include a Metabase dashboard into your application.
- The general steps to embed a Metabase dashboard:
- First, create and configure the dashboard you want to embed within your Metabase instance.
- Generate an Embedding Code:
- Open the dashboard you want to embed.
- Click on the “Share this dashboard” button (it looks like a share icon).
- In the “Share Dashboard” dialog, click on the “Embed in another page” option.
- Customize the settings for your embedded dashboard, such as the width, height, and whether to show the Metabase header.
- Click the “Generate Embed Code” button.
- Metabase will provide you with an HTML code snippet that you can use to embed the dashboard into your web application.
- Copy the generated HTML code snippet and paste it into the HTML source code of your web application or webpage where you want the Metabase dashboard to appear.
This is how the Metabase html will look like:
1
2
3
4
5
6
7
<div>
  <iframe src="https://your-metabase-url/embed/dashboard/your-dashboard-id"
          width="800"
          height="600"
          frameborder="0"
          allowtransparency="true"></iframe>
</div>
Replace https://your-metabase-url with the URL of your Metabase instance and your-dashboard-id with the actual ID of the dashboard you want to embed.
Adjust Styling and Permissions: You may need to adjust the styling and permissions of the embedded iframe to match your application’s design and ensure that it’s accessible to your users.
Metabase and Satic Web Pages?
Yes, you can use the Metabase embedding feature in a Static Web Page.
The static webpage will remain static (yeah), and you can embed a Metabase dashboard within it.
The embedded dashboard will be loaded dynamically into the static page, allowing you to display live data and visualizations without the need for server-side scripting.
To achieve this, follow the steps mentioned earlier to generate the embedding code from Metabase. You will receive an HTML code snippet that you can include in your static webpage’s source code.
Example of how you can embed a Metabase dashboard in a static HTML page:
1
2
3
4
5
6
7
8
9
10
11
12
13
14
15
16
17
18
<!DOCTYPE html>
<html>
<head>
    <title>My Static Webpage</title>
</head>
<body>
    <!-- Embed Metabase Dashboard -->
    <div>
        <iframe src="https://your-metabase-url/embed/dashboard/your-dashboard-id"
                width="800"
                height="600"
                frameborder="0"
                allowtransparency="true"></iframe>
    </div>

    <!-- Other static content goes here -->
</body>
</html>
Just include the iframe code generated by Metabase in your static HTML file where you want the dashboard to appear. When users access the static webpage, the embedded Metabase dashboard will be loaded and displayed within the page, while the rest of the content remains static.
This approach allows you to combine static content with dynamic Metabase dashboards, providing an interactive data visualization experience to your users within a static context.
Managing MongoDBs with UI - Mongo Express
Mongo Express allows us to interact with MongoDB database through the browser.
Installing Adafruit_DHT
If you are getting problems to install the old Adafuit_DHT, you can try to do it from source:
1
2
3
4
5
git clone https://github.com/adafruit/Adafruit_Python_DHT.git
cd Adafruit_Python_DHT
python3 setup.py install --force-pi

#This will bypass any issues you may encounter when doing pip install Adafuit_DHT==1.4.0
More About Adafruit_DHT and in Github. Replaced with Adafruit_CircuitPython_DHT.
Generally, you should just switch to the Adafruit DHT Circuit Python
Testing pymongo
With the latest pip version, you can try:
1
apt install python3-pymongo
Testing in Python venv
You can always test Python libraries in a virtual environment:
1
2
3
4
5
python3 -m venv my_virtual_env
source my_virtual_env/bin/activate

pip install Adafruit_DHT==1.4.0
#deactivate
- Thanks to: https://pimylifeup.com/raspberry-pi-humidity-sensor-dht22/ for inspiration of this project.
Related Code for this IoT Project with Metabase is here